
Lab Streaming Layer (LSL) để đồng bộ hóa nhiều luồng dữ liệu
Roshini Randeniya và Lucas Kleine
Đã cập nhật vào
2 thg 5, 2024
Lab Streaming Layer (LSL) để đồng bộ hóa nhiều luồng dữ liệu
Roshini Randeniya và Lucas Kleine
Đã cập nhật vào
2 thg 5, 2024
Lab Streaming Layer (LSL) để đồng bộ hóa nhiều luồng dữ liệu
Roshini Randeniya và Lucas Kleine
Đã cập nhật vào
2 thg 5, 2024
theo Roshini Randeniya và Lucas Kleine
Hoạt động:
Khi chạy trong dòng lệnh, tập lệnh này ngay lập tức bắt đầu một luồng LSL. Bất cứ khi nào phím 'Enter' được nhấn, nó sẽ gửi một trình kích hoạt và phát một tệp âm thanh."""
nhập sounddevice dưới dạng sd
nhập soundfile dưới dạng sf
từ pylsl nhập StreamInfo, StreamOutlet
def wait_for_keypress():
in mã định dạng ('Press ENTER để bắt đầu phát lại âm thanh và gửi một LSL marker.'
while True: # This loop waits for a keyboard input
    input_str = input()  # Wait for input from the terminal
    if input_str == "":  # If the enter key is pressed, proceed
        break
def AudioMarker(audio_file, outlet): # chức năng phát âm thanh và gửi marker
data, fs = sf.read(audio_file) # Tải tệp âm thanh
print("Playing audio and sending LSL marker...")
marker_val = [1]
outlet.push_sample(marker_val) # Send marker indicating the start of audio playback
sd.play(data, fs) # play the audio
sd.wait()  # Wait until audio is done playing
print("Audio playback finished.")
nếu name == "main": # VÒNG CHÍNH
# Thiết lập luồng LSL cho các marker
stream_name = 'AudioMarkers'
stream_type = 'Markers'
n_chans = 1
sr = 0 # Đặt tốc độ mẫu là 0 vì các marker không đều đặn
chan_format = 'int32'
marker_id = 'uniqueMarkerID12345'
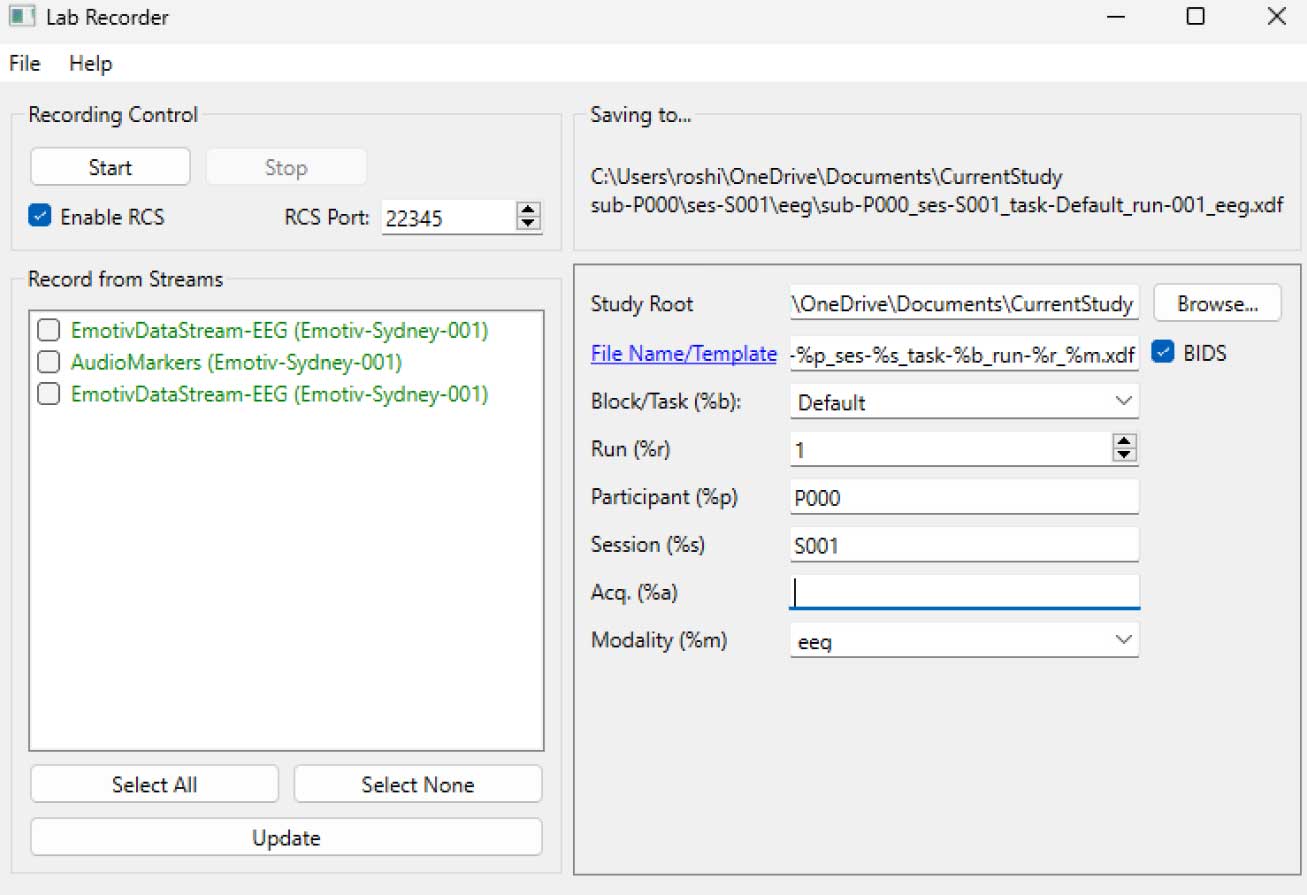
info = StreamInfo(stream_name, stream_type, n_chans, sr, chan_format, marker_id)
outlet = StreamOutlet(info) # create LSL outlet

# Keep the script running and wait for ENTER key to play audio and send marker
while True:
    wait_for_keypress()
    audio_filepath = "/path/to/your/audio_file.wav"  # replace with correct path to your audio file
    AudioMarker(audio_filepath, outlet)
    # After playing audio and sending a marker, the script goes back to waiting for the next keypress</code></pre><p><em><strong>**By running this file (even before playing the audio), you've initiated an LSL stream through an outlet</strong></em><strong>. Now we'll view that stream in LabRecorder</strong></p><p><strong>STEP 5 - Use LabRecorder to view and save all LSL streams</strong></p><ol><li data-preset-tag="p"><p>Open LabRecorder</p></li><li data-preset-tag="p"><p>Press <em><strong>Update</strong></em>. The available LSL streams should be visible in the stream list<br> • You should be able to see streams from both EmotivPROs (usually called "EmotivDataStream") and the marker stream (called "AudioMarkers")</p></li><li data-preset-tag="p"><p>Click <em><strong>Browse</strong></em> to select a location to store data (and set other parameters)</p></li><li data-preset-tag="p"><p>Select all streams and press <em><strong>Record</strong></em> to start recording</p></li><li data-preset-tag="p"><p>Click Stop when you want to end the recording</p></li></ol><p><br></p><img alt="" src="https://framerusercontent.com/images/HFGuJF9ErVu2Jxrgtqt11tl0No.jpg"><h2><strong>Working with the data</strong></h2><p><strong>LabRecorder outputs an XDF file (Extensible Data Format) that contains data from all the streams. XDF files are structured into, </strong><em><strong>streams</strong></em><strong>, each with a different </strong><em><strong>header</strong></em><strong> that describes what it contains (device name, data type, sampling rate, channels, and more). You can use the below codeblock to open your XDF file and display some basic information.</strong></p><pre data-language="JSX"><code>
**Bằng cách chạy tệp này (ngay cả trước khi phát âm thanh), bạn đã bắt đầu một luồng LSL thông qua một outlet . Bây giờ chúng ta sẽ xem luồng đó trong LabRecorder
STEP 5 - Sử dụng LabRecorder để xem và lưu tất cả các luồng LSL
Mở LabRecorder
Nhấn Cập nhật. Các luồng LSL có sẵn nên hiển thị trong danh sách luồng
• Bạn sẽ có thể thấy luồng từ cả EmotivPROs (thường được gọi là "EmotivDataStream") và luồng marker (được gọi là "AudioMarkers")Bấm Duyệt để chọn vị trí lưu trữ dữ liệu (và thiết lập các tham số khác)
Chọn tất cả các luồng và nhấn Ghi lại để bắt đầu ghi âm
Nhấn Stop khi bạn muốn kết thúc ghi âm
Làm việc với dữ liệu
LabRecorder xuất một tệp XDF (Định dạng Dữ liệu Mở Rộng) chứa dữ liệu từ tất cả các luồng. Các tệp XDF được cấu trúc thành, luồng, mỗi luồng có một tiêu đề khác nhau mô tả những gì nó chứa (tên thiết bị, loại dữ liệu, tốc độ mẫu, kênh, và nhiều hơn nữa). Bạn có thể sử dụng đoạn mã dưới đây để mở tệp XDF của bạn và hiển thị một số thông tin cơ bản.
Tập lệnh ví dụ này thể hiện một số chức năng cơ bản để nhập và chú thích dữ liệu EEG được thu thập từ phần mềm EmotivPRO. Nó sử dụng MNE để tải tệp XDF, in một số metadata cơ bản, tạo đối tượng info và vẽ phổ năng lượng."""
nhập pyxdf
nhập mne
nhập matplotlib.pyplot dưới dạng plt
nhập np
Đường dẫn đến tệp XDF của bạn
data_path = '/path/to/your/xdf_file.xdf'
Tải tệp XDF
streams, fileheader = pyxdf.load_xdf(data_path)
in ('XDF File Header:', fileheader )
in ('Số luồng tìm thấy:', len(streams))
cho i, stream trong enumr(steams):
in ('\nStream', i + 1)
in ('Stream Name:', stream['info']['name'][0])
in ('Stream Type:', stream['info']['type'][0])
in ('Number of Channels:', stream['info']['channel_count'][0])
sfreq = float(stream['info']['nominal_srate'][0])
in ('Sampling Rate:', sfreq)
in ('Number of Samples:', len(stream['time_series']))
in ('In dữ liệu điểm đầu tiên:', stream['time_series'][:5])
channel_names = [chan['label'][0] for chan in stream['info']['desc'][0]['channels'][0]['channel']]
print("Channel Names:", channel_names)
channel_types = 'eeg'
Tạo đối tượng MNE info
info = mne.create_info(channel_names, sfreq, channel_types)
dữ liệu = np.array(stream['time_series']).T # Dữ liệu cần được chuyển vị: các kênh x mẫu
raw = mne.io.RawArray(dữ liệu, info)
raw.plot_psd(fmax=50) # vẽ giản đồ phổ đơn giản (mật độ phổ năng lượng)Các tài nguyên bổ sungTải xuống hướng dẫn này dưới dạng notebook Jupyter từ EMOTIV GitHubKiểm tra tài liệu trực tuyến của LSL, bao gồm cả tệp README chính thức trên GitHubBạn sẽ cần một hoặc nhiều thiết bị thu thập dữ liệu được hỗ trợ để thu thập dữ liệuTất cả các thiết bị brainware của EMOTIV đều kết nối với phần mềm EmotivPRO, mà có khả năng tích hợp LSL để gửi và nhận luồng dữ liệuTài nguyên bổ sung:Mã để chạy LSL sử dụng các thiết bị của Emotiv, với các tập lệnh ví dụĐề mô LSL hữu ích trên YouTubeKho lưu trữ SCCN LSL GitHub trên tất cả các thư viện liên quanKho lưu trữ GitHub cho một bộ sưu tập các tiểu mô-đun và ứng dụngỐng dẫn phân tích HyPyP cho các nghiên cứu Hyperscanning.
theo Roshini Randeniya và Lucas Kleine
Hoạt động:
Khi chạy trong dòng lệnh, tập lệnh này ngay lập tức bắt đầu một luồng LSL. Bất cứ khi nào phím 'Enter' được nhấn, nó sẽ gửi một trình kích hoạt và phát một tệp âm thanh."""
nhập sounddevice dưới dạng sd
nhập soundfile dưới dạng sf
từ pylsl nhập StreamInfo, StreamOutlet
def wait_for_keypress():
in mã định dạng ('Press ENTER để bắt đầu phát lại âm thanh và gửi một LSL marker.'
while True: # This loop waits for a keyboard input
    input_str = input()  # Wait for input from the terminal
    if input_str == "":  # If the enter key is pressed, proceed
        break
def AudioMarker(audio_file, outlet): # chức năng phát âm thanh và gửi marker
data, fs = sf.read(audio_file) # Tải tệp âm thanh
print("Playing audio and sending LSL marker...")
marker_val = [1]
outlet.push_sample(marker_val) # Send marker indicating the start of audio playback
sd.play(data, fs) # play the audio
sd.wait()  # Wait until audio is done playing
print("Audio playback finished.")
nếu name == "main": # VÒNG CHÍNH
# Thiết lập luồng LSL cho các marker
stream_name = 'AudioMarkers'
stream_type = 'Markers'
n_chans = 1
sr = 0 # Đặt tốc độ mẫu là 0 vì các marker không đều đặn
chan_format = 'int32'
marker_id = 'uniqueMarkerID12345'
info = StreamInfo(stream_name, stream_type, n_chans, sr, chan_format, marker_id)
outlet = StreamOutlet(info) # create LSL outlet

# Keep the script running and wait for ENTER key to play audio and send marker
while True:
    wait_for_keypress()
    audio_filepath = "/path/to/your/audio_file.wav"  # replace with correct path to your audio file
    AudioMarker(audio_filepath, outlet)
    # After playing audio and sending a marker, the script goes back to waiting for the next keypress</code></pre><p><em><strong>**By running this file (even before playing the audio), you've initiated an LSL stream through an outlet</strong></em><strong>. Now we'll view that stream in LabRecorder</strong></p><p><strong>STEP 5 - Use LabRecorder to view and save all LSL streams</strong></p><ol><li data-preset-tag="p"><p>Open LabRecorder</p></li><li data-preset-tag="p"><p>Press <em><strong>Update</strong></em>. The available LSL streams should be visible in the stream list<br> • You should be able to see streams from both EmotivPROs (usually called "EmotivDataStream") and the marker stream (called "AudioMarkers")</p></li><li data-preset-tag="p"><p>Click <em><strong>Browse</strong></em> to select a location to store data (and set other parameters)</p></li><li data-preset-tag="p"><p>Select all streams and press <em><strong>Record</strong></em> to start recording</p></li><li data-preset-tag="p"><p>Click Stop when you want to end the recording</p></li></ol><p><br></p><img alt="" src="https://framerusercontent.com/images/HFGuJF9ErVu2Jxrgtqt11tl0No.jpg"><h2><strong>Working with the data</strong></h2><p><strong>LabRecorder outputs an XDF file (Extensible Data Format) that contains data from all the streams. XDF files are structured into, </strong><em><strong>streams</strong></em><strong>, each with a different </strong><em><strong>header</strong></em><strong> that describes what it contains (device name, data type, sampling rate, channels, and more). You can use the below codeblock to open your XDF file and display some basic information.</strong></p><pre data-language="JSX"><code>
**Bằng cách chạy tệp này (ngay cả trước khi phát âm thanh), bạn đã bắt đầu một luồng LSL thông qua một outlet . Bây giờ chúng ta sẽ xem luồng đó trong LabRecorder
STEP 5 - Sử dụng LabRecorder để xem và lưu tất cả các luồng LSL
Mở LabRecorder
Nhấn Cập nhật. Các luồng LSL có sẵn nên hiển thị trong danh sách luồng
• Bạn sẽ có thể thấy luồng từ cả EmotivPROs (thường được gọi là "EmotivDataStream") và luồng marker (được gọi là "AudioMarkers")Bấm Duyệt để chọn vị trí lưu trữ dữ liệu (và thiết lập các tham số khác)
Chọn tất cả các luồng và nhấn Ghi lại để bắt đầu ghi âm
Nhấn Stop khi bạn muốn kết thúc ghi âm
Làm việc với dữ liệu
LabRecorder xuất một tệp XDF (Định dạng Dữ liệu Mở Rộng) chứa dữ liệu từ tất cả các luồng. Các tệp XDF được cấu trúc thành, luồng, mỗi luồng có một tiêu đề khác nhau mô tả những gì nó chứa (tên thiết bị, loại dữ liệu, tốc độ mẫu, kênh, và nhiều hơn nữa). Bạn có thể sử dụng đoạn mã dưới đây để mở tệp XDF của bạn và hiển thị một số thông tin cơ bản.
Tập lệnh ví dụ này thể hiện một số chức năng cơ bản để nhập và chú thích dữ liệu EEG được thu thập từ phần mềm EmotivPRO. Nó sử dụng MNE để tải tệp XDF, in một số metadata cơ bản, tạo đối tượng info và vẽ phổ năng lượng."""
nhập pyxdf
nhập mne
nhập matplotlib.pyplot dưới dạng plt
nhập np
Đường dẫn đến tệp XDF của bạn
data_path = '/path/to/your/xdf_file.xdf'
Tải tệp XDF
streams, fileheader = pyxdf.load_xdf(data_path)
in ('XDF File Header:', fileheader )
in ('Số luồng tìm thấy:', len(streams))
cho i, stream trong enumr(steams):
in ('\nStream', i + 1)
in ('Stream Name:', stream['info']['name'][0])
in ('Stream Type:', stream['info']['type'][0])
in ('Number of Channels:', stream['info']['channel_count'][0])
sfreq = float(stream['info']['nominal_srate'][0])
in ('Sampling Rate:', sfreq)
in ('Number of Samples:', len(stream['time_series']))
in ('In dữ liệu điểm đầu tiên:', stream['time_series'][:5])
channel_names = [chan['label'][0] for chan in stream['info']['desc'][0]['channels'][0]['channel']]
print("Channel Names:", channel_names)
channel_types = 'eeg'
Tạo đối tượng MNE info
info = mne.create_info(channel_names, sfreq, channel_types)
dữ liệu = np.array(stream['time_series']).T # Dữ liệu cần được chuyển vị: các kênh x mẫu
raw = mne.io.RawArray(dữ liệu, info)
raw.plot_psd(fmax=50) # vẽ giản đồ phổ đơn giản (mật độ phổ năng lượng)Các tài nguyên bổ sungTải xuống hướng dẫn này dưới dạng notebook Jupyter từ EMOTIV GitHubKiểm tra tài liệu trực tuyến của LSL, bao gồm cả tệp README chính thức trên GitHubBạn sẽ cần một hoặc nhiều thiết bị thu thập dữ liệu được hỗ trợ để thu thập dữ liệuTất cả các thiết bị brainware của EMOTIV đều kết nối với phần mềm EmotivPRO, mà có khả năng tích hợp LSL để gửi và nhận luồng dữ liệuTài nguyên bổ sung:Mã để chạy LSL sử dụng các thiết bị của Emotiv, với các tập lệnh ví dụĐề mô LSL hữu ích trên YouTubeKho lưu trữ SCCN LSL GitHub trên tất cả các thư viện liên quanKho lưu trữ GitHub cho một bộ sưu tập các tiểu mô-đun và ứng dụngỐng dẫn phân tích HyPyP cho các nghiên cứu Hyperscanning.