다중 데이터 스트림을 동기화하기 위한 Lab Streaming Layer (LSL)
로시니 란데니야와 루카스 클라인
업데이트됨
2024. 5. 2.
다중 데이터 스트림을 동기화하기 위한 Lab Streaming Layer (LSL)
로시니 란데니야와 루카스 클라인
업데이트됨
2024. 5. 2.
다중 데이터 스트림을 동기화하기 위한 Lab Streaming Layer (LSL)
로시니 란데니야와 루카스 클라인
업데이트됨
2024. 5. 2.
로시니 랜데니야 및 루카스 클라인
작동:
명령줄에서 실행하면 이 스크립트는 즉시 LSL 스트림을 시작합니다. 'Enter' 키를 누를 때마다 트리거를 전송하고 오디오 파일을 재생합니다."""
import sounddevice as sd
import soundfile as sf
from pylsl import StreamInfo, StreamOutlet
def wait_for_keypress():
print("ENTER 키를 눌러 오디오 재생을 시작하고 LSL 마커를 전송합니다.")
while True: # This loop waits for a keyboard input
    input_str = input()  # Wait for input from the terminal
    if input_str == "":  # If the enter key is pressed, proceed
        break
def AudioMarker(audio_file, outlet): # 오디오 재생 및 마커 전송 함수
data, fs = sf.read(audio_file) # 오디오 파일 로드
print("Playing audio and sending LSL marker...")
marker_val = [1]
outlet.push_sample(marker_val) # Send marker indicating the start of audio playback
sd.play(data, fs) # play the audio
sd.wait()  # Wait until audio is done playing
print("Audio playback finished.")
if name == "main": # 메인 루프
# 마커용 LSL 스트림 설정
stream_name = 'AudioMarkers'
stream_type = 'Markers'
n_chans = 1
sr = 0 # 마커는 불규칙하므로 샘플링 비율을 0으로 설정
chan_format = 'int32'
marker_id = 'uniqueMarkerID12345'
info = StreamInfo(stream_name, stream_type, n_chans, sr, chan_format, marker_id)
outlet = StreamOutlet(info) # create LSL outlet

# Keep the script running and wait for ENTER key to play audio and send marker
while True:
    wait_for_keypress()
    audio_filepath = "/path/to/your/audio_file.wav"  # replace with correct path to your audio file
    AudioMarker(audio_filepath, outlet)
    # After playing audio and sending a marker, the script goes back to waiting for the next keypress</code></pre><p><em><strong>**By running this file (even before playing the audio), you've initiated an LSL stream through an outlet</strong></em><strong>. Now we'll view that stream in LabRecorder</strong></p><p><strong>STEP 5 - Use LabRecorder to view and save all LSL streams</strong></p><ol><li data-preset-tag="p"><p>Open LabRecorder</p></li><li data-preset-tag="p"><p>Press <em><strong>Update</strong></em>. The available LSL streams should be visible in the stream list<br> • You should be able to see streams from both EmotivPROs (usually called "EmotivDataStream") and the marker stream (called "AudioMarkers")</p></li><li data-preset-tag="p"><p>Click <em><strong>Browse</strong></em> to select a location to store data (and set other parameters)</p></li><li data-preset-tag="p"><p>Select all streams and press <em><strong>Record</strong></em> to start recording</p></li><li data-preset-tag="p"><p>Click Stop when you want to end the recording</p></li></ol><p><br></p><img alt="" src="https://framerusercontent.com/images/HFGuJF9ErVu2Jxrgtqt11tl0No.jpg"><h2><strong>Working with the data</strong></h2><p><strong>LabRecorder outputs an XDF file (Extensible Data Format) that contains data from all the streams. XDF files are structured into, </strong><em><strong>streams</strong></em><strong>, each with a different </strong><em><strong>header</strong></em><strong> that describes what it contains (device name, data type, sampling rate, channels, and more). You can use the below codeblock to open your XDF file and display some basic information.</strong></p><pre data-language="JSX"><code>
**이 파일을 실행하면 (오디오를 재생하기 전이라도) 아웃렛을 통해 LSL 스트림을 시작하게 됩니다
이제 그 스트림을 LabRecorder에서 보겠습니다
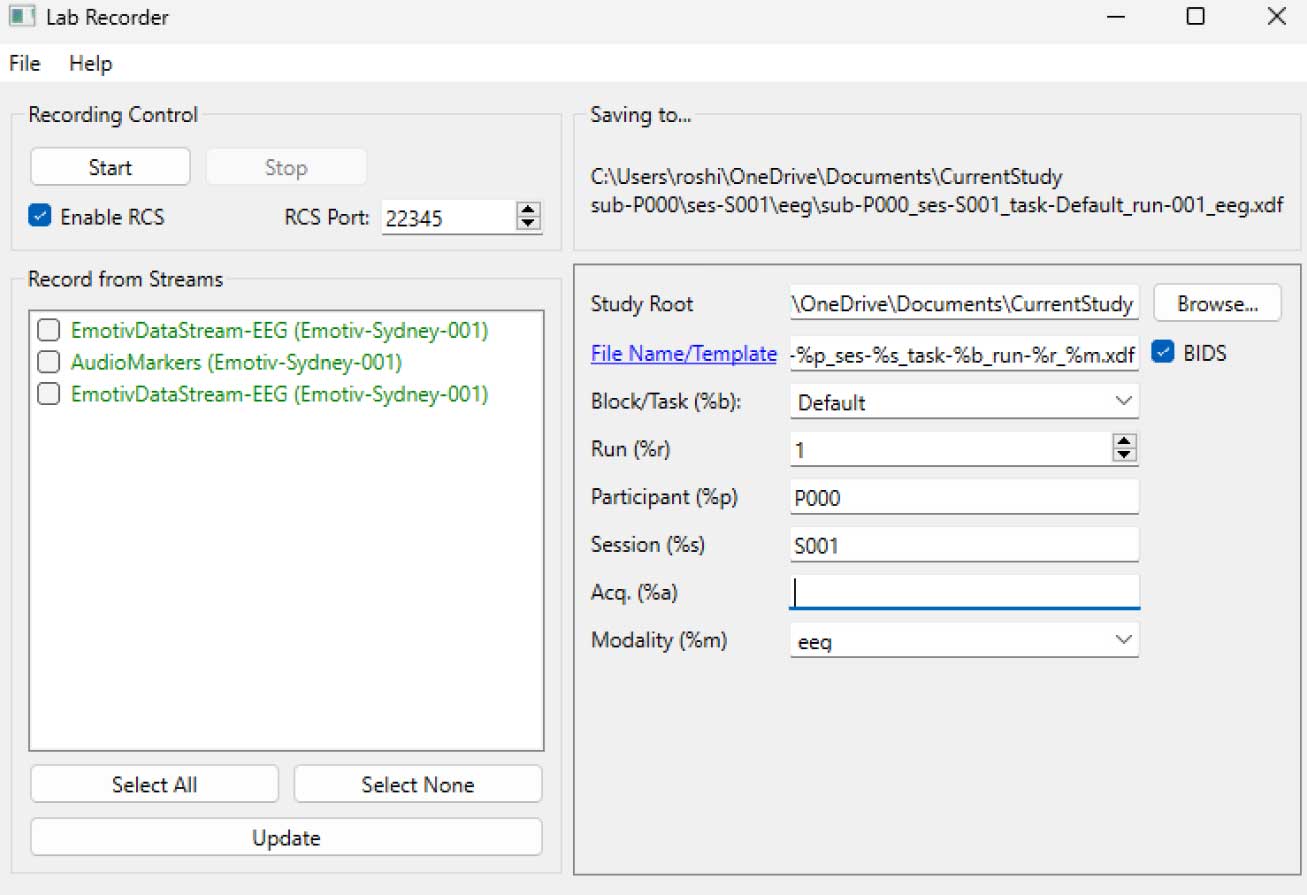
STEP 5 - 모든 LSL 스트림을 보고 저장하기 위해 LabRecorder 사용
LabRecorder 열기
업데이트(Update)를 누르세요. 사용 가능한 LSL 스트림이 스트림 목록에 표시돼야 합니다
• EmotivPROs에서 오는 스트림(일반적으로 "EmotivDataStream"이라고 부름)과 마커 스트림("AudioMarkers"라고 부름)을 볼 수 있어야 합니다탐색(Browse)을 클릭하여 데이터를 저장할 위치를 선택하고 기타 매개변수를 설정하세요
모든 스트림을 선택하고 녹음(Record)을 눌러 녹음을 시작하세요
녹음을 종료하려면 중지(Stop)를 클릭하세요
데이터 작업하기
LabRecorder는 모든 스트림의 데이터를 포함하는 XDF 파일(Extensible Data Format)을 출력합니다. XDF 파일은 서로 다른 내용을 설명하는 헤더를 가진 각 스트림으로 구성됩니다 (장치 이름, 데이터 유형, 샘플링 비율, 채널 등). 아래의 코드 블록을 사용하여 XDF 파일을 열고 기본 정보를 표시할 수 있습니다.
이 예제 스크립트는 EmotivPRO 소프트웨어에서 수집한 EEG 데이터를 가져오고 주석을 추가하기 위한 몇 가지 기본 함수들을 보여줍니다. XDF 파일을 로드하고, 기본 메타데이터를 출력하며, info 객체를 생성하고 전력 스펙트럼을 그리는 데 MNE를 사용합니다."""
import pyxdf
import mne
import matplotlib.pyplot as plt
import numpy as np
XDF 파일 경로
data_path = '/path/to/your/xdf_file.xdf'
XDF 파일 로드
streams, fileheader = pyxdf.load_xdf(data_path)
print("XDF 파일 헤더:", fileheader)
print("발견된 스트림 수:", len(streams))
for i, stream in enumerate(streams):
print("\n스트림", i + 1)
print("스트림 이름:", stream['info']['name'][0])
print("스트림 타입:", stream['info']['type'][0])
print("채널 수:", stream['info']['channel_count'][0])
sfreq = float(stream['info']['nominal_srate'][0])
print("샘플링 속도:", sfreq)
print("샘플 수:", len(stream['time_series']))
print("처음 5개의 데이터 포인트:", stream['time_series'][:5])
channel_names = [chan['label'][0] for chan in stream['info']['desc'][0]['channels'][0]['channel']]
print("Channel Names:", channel_names)
channel_types = 'eeg'
MNE 정보 객체 생성
info = mne.create_info(channel_names, sfreq, channel_types)
data = np.array(stream['time_series']).T # 데이터는 전치되어야 합니다: 채널 x 샘플
raw = mne.io.RawArray(data, info)
raw.plot_psd(fmax=50) # 간단한 스펙트로그래프(전력 스펙트럼 밀도) 그리기추가 자료이 튜토리얼을 Jupyter 노트북으로 EMOTIV GitHub에서 다운로드LSL 온라인 설명 문서, GitHub의 공식 README 파일 포함한 곳을 확인데이터 수집 장치를 하나 이상 필요로 합니다EMOTIV의 모든 뇌 장치가 EmotivPRO 소프트웨어에 연결되어 LSL 내장 기능을 통해 데이터 스트림을 보내고 받을 수 있습니다추가 자료:Emotiv의 장치로 LSL을 실행하기 위한 코드, 예제 스크립트 포함유용한 LSL 데모 유튜브에서SCCN LSL GitHub 저장소 관련 모든 라이브러리GitHub 저장소 다양한 서브모듈 및 앱 모음HyPyP 분석 파이프라인, 하이퍼스캐닝 연구용
로시니 랜데니야 및 루카스 클라인
작동:
명령줄에서 실행하면 이 스크립트는 즉시 LSL 스트림을 시작합니다. 'Enter' 키를 누를 때마다 트리거를 전송하고 오디오 파일을 재생합니다."""
import sounddevice as sd
import soundfile as sf
from pylsl import StreamInfo, StreamOutlet
def wait_for_keypress():
print("ENTER 키를 눌러 오디오 재생을 시작하고 LSL 마커를 전송합니다.")
while True: # This loop waits for a keyboard input
    input_str = input()  # Wait for input from the terminal
    if input_str == "":  # If the enter key is pressed, proceed
        break
def AudioMarker(audio_file, outlet): # 오디오 재생 및 마커 전송 함수
data, fs = sf.read(audio_file) # 오디오 파일 로드
print("Playing audio and sending LSL marker...")
marker_val = [1]
outlet.push_sample(marker_val) # Send marker indicating the start of audio playback
sd.play(data, fs) # play the audio
sd.wait()  # Wait until audio is done playing
print("Audio playback finished.")
if name == "main": # 메인 루프
# 마커용 LSL 스트림 설정
stream_name = 'AudioMarkers'
stream_type = 'Markers'
n_chans = 1
sr = 0 # 마커는 불규칙하므로 샘플링 비율을 0으로 설정
chan_format = 'int32'
marker_id = 'uniqueMarkerID12345'
info = StreamInfo(stream_name, stream_type, n_chans, sr, chan_format, marker_id)
outlet = StreamOutlet(info) # create LSL outlet

# Keep the script running and wait for ENTER key to play audio and send marker
while True:
    wait_for_keypress()
    audio_filepath = "/path/to/your/audio_file.wav"  # replace with correct path to your audio file
    AudioMarker(audio_filepath, outlet)
    # After playing audio and sending a marker, the script goes back to waiting for the next keypress</code></pre><p><em><strong>**By running this file (even before playing the audio), you've initiated an LSL stream through an outlet</strong></em><strong>. Now we'll view that stream in LabRecorder</strong></p><p><strong>STEP 5 - Use LabRecorder to view and save all LSL streams</strong></p><ol><li data-preset-tag="p"><p>Open LabRecorder</p></li><li data-preset-tag="p"><p>Press <em><strong>Update</strong></em>. The available LSL streams should be visible in the stream list<br> • You should be able to see streams from both EmotivPROs (usually called "EmotivDataStream") and the marker stream (called "AudioMarkers")</p></li><li data-preset-tag="p"><p>Click <em><strong>Browse</strong></em> to select a location to store data (and set other parameters)</p></li><li data-preset-tag="p"><p>Select all streams and press <em><strong>Record</strong></em> to start recording</p></li><li data-preset-tag="p"><p>Click Stop when you want to end the recording</p></li></ol><p><br></p><img alt="" src="https://framerusercontent.com/images/HFGuJF9ErVu2Jxrgtqt11tl0No.jpg"><h2><strong>Working with the data</strong></h2><p><strong>LabRecorder outputs an XDF file (Extensible Data Format) that contains data from all the streams. XDF files are structured into, </strong><em><strong>streams</strong></em><strong>, each with a different </strong><em><strong>header</strong></em><strong> that describes what it contains (device name, data type, sampling rate, channels, and more). You can use the below codeblock to open your XDF file and display some basic information.</strong></p><pre data-language="JSX"><code>
**이 파일을 실행하면 (오디오를 재생하기 전이라도) 아웃렛을 통해 LSL 스트림을 시작하게 됩니다
이제 그 스트림을 LabRecorder에서 보겠습니다
STEP 5 - 모든 LSL 스트림을 보고 저장하기 위해 LabRecorder 사용
LabRecorder 열기
업데이트(Update)를 누르세요. 사용 가능한 LSL 스트림이 스트림 목록에 표시돼야 합니다
• EmotivPROs에서 오는 스트림(일반적으로 "EmotivDataStream"이라고 부름)과 마커 스트림("AudioMarkers"라고 부름)을 볼 수 있어야 합니다탐색(Browse)을 클릭하여 데이터를 저장할 위치를 선택하고 기타 매개변수를 설정하세요
모든 스트림을 선택하고 녹음(Record)을 눌러 녹음을 시작하세요
녹음을 종료하려면 중지(Stop)를 클릭하세요
데이터 작업하기
LabRecorder는 모든 스트림의 데이터를 포함하는 XDF 파일(Extensible Data Format)을 출력합니다. XDF 파일은 서로 다른 내용을 설명하는 헤더를 가진 각 스트림으로 구성됩니다 (장치 이름, 데이터 유형, 샘플링 비율, 채널 등). 아래의 코드 블록을 사용하여 XDF 파일을 열고 기본 정보를 표시할 수 있습니다.
이 예제 스크립트는 EmotivPRO 소프트웨어에서 수집한 EEG 데이터를 가져오고 주석을 추가하기 위한 몇 가지 기본 함수들을 보여줍니다. XDF 파일을 로드하고, 기본 메타데이터를 출력하며, info 객체를 생성하고 전력 스펙트럼을 그리는 데 MNE를 사용합니다."""
import pyxdf
import mne
import matplotlib.pyplot as plt
import numpy as np
XDF 파일 경로
data_path = '/path/to/your/xdf_file.xdf'
XDF 파일 로드
streams, fileheader = pyxdf.load_xdf(data_path)
print("XDF 파일 헤더:", fileheader)
print("발견된 스트림 수:", len(streams))
for i, stream in enumerate(streams):
print("\n스트림", i + 1)
print("스트림 이름:", stream['info']['name'][0])
print("스트림 타입:", stream['info']['type'][0])
print("채널 수:", stream['info']['channel_count'][0])
sfreq = float(stream['info']['nominal_srate'][0])
print("샘플링 속도:", sfreq)
print("샘플 수:", len(stream['time_series']))
print("처음 5개의 데이터 포인트:", stream['time_series'][:5])
channel_names = [chan['label'][0] for chan in stream['info']['desc'][0]['channels'][0]['channel']]
print("Channel Names:", channel_names)
channel_types = 'eeg'
MNE 정보 객체 생성
info = mne.create_info(channel_names, sfreq, channel_types)
data = np.array(stream['time_series']).T # 데이터는 전치되어야 합니다: 채널 x 샘플
raw = mne.io.RawArray(data, info)
raw.plot_psd(fmax=50) # 간단한 스펙트로그래프(전력 스펙트럼 밀도) 그리기추가 자료이 튜토리얼을 Jupyter 노트북으로 EMOTIV GitHub에서 다운로드LSL 온라인 설명 문서, GitHub의 공식 README 파일 포함한 곳을 확인데이터 수집 장치를 하나 이상 필요로 합니다EMOTIV의 모든 뇌 장치가 EmotivPRO 소프트웨어에 연결되어 LSL 내장 기능을 통해 데이터 스트림을 보내고 받을 수 있습니다추가 자료:Emotiv의 장치로 LSL을 실행하기 위한 코드, 예제 스크립트 포함유용한 LSL 데모 유튜브에서SCCN LSL GitHub 저장소 관련 모든 라이브러리GitHub 저장소 다양한 서브모듈 및 앱 모음HyPyP 분석 파이프라인, 하이퍼스캐닝 연구용