Couche de diffusion de laboratoire (LSL) pour synchroniser plusieurs flux de données
Roshini Randeniya et Lucas Kleine
Mis à jour le
2 mai 2024
Couche de diffusion de laboratoire (LSL) pour synchroniser plusieurs flux de données
Roshini Randeniya et Lucas Kleine
Mis à jour le
2 mai 2024
Couche de diffusion de laboratoire (LSL) pour synchroniser plusieurs flux de données
Roshini Randeniya et Lucas Kleine
Mis à jour le
2 mai 2024
par Roshini Randeniya et Lucas Kleine
Fonctionnement :
Une fois exécuté dans la ligne de commande, ce script initie immédiatement un flux LSL. Chaque fois que la touche 'Entrée' est pressée, il envoie un déclencheur et joue un fichier audio.
importer sounddevice comme sd
importer soundfile comme sf
de pylsl import StreamInfo, StreamOutlet
def attendre_appui_touche():
print("Appuyez sur ENTRÉE pour démarrer la lecture audio et envoyer un marqueur LSL.")
while True: # This loop waits for a keyboard input
    input_str = input()  # Wait for input from the terminal
    if input_str == "":  # If the enter key is pressed, proceed
        break
def AudioMarker(audio_file, outlet): # fonction pour jouer l'audio et envoyer le marqueur
data, fs = sf.read(audio_file) # Charger le fichier audio
print("Playing audio and sending LSL marker...")
marker_val = [1]
outlet.push_sample(marker_val) # Send marker indicating the start of audio playback
sd.play(data, fs) # play the audio
sd.wait()  # Wait until audio is done playing
print("Audio playback finished.")
si nom == "main": # BOUCLE PRINCIPALE
# Configurer le flux LSL pour les marqueurs
stream_name = 'AudioMarkers'
stream_type = 'Markers'
n_chans = 1
sr = 0 # Mettre à 0 le taux d'échantillonnage car les marqueurs sont irréguliers
chan_format = 'int32'
marker_id = 'uniqueMarkerID12345'
info = StreamInfo(stream_name, stream_type, n_chans, sr, chan_format, marker_id)
outlet = StreamOutlet(info) # create LSL outlet

# Keep the script running and wait for ENTER key to play audio and send marker
while True:
    wait_for_keypress()
    audio_filepath = "/path/to/your/audio_file.wav"  # replace with correct path to your audio file
    AudioMarker(audio_filepath, outlet)
    # After playing audio and sending a marker, the script goes back to waiting for the next keypress</code></pre><p><em><strong>**By running this file (even before playing the audio), you've initiated an LSL stream through an outlet</strong></em><strong>. Now we'll view that stream in LabRecorder</strong></p><p><strong>STEP 5 - Use LabRecorder to view and save all LSL streams</strong></p><ol><li data-preset-tag="p"><p>Open LabRecorder</p></li><li data-preset-tag="p"><p>Press <em><strong>Update</strong></em>. The available LSL streams should be visible in the stream list<br> • You should be able to see streams from both EmotivPROs (usually called "EmotivDataStream") and the marker stream (called "AudioMarkers")</p></li><li data-preset-tag="p"><p>Click <em><strong>Browse</strong></em> to select a location to store data (and set other parameters)</p></li><li data-preset-tag="p"><p>Select all streams and press <em><strong>Record</strong></em> to start recording</p></li><li data-preset-tag="p"><p>Click Stop when you want to end the recording</p></li></ol><p><br></p><img alt="" src="https://framerusercontent.com/images/HFGuJF9ErVu2Jxrgtqt11tl0No.jpg"><h2><strong>Working with the data</strong></h2><p><strong>LabRecorder outputs an XDF file (Extensible Data Format) that contains data from all the streams. XDF files are structured into, </strong><em><strong>streams</strong></em><strong>, each with a different </strong><em><strong>header</strong></em><strong> that describes what it contains (device name, data type, sampling rate, channels, and more). You can use the below codeblock to open your XDF file and display some basic information.</strong></p><pre data-language="JSX"><code>
**En exécutant ce fichier (même avant de jouer l'audio), vous avez initié un flux LSL via une sortie. Maintenant, nous allons visualiser ce flux dans LabRecorder
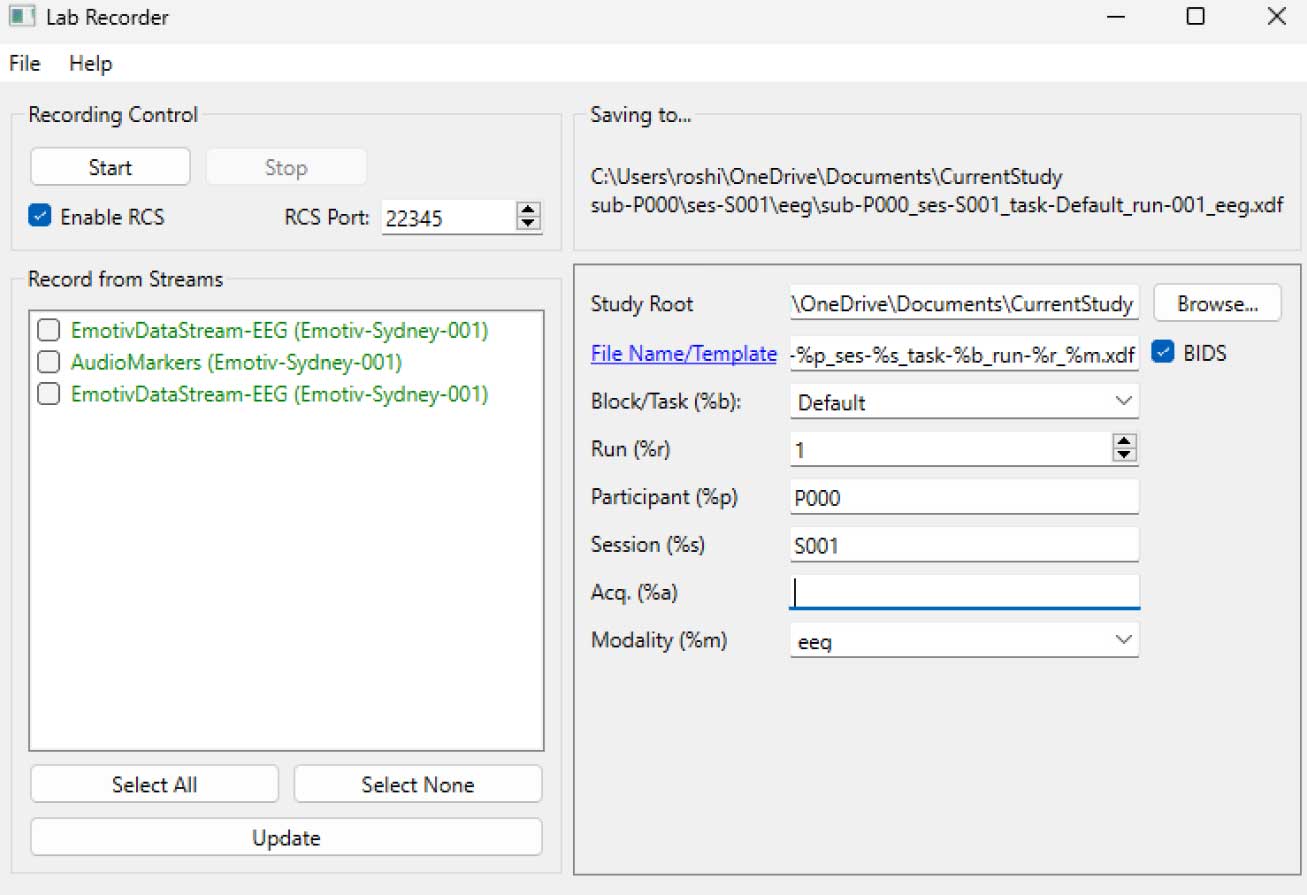
ÉTAPE 5 - Utilisez LabRecorder pour visualiser et enregistrer tous les flux LSL
Ouvrir LabRecorder
Appuyer sur Mettre à jour. Les flux LSL disponibles doivent être visibles dans la liste de flux
• Vous devriez pouvoir voir des flux depuis les EmotivPROs (généralement appelés "EmotivDataStream") et le flux de marqueur (appelé "AudioMarkers")Cliquez sur Parcourir pour choisir un emplacement pour stocker les données (et définir d'autres paramètres)
Sélectionnez tous les flux et appuyez sur Enregistrer pour commencer l'enregistrement
Cliquez sur Arrêter lorsque vous souhaitez terminer l'enregistrement
Travailler avec les données
LabRecorder génère un fichier XDF (Format de Données Extensible) qui contient des données de tous les flux. Les fichiers XDF sont structurés en, flux, chacun avec un en-tête différent qui décrit ce qu'il contient (nom de l'appareil, type de données, taux d'échantillonnage, canaux, et plus). Vous pouvez utiliser le bloc de code ci-dessous pour ouvrir votre fichier XDF et afficher quelques informations de base.
Cet exemple de script démontre quelques fonctions de base pour importer et annoter des données EEG collectées depuis le logiciel emotivpro. Il utilise MNE pour charger un fichier XDF, imprimer quelques métadonnées de base, créer un objet info et tracer le spectre de puissance.
importer pyxdf
importer mne
importer matplotlib.pyplot comme plt
importer numpy comme np
Chemin vers votre fichier XDF
data_path = '/path/to/your/xdf_file.xdf'
Charger le fichier XDF
streams, fileheader = pyxdf.load_xdf(data_path)
print("En-tête du fichier XDF:", fileheader)
print("Nombre de flux trouvés:", len(streams))
pour i, stream dans enumerate(streams):
print("\nFlux", i + 1)
print("Nom du flux:", stream['info']['name'][0])
print("Type de flux:", stream['info']['type'][0])
print("Nombre de canaux:", stream['info']['channel_count'][0])
sfreq = float(stream['info']['nominal_srate'][0])
print("Taux d'échantillonnage:", sfreq)
print("Nombre d'échantillons:", len(stream['time_series']))
print("Imprimer les 5 premiers points de données:", stream['time_series'][:5])
channel_names = [chan['label'][0] for chan in stream['info']['desc'][0]['channels'][0]['channel']]
print("Channel Names:", channel_names)
channel_types = 'eeg'
Créer un objet info MNE
info = mne.create_info(channel_names, sfreq, channel_types)
data = np.array(stream['time_series']).T # Les données doivent être transposées : canaux x échantillons
raw = mne.io.RawArray(data, info)
raw.plot_psd(fmax=50) # tracer un simple spectrogramme (densité spectrale de puissance)Ressources additionnellesTéléchargez ce tutoriel sous forme de notebook Jupyter à partir du GitHub d'EMOTIVConsultez la documentation en ligne LSL, y compris le fichier README officiel sur GitHubVous aurez besoin d'un ou plusieurs dispositifs d'acquisition de données pris en charge pour collecter des donnéesTous les appareils brainware d'EMOTIV se connectent au logiciel emotivpro, qui dispose de capacités LSL intégrées pour envoyer et recevoir des flux de donnéesRessources additionnelles:Code pour exécuter LSL avec les appareils Emotiv, avec des scripts d'exempleDémo utile LSL sur YouTubeDépôt GitHub SCCN LSL pour toutes les bibliothèques associéesDépôt GitHub pour une collection de sous-modules et d'applicationsPipeline d'analyse HyPyP pour les études de scanning hyperspectral.
par Roshini Randeniya et Lucas Kleine
Fonctionnement :
Une fois exécuté dans la ligne de commande, ce script initie immédiatement un flux LSL. Chaque fois que la touche 'Entrée' est pressée, il envoie un déclencheur et joue un fichier audio.
importer sounddevice comme sd
importer soundfile comme sf
de pylsl import StreamInfo, StreamOutlet
def attendre_appui_touche():
print("Appuyez sur ENTRÉE pour démarrer la lecture audio et envoyer un marqueur LSL.")
while True: # This loop waits for a keyboard input
    input_str = input()  # Wait for input from the terminal
    if input_str == "":  # If the enter key is pressed, proceed
        break
def AudioMarker(audio_file, outlet): # fonction pour jouer l'audio et envoyer le marqueur
data, fs = sf.read(audio_file) # Charger le fichier audio
print("Playing audio and sending LSL marker...")
marker_val = [1]
outlet.push_sample(marker_val) # Send marker indicating the start of audio playback
sd.play(data, fs) # play the audio
sd.wait()  # Wait until audio is done playing
print("Audio playback finished.")
si nom == "main": # BOUCLE PRINCIPALE
# Configurer le flux LSL pour les marqueurs
stream_name = 'AudioMarkers'
stream_type = 'Markers'
n_chans = 1
sr = 0 # Mettre à 0 le taux d'échantillonnage car les marqueurs sont irréguliers
chan_format = 'int32'
marker_id = 'uniqueMarkerID12345'
info = StreamInfo(stream_name, stream_type, n_chans, sr, chan_format, marker_id)
outlet = StreamOutlet(info) # create LSL outlet

# Keep the script running and wait for ENTER key to play audio and send marker
while True:
    wait_for_keypress()
    audio_filepath = "/path/to/your/audio_file.wav"  # replace with correct path to your audio file
    AudioMarker(audio_filepath, outlet)
    # After playing audio and sending a marker, the script goes back to waiting for the next keypress</code></pre><p><em><strong>**By running this file (even before playing the audio), you've initiated an LSL stream through an outlet</strong></em><strong>. Now we'll view that stream in LabRecorder</strong></p><p><strong>STEP 5 - Use LabRecorder to view and save all LSL streams</strong></p><ol><li data-preset-tag="p"><p>Open LabRecorder</p></li><li data-preset-tag="p"><p>Press <em><strong>Update</strong></em>. The available LSL streams should be visible in the stream list<br> • You should be able to see streams from both EmotivPROs (usually called "EmotivDataStream") and the marker stream (called "AudioMarkers")</p></li><li data-preset-tag="p"><p>Click <em><strong>Browse</strong></em> to select a location to store data (and set other parameters)</p></li><li data-preset-tag="p"><p>Select all streams and press <em><strong>Record</strong></em> to start recording</p></li><li data-preset-tag="p"><p>Click Stop when you want to end the recording</p></li></ol><p><br></p><img alt="" src="https://framerusercontent.com/images/HFGuJF9ErVu2Jxrgtqt11tl0No.jpg"><h2><strong>Working with the data</strong></h2><p><strong>LabRecorder outputs an XDF file (Extensible Data Format) that contains data from all the streams. XDF files are structured into, </strong><em><strong>streams</strong></em><strong>, each with a different </strong><em><strong>header</strong></em><strong> that describes what it contains (device name, data type, sampling rate, channels, and more). You can use the below codeblock to open your XDF file and display some basic information.</strong></p><pre data-language="JSX"><code>
**En exécutant ce fichier (même avant de jouer l'audio), vous avez initié un flux LSL via une sortie. Maintenant, nous allons visualiser ce flux dans LabRecorder
ÉTAPE 5 - Utilisez LabRecorder pour visualiser et enregistrer tous les flux LSL
Ouvrir LabRecorder
Appuyer sur Mettre à jour. Les flux LSL disponibles doivent être visibles dans la liste de flux
• Vous devriez pouvoir voir des flux depuis les EmotivPROs (généralement appelés "EmotivDataStream") et le flux de marqueur (appelé "AudioMarkers")Cliquez sur Parcourir pour choisir un emplacement pour stocker les données (et définir d'autres paramètres)
Sélectionnez tous les flux et appuyez sur Enregistrer pour commencer l'enregistrement
Cliquez sur Arrêter lorsque vous souhaitez terminer l'enregistrement
Travailler avec les données
LabRecorder génère un fichier XDF (Format de Données Extensible) qui contient des données de tous les flux. Les fichiers XDF sont structurés en, flux, chacun avec un en-tête différent qui décrit ce qu'il contient (nom de l'appareil, type de données, taux d'échantillonnage, canaux, et plus). Vous pouvez utiliser le bloc de code ci-dessous pour ouvrir votre fichier XDF et afficher quelques informations de base.
Cet exemple de script démontre quelques fonctions de base pour importer et annoter des données EEG collectées depuis le logiciel emotivpro. Il utilise MNE pour charger un fichier XDF, imprimer quelques métadonnées de base, créer un objet info et tracer le spectre de puissance.
importer pyxdf
importer mne
importer matplotlib.pyplot comme plt
importer numpy comme np
Chemin vers votre fichier XDF
data_path = '/path/to/your/xdf_file.xdf'
Charger le fichier XDF
streams, fileheader = pyxdf.load_xdf(data_path)
print("En-tête du fichier XDF:", fileheader)
print("Nombre de flux trouvés:", len(streams))
pour i, stream dans enumerate(streams):
print("\nFlux", i + 1)
print("Nom du flux:", stream['info']['name'][0])
print("Type de flux:", stream['info']['type'][0])
print("Nombre de canaux:", stream['info']['channel_count'][0])
sfreq = float(stream['info']['nominal_srate'][0])
print("Taux d'échantillonnage:", sfreq)
print("Nombre d'échantillons:", len(stream['time_series']))
print("Imprimer les 5 premiers points de données:", stream['time_series'][:5])
channel_names = [chan['label'][0] for chan in stream['info']['desc'][0]['channels'][0]['channel']]
print("Channel Names:", channel_names)
channel_types = 'eeg'
Créer un objet info MNE
info = mne.create_info(channel_names, sfreq, channel_types)
data = np.array(stream['time_series']).T # Les données doivent être transposées : canaux x échantillons
raw = mne.io.RawArray(data, info)
raw.plot_psd(fmax=50) # tracer un simple spectrogramme (densité spectrale de puissance)Ressources additionnellesTéléchargez ce tutoriel sous forme de notebook Jupyter à partir du GitHub d'EMOTIVConsultez la documentation en ligne LSL, y compris le fichier README officiel sur GitHubVous aurez besoin d'un ou plusieurs dispositifs d'acquisition de données pris en charge pour collecter des donnéesTous les appareils brainware d'EMOTIV se connectent au logiciel emotivpro, qui dispose de capacités LSL intégrées pour envoyer et recevoir des flux de donnéesRessources additionnelles:Code pour exécuter LSL avec les appareils Emotiv, avec des scripts d'exempleDémo utile LSL sur YouTubeDépôt GitHub SCCN LSL pour toutes les bibliothèques associéesDépôt GitHub pour une collection de sous-modules et d'applicationsPipeline d'analyse HyPyP pour les études de scanning hyperspectral.