
用于同步多个数据流的实验室流图层 (Lab Streaming Layer, LSL)
Roshini Randeniya 博士和 Lucas Kleine
更新于
2024年5月17日
用于同步多个数据流的实验室流图层 (Lab Streaming Layer, LSL)
Roshini Randeniya 博士和 Lucas Kleine
更新于
2024年5月17日
用于同步多个数据流的实验室流图层 (Lab Streaming Layer, LSL)
Roshini Randeniya 博士和 Lucas Kleine
更新于
2024年5月17日
欢迎!在本教程中,我们将学习如何使用 Python 中的实验室流层(Lab Streaming Layer,简称 LSL)来收集并同步来自多个设备的 Emotiv 脑电(EEG)数据。这需要您具备 Python 编程语言的基本工作知识。
您将学到什么
什么是实验室流层(LSL)以及研究人员为什么要使用它
如何从多个 Emotiv EEG 设备收集同步数据
如何导入和检查收集到的数据
1.1 什么是 LSL,它有什么用?
实验室流层(LSL)是一个开源工具箱,可用于发送、接收和同步来自不同传感器硬件的神经、生理和行为数据流。功能日益强大、精确且便携的大脑和身体传感硬件设备(如 Emotiv EEG 系统)正在将神经科学从实验室带入实时数据的世界。大脑测量(如 EEG 和 MEG)曾一度局限于研究实验室,而移动设备让我们能够在更自然的环境中同时收集多人的多项数据。
研究人员可能会对听同一首音乐的两个人之间的生理同步性感兴趣。LSL 可以帮助我们分别收集来自两个 EEG 脑电帽的数据,这些数据同时还能与声音的播放保持同步。
LSL 的其他一些使用示例:
将实验中的事件标记添加到持续的 EEG 数据中
为单个参与者对齐来自多个来源的时间对应数据(例如心率、EMG、EEG)
对齐来自多个参与者的的时间对应数据(例如 EEG 超扫描研究)
1.2 LSL 是如何工作的?
实验室流层是在多个设备之间实时交换时间序列数据的协议。LSL 可以使用 Python、MATLAB、C++、Java 等编程语言的开源库来实现。
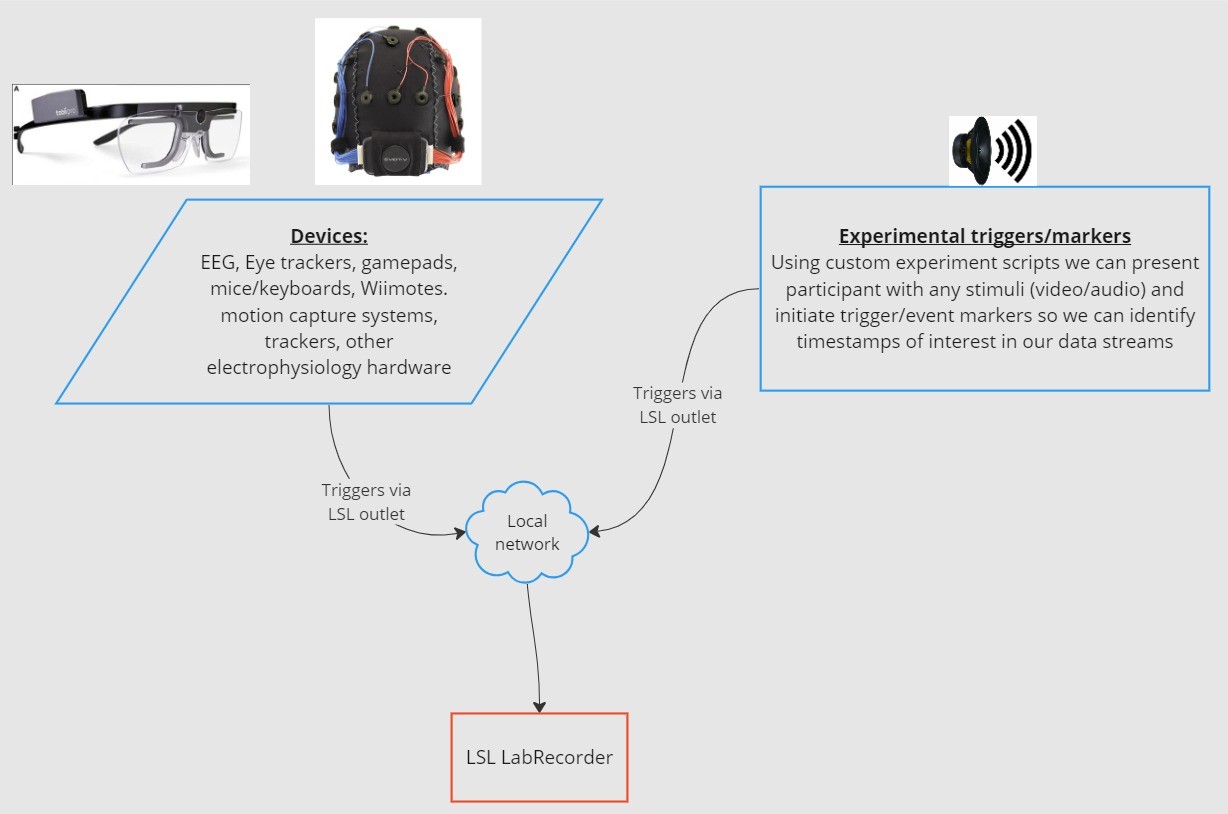
核心功能围绕 LSL 数据流展开:
1. 采集设备/软件收集数据并创建数据流 - 生理数据可以从 EEG 记录设备、眼动仪、动作捕捉系统、心率监测器等流传输到 LSL,包括元数据(采样率、数据类型、通道信息等) - 实验中的事件标记(例如使用 PsychoPy)也可以作为数据流使用 LSL 发送
2. 数据流被发布到网络 - 这就是使用 LSL 发送数据的方式;数据流被“广播”到网络中 - 已发布的流在网络上可用,并可被同一网络上的其他支持 LSL 的设备发现 - LSL 根据通用时钟(遵循网络时间协议)为每个数据块或样本分配一个时间戳。 - 数据流通过“出口”逐个样本(或逐个数据块)地推送
3. 收集设备“订阅”数据流 - 这 tap 是使用 LSL 接收数据的方式 - 同一网络上的收集设备通过“进口”接收发布的数据流。 - 每个进口仅从一个出口接收流样本和元数据
4. 保存数据 - 订阅数据流后,您可以将其保存为您喜欢的编程语言中的变量,或使用 LSL 提供的软件 LabRecorder 将其保存为标准格式,例如 .xdf。
2.0 教程概述
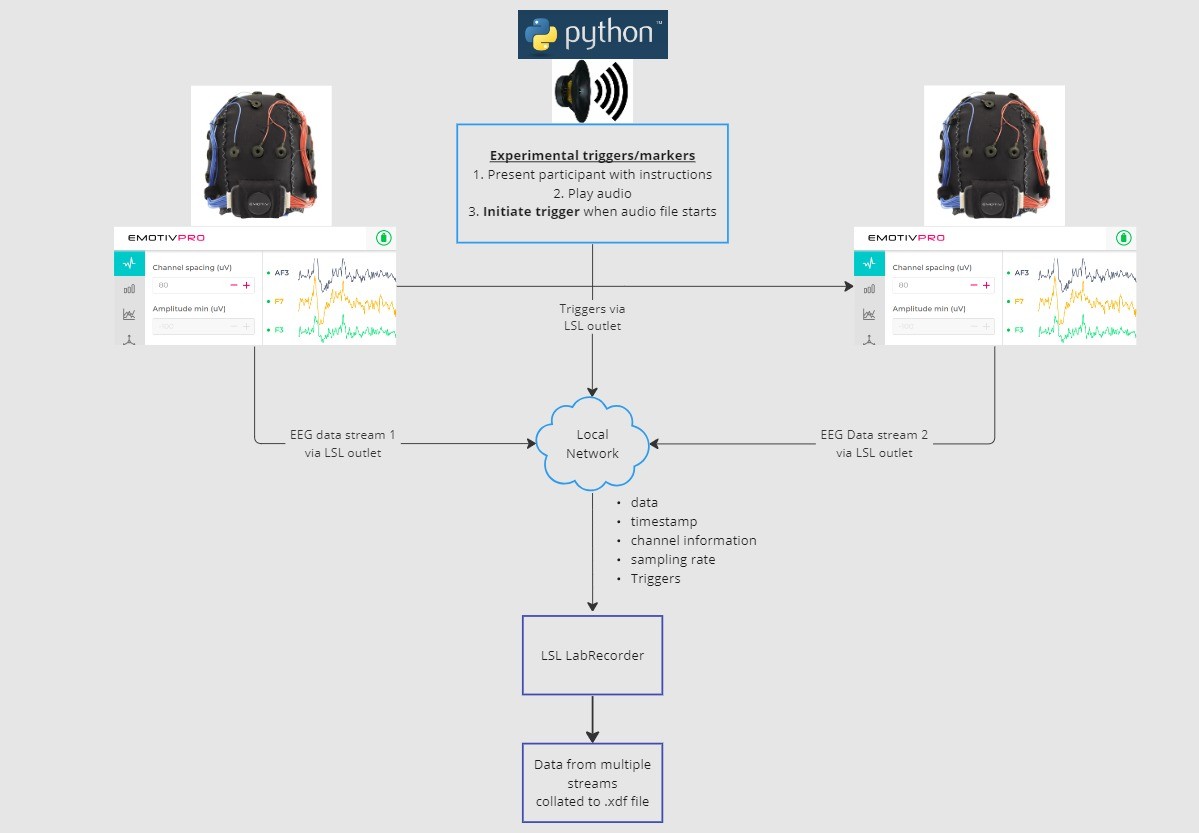
在本教程中,我们将以一个实验设置示例为例,引导您完成在 Python 中使用 LSL 实现该设置所需的步骤和代码。我们将使用 Python 播放声音,同时从两个佩戴 Emotiv 脑电帽的人那里收集 EEG 数据。我们将使用两台分别运行 EmotivPRO 的计算机来收集 EEG 数据,并分别通过独立的 LSL 出口广播每个数据流。我们将使用 Python 库播放音频文件,并在每次文件开始播放时同时发送一个触发器。
步骤:
1. 使用 EmotivPRO 通过 LSL 出口流式传输包含 EEG 数据(和/或运动、接触质量、信号质量等)的海量数据。 2. 使用 Python 脚本播放音轨,同时通过另一个 LSL 发送触发器,使用 LabRecorder 通过 LSL 进口捕获并保存所有三个数据流。
2.1 步骤 1 - 设置和安装
您需要有支持的数据采集设备来收集数据
• 所有 Emotiv 的脑电设备都通过 EmotivPRO 软件连接到 LSL在您的设备上安装 EmotivPRO 。您需要一个有效的 EmotivPRO 许可证才能使用 LSL。
使用以下命令安装 Python LSL 库:
pip install pylsl下载 LabRecorder 软件。这是一个简单、免费的应用程序,可以从命令行运行或作为独立程序下载
针对我们的实验:安装使用 Python 播放音频所需的软件包
pip install sounddevice soundfile
2.2 步骤 3 - 通过 LSL 流从 EmotivPRO 发送数据
在应用程序的右上角找到“...”,导航到设置(Settings)
找到“实验室流层”(Lab Streaming Layer)部分和“出口”(Outlet)子部分
选择所有您想要广播的数据类型
选择数据格式(32位浮点型 32-bit float 或 64位双精度型 64-bit double)
选择是逐个样本发送数据还是批量样本(数据块)发送数据
点击“开始”(Start)来广播 LSL 数据流
2.3 步骤 4 - 使用 Python 脚本播放音频和发送触发器
复制以下代码块并将其粘贴到 Python 文件中,然后保存到您的计算机。
找到您想播放的音频文件(最好是 .wav 文件),并修改脚本,将变量
audio_filepath更改为您计算机上该音频文件的文件路径打开命令提示符与命令行交互,并导航到您保存 Python 文件的文件夹
输入:
python3 filename.py
• 取决于您安装的 Python 版本,您可能需要使用python而不是python3
注意:将/path/to/audio.wav替换为您在实验期间想要播放的音频文件的位置。
"""
LSL 示例:播放音频并发送触发标记

此脚本创建一个 LSL 标记流,等待用户按回车键(ENTER),
然后播放音频文件并发送一个可以与通过 LabRecorder
收集的 EEG 数据同步的标记。
"""

import sounddevice as sd
import soundfile as sf
from pylsl import StreamInfo, StreamOutlet


def wait_for_keypress():
    print("请按回车键(ENTER)开始播放音频并发送 LSL 标记。")
    while True:
        if input() == "":
            break


def play_audio_and_send_marker(audio_file, outlet):
    data, fs = sf.read(audio_file)

    print("正在播放音频并发送 LSL 标记...")

    marker_val = [1]
    outlet.push_sample(marker_val)

    sd.play(data, fs)
    sd.wait()

    print("音频播放结束。")


if __name__ == "__main__":

    info = StreamInfo(
        name="AudioMarkers",
        type="Markers",
        channel_count=1,
        nominal_srate=0,
        channel_format="int32",
        source_id="uniqueMarkerID12345"
    )

    outlet = StreamOutlet(info)

    while True:
        wait_for_keypress()

        audio_filepath = "/path/to/audio.wav"

        play_audio_and_send_marker(
            audio_filepath,
            outlet
        )
"""
LSL 示例:播放音频并发送触发标记

此脚本创建一个 LSL 标记流,等待用户按回车键(ENTER),
然后播放音频文件并发送一个可以与通过 LabRecorder
收集的 EEG 数据同步的标记。
"""

import sounddevice as sd
import soundfile as sf
from pylsl import StreamInfo, StreamOutlet


def wait_for_keypress():
    print("请按回车键(ENTER)开始播放音频并发送 LSL 标记。")
    while True:
        if input() == "":
            break


def play_audio_and_send_marker(audio_file, outlet):
    data, fs = sf.read(audio_file)

    print("正在播放音频并发送 LSL 标记...")

    marker_val = [1]
    outlet.push_sample(marker_val)

    sd.play(data, fs)
    sd.wait()

    print("音频播放结束。")


if __name__ == "__main__":

    info = StreamInfo(
        name="AudioMarkers",
        type="Markers",
        channel_count=1,
        nominal_srate=0,
        channel_format="int32",
        source_id="uniqueMarkerID12345"
    )

    outlet = StreamOutlet(info)

    while True:
        wait_for_keypress()

        audio_filepath = "/path/to/audio.wav"

        play_audio_and_send_marker(
            audio_filepath,
            outlet
        )
2.4 步骤 5 - 使用 LabRecorder 查看并保存所有 LSL 流
打开 LabRecorder
按
Update。可用的 LSL 流应显示在流列表中
• 您应该能够看到来自两个 EmotivPRO 的流(通常名为“Emotiv-DataStream”)以及标记流(名为“AudioMarkers”)点击
Browse选择保存数据的位置(并设置其他参数)选择所有流,然后按
Record开始录制
3.0 处理数据
LabRecorder 会输出一个包含所有流中数据的 XDF 文件(可扩展数据格式)。XDF 文件结构化为不同的流,每个流都有不同的头部信息,描述其包含的内容(设备名称、数据类型、采样率、通道等)。您可以使用以下代码块打开您的 XDF 文件并显示一些基本信息。
注意:将 /path/to/your/file.xdf 替换为您的 LabRecorder XDF 输出文件的文件路径。
import pyxdf
import mne
import matplotlib.pyplot as plt
import numpy as np

# 在此处提供您的 LSL 输出文件路径。
data_path = "/path/to/your/file.xdf"

# 加载 XDF 文件。
streams, fileheader = pyxdf.load_xdf(data_path)

print("XDF 文件头:", fileheader)
print("找到的流数量:", len(streams))

for i, stream in enumerate(streams):
    print("\n数据流", i + 1)
    print("数据流名称:", stream["info"]["name"][0])
    print("数据流类型:", stream["info"]["type"][0])
    print("通道数量:", stream["info"]["channel_count"][0])

    sfreq = float(stream["info"]["nominal_srate"][0])
    print("采样率:", sfreq)

    print("采样数量:", len(stream["time_series"]))
    print("前5个数据点:", stream["time_series"][:5])

    channel_names = [
        chan["label"][0]
        for chan in stream["info"]["desc"][0]["channels"][0]["channel"]
    ]

    print("通道名称:", channel_names)

    channel_types = "eeg"
4.0 其他资源
官方文档
查看 在线文档,包括 GitHub 上的官方 README 文件
其他资源:
• 使用 Emotiv 设备运行 LSL 的 代码,包含示例脚本
• YouTube 上非常有用的 LSL 演示视频
• 所有相关库的 SCCN LSL GitHub 仓库
• 收集子模块和应用程序的 LSL GitHub 仓库用于超扫描研究的 HyPyP 分析流程
欢迎!在本教程中,我们将学习如何使用 Python 中的实验室流层(Lab Streaming Layer,简称 LSL)来收集并同步来自多个设备的 Emotiv 脑电(EEG)数据。这需要您具备 Python 编程语言的基本工作知识。
您将学到什么
什么是实验室流层(LSL)以及研究人员为什么要使用它
如何从多个 Emotiv EEG 设备收集同步数据
如何导入和检查收集到的数据
1.1 什么是 LSL,它有什么用?
实验室流层(LSL)是一个开源工具箱,可用于发送、接收和同步来自不同传感器硬件的神经、生理和行为数据流。功能日益强大、精确且便携的大脑和身体传感硬件设备(如 Emotiv EEG 系统)正在将神经科学从实验室带入实时数据的世界。大脑测量(如 EEG 和 MEG)曾一度局限于研究实验室,而移动设备让我们能够在更自然的环境中同时收集多人的多项数据。
研究人员可能会对听同一首音乐的两个人之间的生理同步性感兴趣。LSL 可以帮助我们分别收集来自两个 EEG 脑电帽的数据,这些数据同时还能与声音的播放保持同步。
LSL 的其他一些使用示例:
将实验中的事件标记添加到持续的 EEG 数据中
为单个参与者对齐来自多个来源的时间对应数据(例如心率、EMG、EEG)
对齐来自多个参与者的的时间对应数据(例如 EEG 超扫描研究)
1.2 LSL 是如何工作的?
实验室流层是在多个设备之间实时交换时间序列数据的协议。LSL 可以使用 Python、MATLAB、C++、Java 等编程语言的开源库来实现。
核心功能围绕 LSL 数据流展开:
1. 采集设备/软件收集数据并创建数据流 - 生理数据可以从 EEG 记录设备、眼动仪、动作捕捉系统、心率监测器等流传输到 LSL,包括元数据(采样率、数据类型、通道信息等) - 实验中的事件标记(例如使用 PsychoPy)也可以作为数据流使用 LSL 发送
2. 数据流被发布到网络 - 这就是使用 LSL 发送数据的方式;数据流被“广播”到网络中 - 已发布的流在网络上可用,并可被同一网络上的其他支持 LSL 的设备发现 - LSL 根据通用时钟(遵循网络时间协议)为每个数据块或样本分配一个时间戳。 - 数据流通过“出口”逐个样本(或逐个数据块)地推送
3. 收集设备“订阅”数据流 - 这 tap 是使用 LSL 接收数据的方式 - 同一网络上的收集设备通过“进口”接收发布的数据流。 - 每个进口仅从一个出口接收流样本和元数据
4. 保存数据 - 订阅数据流后,您可以将其保存为您喜欢的编程语言中的变量,或使用 LSL 提供的软件 LabRecorder 将其保存为标准格式,例如 .xdf。
2.0 教程概述
在本教程中,我们将以一个实验设置示例为例,引导您完成在 Python 中使用 LSL 实现该设置所需的步骤和代码。我们将使用 Python 播放声音,同时从两个佩戴 Emotiv 脑电帽的人那里收集 EEG 数据。我们将使用两台分别运行 EmotivPRO 的计算机来收集 EEG 数据,并分别通过独立的 LSL 出口广播每个数据流。我们将使用 Python 库播放音频文件,并在每次文件开始播放时同时发送一个触发器。
步骤:
1. 使用 EmotivPRO 通过 LSL 出口流式传输包含 EEG 数据(和/或运动、接触质量、信号质量等)的海量数据。 2. 使用 Python 脚本播放音轨,同时通过另一个 LSL 发送触发器,使用 LabRecorder 通过 LSL 进口捕获并保存所有三个数据流。
2.1 步骤 1 - 设置和安装
您需要有支持的数据采集设备来收集数据
• 所有 Emotiv 的脑电设备都通过 EmotivPRO 软件连接到 LSL在您的设备上安装 EmotivPRO 。您需要一个有效的 EmotivPRO 许可证才能使用 LSL。
使用以下命令安装 Python LSL 库:
pip install pylsl下载 LabRecorder 软件。这是一个简单、免费的应用程序,可以从命令行运行或作为独立程序下载
针对我们的实验:安装使用 Python 播放音频所需的软件包
pip install sounddevice soundfile
2.2 步骤 3 - 通过 LSL 流从 EmotivPRO 发送数据
在应用程序的右上角找到“...”,导航到设置(Settings)
找到“实验室流层”(Lab Streaming Layer)部分和“出口”(Outlet)子部分
选择所有您想要广播的数据类型
选择数据格式(32位浮点型 32-bit float 或 64位双精度型 64-bit double)
选择是逐个样本发送数据还是批量样本(数据块)发送数据
点击“开始”(Start)来广播 LSL 数据流
2.3 步骤 4 - 使用 Python 脚本播放音频和发送触发器
复制以下代码块并将其粘贴到 Python 文件中,然后保存到您的计算机。
找到您想播放的音频文件(最好是 .wav 文件),并修改脚本,将变量
audio_filepath更改为您计算机上该音频文件的文件路径打开命令提示符与命令行交互,并导航到您保存 Python 文件的文件夹
输入:
python3 filename.py
• 取决于您安装的 Python 版本,您可能需要使用python而不是python3
注意:将/path/to/audio.wav替换为您在实验期间想要播放的音频文件的位置。
"""
LSL 示例:播放音频并发送触发标记

此脚本创建一个 LSL 标记流,等待用户按回车键(ENTER),
然后播放音频文件并发送一个可以与通过 LabRecorder
收集的 EEG 数据同步的标记。
"""

import sounddevice as sd
import soundfile as sf
from pylsl import StreamInfo, StreamOutlet


def wait_for_keypress():
    print("请按回车键(ENTER)开始播放音频并发送 LSL 标记。")
    while True:
        if input() == "":
            break


def play_audio_and_send_marker(audio_file, outlet):
    data, fs = sf.read(audio_file)

    print("正在播放音频并发送 LSL 标记...")

    marker_val = [1]
    outlet.push_sample(marker_val)

    sd.play(data, fs)
    sd.wait()

    print("音频播放结束。")


if __name__ == "__main__":

    info = StreamInfo(
        name="AudioMarkers",
        type="Markers",
        channel_count=1,
        nominal_srate=0,
        channel_format="int32",
        source_id="uniqueMarkerID12345"
    )

    outlet = StreamOutlet(info)

    while True:
        wait_for_keypress()

        audio_filepath = "/path/to/audio.wav"

        play_audio_and_send_marker(
            audio_filepath,
            outlet
        )
2.4 步骤 5 - 使用 LabRecorder 查看并保存所有 LSL 流
打开 LabRecorder
按
Update。可用的 LSL 流应显示在流列表中
• 您应该能够看到来自两个 EmotivPRO 的流(通常名为“Emotiv-DataStream”)以及标记流(名为“AudioMarkers”)点击
Browse选择保存数据的位置(并设置其他参数)选择所有流,然后按
Record开始录制
3.0 处理数据
LabRecorder 会输出一个包含所有流中数据的 XDF 文件(可扩展数据格式)。XDF 文件结构化为不同的流,每个流都有不同的头部信息,描述其包含的内容(设备名称、数据类型、采样率、通道等)。您可以使用以下代码块打开您的 XDF 文件并显示一些基本信息。
注意:将 /path/to/your/file.xdf 替换为您的 LabRecorder XDF 输出文件的文件路径。
import pyxdf
import mne
import matplotlib.pyplot as plt
import numpy as np

# 在此处提供您的 LSL 输出文件路径。
data_path = "/path/to/your/file.xdf"

# 加载 XDF 文件。
streams, fileheader = pyxdf.load_xdf(data_path)

print("XDF 文件头:", fileheader)
print("找到的流数量:", len(streams))

for i, stream in enumerate(streams):
    print("\n数据流", i + 1)
    print("数据流名称:", stream["info"]["name"][0])
    print("数据流类型:", stream["info"]["type"][0])
    print("通道数量:", stream["info"]["channel_count"][0])

    sfreq = float(stream["info"]["nominal_srate"][0])
    print("采样率:", sfreq)

    print("采样数量:", len(stream["time_series"]))
    print("前5个数据点:", stream["time_series"][:5])

    channel_names = [
        chan["label"][0]
        for chan in stream["info"]["desc"][0]["channels"][0]["channel"]
    ]

    print("通道名称:", channel_names)

    channel_types = "eeg"
4.0 其他资源
官方文档
查看 在线文档,包括 GitHub 上的官方 README 文件
其他资源:
• 使用 Emotiv 设备运行 LSL 的 代码,包含示例脚本
• YouTube 上非常有用的 LSL 演示视频
• 所有相关库的 SCCN LSL GitHub 仓库
• 收集子模块和应用程序的 LSL GitHub 仓库用于超扫描研究的 HyPyP 分析流程
继续阅读