एकाधिक डेटा स्ट्रीम को सिंक्रोनाइज़ करने के लिए लैब स्ट्रीमिंग लेयर (LSL)
डॉ. रोशिनी रंदेनिया और लुकास क्लेइन
संशोधित किया गया
17 मई 2024
एकाधिक डेटा स्ट्रीम को सिंक्रोनाइज़ करने के लिए लैब स्ट्रीमिंग लेयर (LSL)
डॉ. रोशिनी रंदेनिया और लुकास क्लेइन
संशोधित किया गया
17 मई 2024
एकाधिक डेटा स्ट्रीम को सिंक्रोनाइज़ करने के लिए लैब स्ट्रीमिंग लेयर (LSL)
डॉ. रोशिनी रंदेनिया और लुकास क्लेइन
संशोधित किया गया
17 मई 2024
स्वागत है! इस ट्यूटोरियल में हम सीखेंगे कि कई डिवाइसों से Emotiv EEG डेटा एकत्र करने और सिंक्रनाइज़ करने के लिए Python में लैब स्ट्रीमिंग लेयर (LSL) का उपयोग कैसे करें। इसके लिए Python प्रोग्रामिंग भाषा के बुनियादी व्यावहारिक ज्ञान की आवश्यकता होगी।
आप क्या सीखेंगे
लैब स्ट्रीमिंग लेयर (LSL) क्या है और शोधकर्ता इसका उपयोग क्यों करते हैं
एकाधिक Emotiv EEG उपकरणों से सिंक्रनाइज़ डेटा कैसे एकत्र करें
एकत्र किए गए डेटा को कैसे आयात और निरीक्षण करें
1.1 LSL क्या है और यह किस काम आता है?
लैब स्ट्रीमिंग लेयर (LSL) एक ओपन-सोर्स टूलबॉक्स है जिसका उपयोग विभिन्न सेंसर हार्डवेयर से तंत्रिका, शारीरिक और व्यावहारिक डेटा स्ट्रीम भेजने, प्राप्त करने और सिंक्रनाइज़ करने के लिए किया जा सकता है। तेजी से सक्षम, सटीक और मोबाइल मस्तिष्क और शरीर को संवेदन करने वाले हार्डवेयर उपकरण (जैसे Emotiv EEG सिस्टम) न्यूरोसाइंस को लैब से बाहर वास्तविक समय के डेटा की दुनिया में ला रहे हैं। जहां कभी EEG और MEG जैसे मस्तिष्क माप अनुसंधान प्रयोगशालाओं तक सीमित थे, वहीं मोबाइल उपकरण हमें अधिक प्राकृतिक वातावरण में और एक साथ कई लोगों से डेटा एकत्र करने की अनुमति देते हैं।
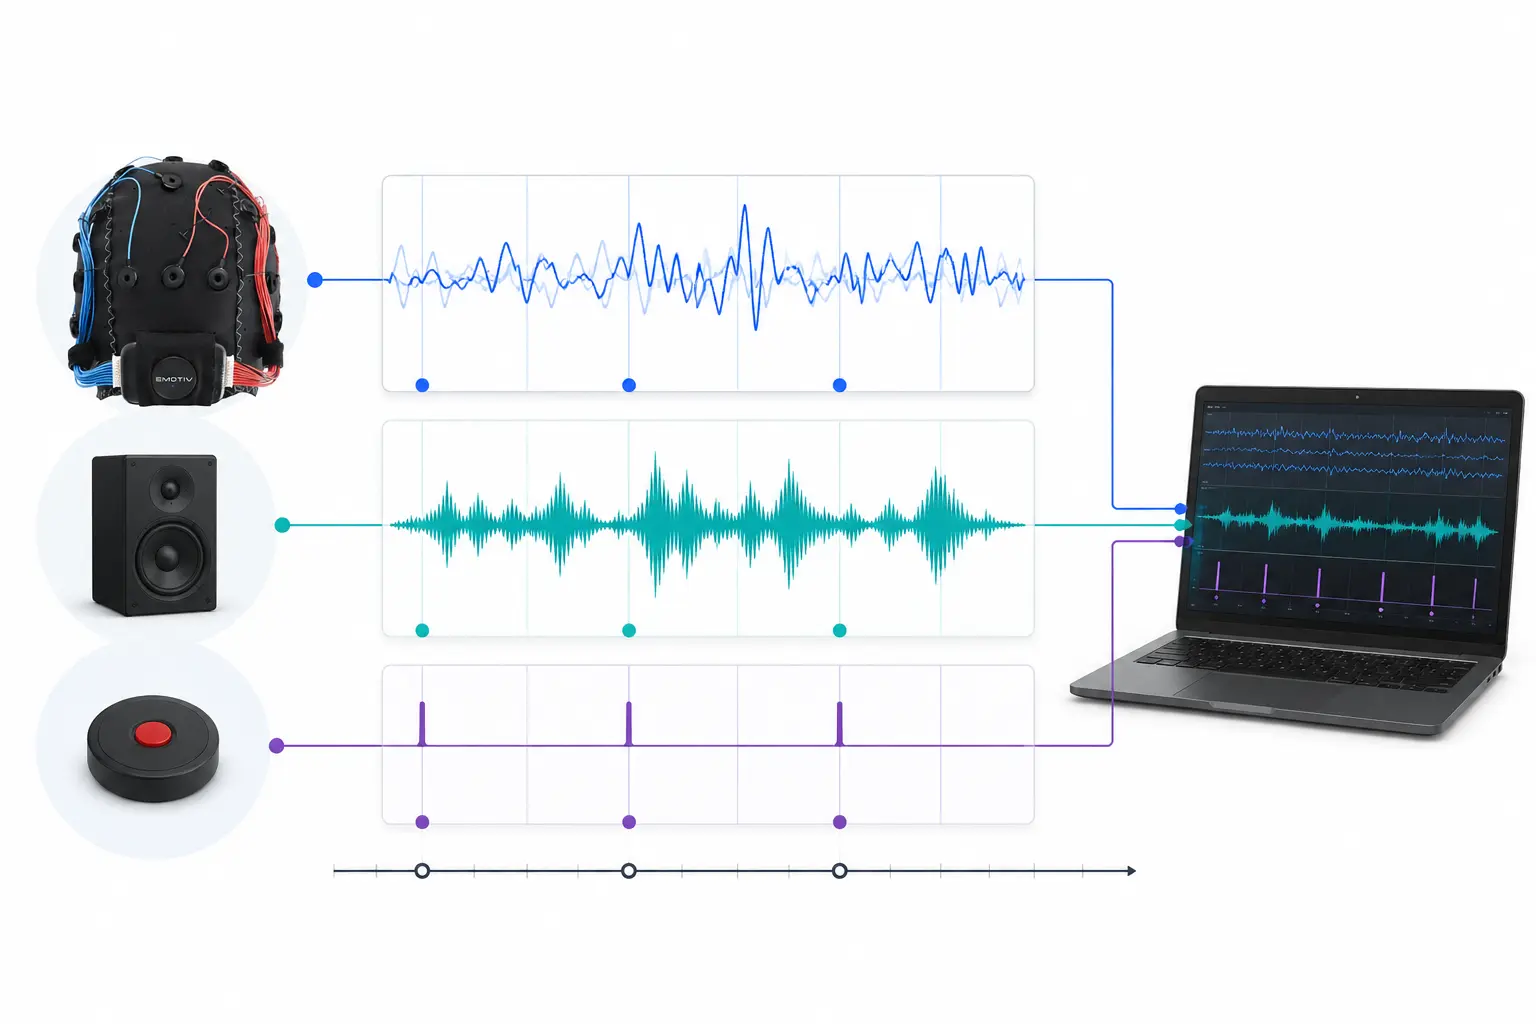
एक शोधकर्ता एक ही संगीत सुनने वाले दो लोगों के बीच शारीरिक तालमेल में रुचि रख सकता है। LSL हमें दो EEG हेडसेट से अलग-अलग डेटा एकत्र करने में मदद कर सकता है जो ध्वनि की प्रस्तुति के साथ भी सिंक्रनाइज़ होता है।
LSL के अन्य उपयोगों के कुछ उदाहरण:
एक प्रयोग से चल रहे EEG डेटा में इवेंट मार्कर जोड़ें
एक ही प्रतिभागी के लिए कई स्रोतों (जैसे हृदय गति, EMG, EEG) से डेटा को समय-संरेखित करें
एकाधिक प्रतिभागियों के डेटा को समय-संरेखित करें (जैसे EEG हाइपरस्कैनिंग अध्ययन)
1.2 LSL कैसे काम करता है?
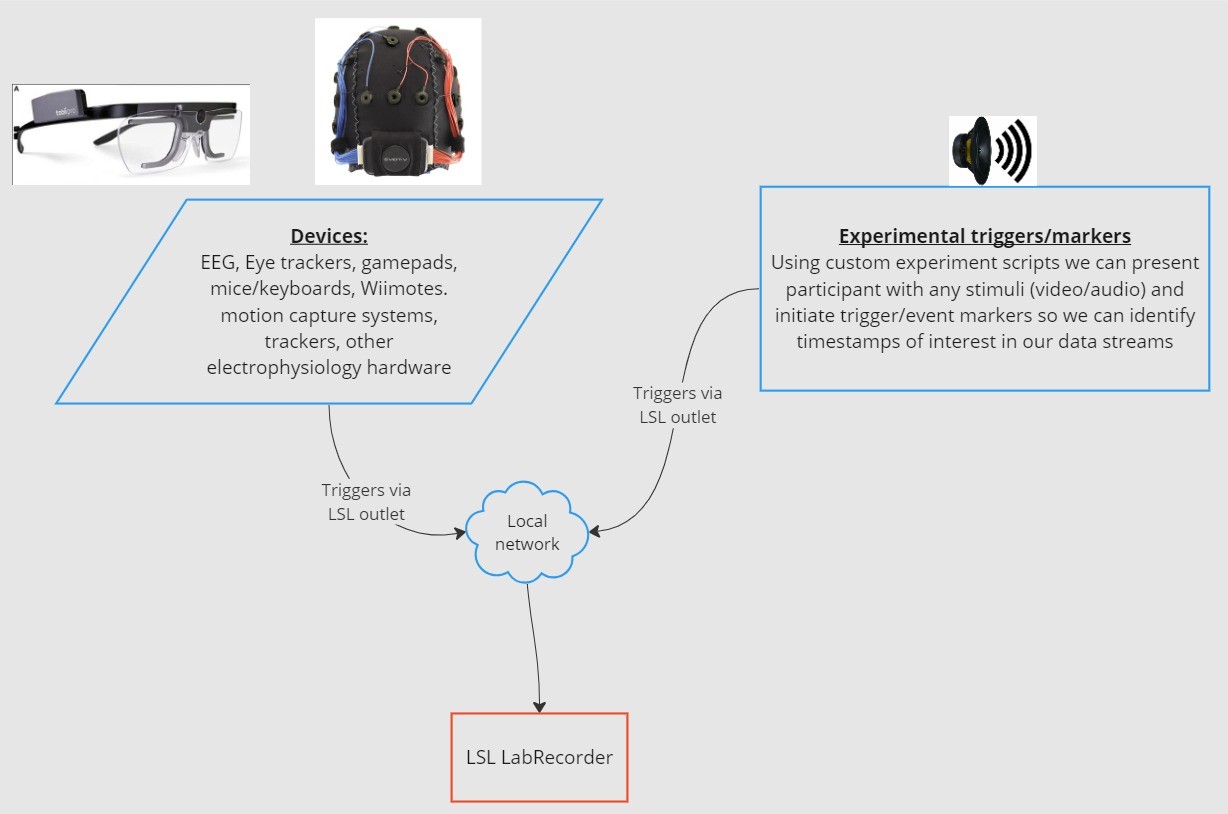
लैब स्ट्रीमिंग लेयर कई उपकरणों के बीच समय-श्रृंखला डेटा के वास्तविक समय के आदान-प्रदान के लिए एक प्रोटोकॉल है। Python, MATLAB, C++, Java और अन्य प्रोग्रामिंग भाषाओं के लिए ओपन-सोर्स लाइब्रेरी का उपयोग करके LSL को लागू किया जा सकता है।
मुख्य कार्यक्षमता LSL डेटा स्ट्रीम (data streams) के इर्द-गिर्द घूमती है:
1. एक अधिग्रहण उपकरण/सॉफ़्टवेयर डेटा एकत्र करता है और एक डेटा स्ट्रीम बनाता है - शारीरिक डेटा को EEG रिकॉर्डिंग डिवाइस, आई-ट्रैकर, मोशन कैप्चर सिस्टम, हार्ट रेट मॉनिटर आदि से LSL में स्ट्रीम किया जा सकता है, जिसमें मेटाडेटा (सैंपलिंग दर, डेटा प्रकार, चैनल जानकारी, आदि) शामिल हैं - प्रयोगों से इवेंट मार्कर (जैसे PsychoPy का उपयोग करके) को भी LSL का उपयोग करके डेटा स्ट्रीम के रूप में भेजा जा सकता है।
2. डेटा स्ट्रीम को नेटवर्क पर प्रकाशित (published) किया जाता है - LSL का उपयोग करके डेटा इसी तरह भेजा जाता है; डेटा स्ट्रीम नेटवर्क पर "प्रसारित (broadcast)" होती है - प्रकाशित स्ट्रीम नेटवर्क पर उपलब्ध होती हैं और उसी नेटवर्क पर अन्य LSL-समर्थित उपकरणों द्वारा खोजी जा सकती हैं - LSL एक सामान्य क्लॉक (नेटवर्क टाइम प्रोटोकॉल का पालन करते हुए) के आधार पर प्रत्येक डेटा चंक या सैंपल को एक टाइमस्टैम्प निर्दिष्ट करता है। - स्ट्रीम को एक "आउटलेट" के माध्यम से सैंपल-दर-सैंपल (या चंक-दर-चंक) धकेला जाता है
3. संग्रह उपकरण (Collection devices) डेटा स्ट्रीम की "सदस्यता (subscribe)" लेते हैं - LSL का उपयोग करके डेटा इसी तरह प्राप्त किया जाता है - उसी नेटवर्क पर संग्रह उपकरण "इनलेट्स" के माध्यम से प्रकाशित डेटा स्ट्रीम प्राप्त करते हैं। - प्रत्येक इनलेट केवल एक आउटलेट से स्ट्रीम सैंपल और मेटाडेटा प्राप्त करता है
4. डेटा सहेजें (Save data) - डेटा स्ट्रीम की सदस्यता लेने पर, आप इसे अपनी पसंदीदा प्रोग्रामिंग भाषा में एक वेरिएबल में सहेज सकते हैं, या इसे .xdf जैसे मानक प्रारूप में सहेजने के लिए LSL के प्रदान किए गए सॉफ़्टवेयर LabRecorder का उपयोग कर सकते हैं।
2.0 ट्यूटोरियल अवलोकन
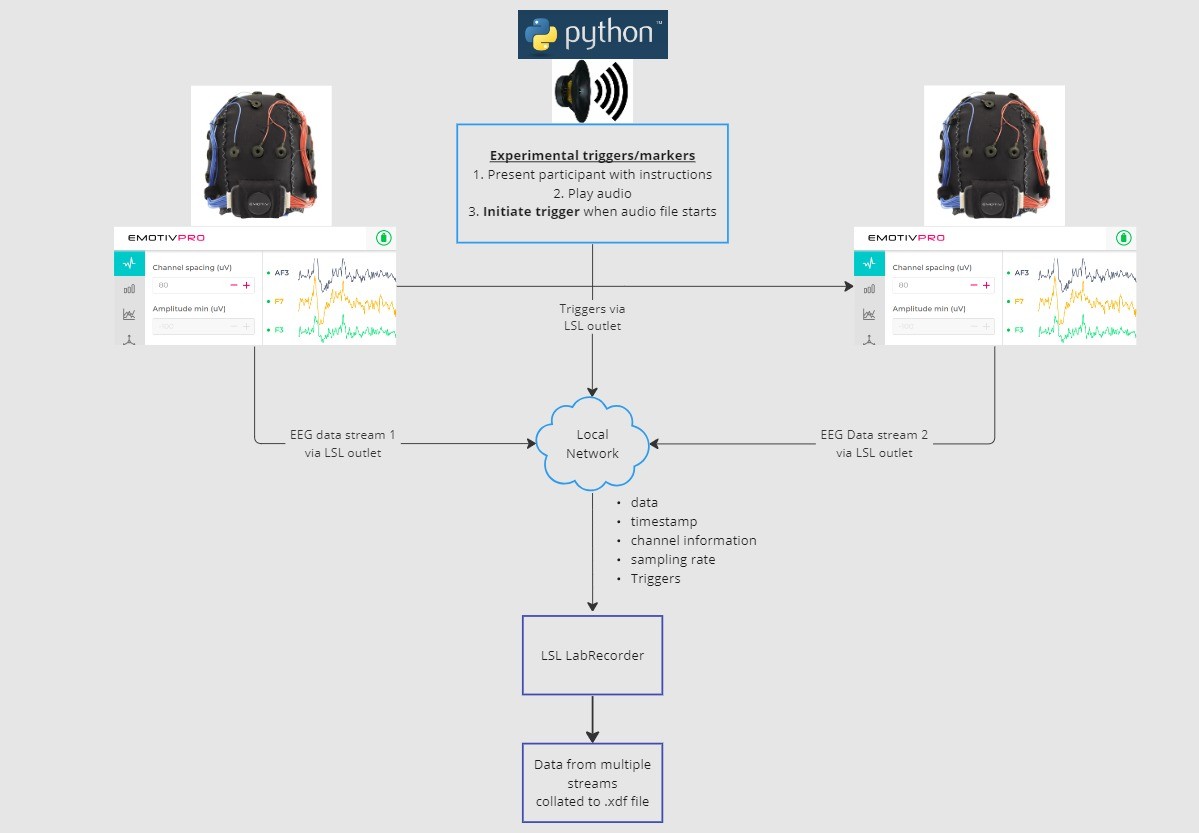
इस ट्यूटोरियल में, हम एक उदाहरण प्रयोगात्मक सेटअप लेंगे और Python में LSL का उपयोग करके इसे लागू करने के लिए आवश्यक चरणों और कोड के माध्यम से आपका मार्गदर्शन करेंगे। हम दो लोगों से EEG डेटा एकत्र करने के दौरान ध्वनि बजाने के लिए Python का उपयोग करेंगे जिन्होंने Emotiv हेडसेट पहने हैं। हम EEG डेटा एकत्र करने के लिए दो कंप्यूटरों का उपयोग करेंगे जिनमें से प्रत्येक पर EmotivPRO चल रहा होगा, और प्रत्येक स्ट्रीम को एक अलग LSL आउटलेट के माध्यम से प्रसारित करेंगे। हम एक ऑडियो फ़ाइल चलाने के लिए एक Python लाइब्रेरी का उपयोग करेंगे और साथ ही हर बार फ़ाइल शुरू होने पर एक ट्रिगर भेजेंगे।
चरण:
1. LSL आउटलेट्स के माध्यम से डेटा स्ट्रीम करने के लिए EmotivPRO का उपयोग करें जिसमें EEG डेटा (और/या मोशन, संपर्क गुणवत्ता, सिग्नल गुणवत्ता आदि) शामिल हैं। 2. Python स्क्रिप्ट का उपयोग करके एक ऑडियो ट्रैक चलाएं, और साथ ही दूसरे LSL के माध्यम से एक ट्रिगर भेजें। एक LSL इनलेट के माध्यम से तीनों डेटा स्ट्रीम को कैप्चर करने और सहेजने के लिए LabRecorder का उपयोग करें।
2.1 चरण 1 - सेटअप और इंस्टॉलेशन
डेटा एकत्र करने के लिए आपको समर्थित डेटा अधिग्रहण उपकरणों की आवश्यकता होगी
• Emotiv के सभी मस्तिष्क हार्डवेयर (brainware) उपकरण EmotivPRO सॉफ़्टवेयर के माध्यम से LSL से जुड़ते हैंअपने डिवाइस पर EmotivPRO इंस्टॉल करें। LSL का उपयोग करने के लिए आपको एक वैध EmotivPRO लाइसेंस की आवश्यकता होगी।
निम्नलिखित कमांड के साथ Python LSL लाइब्रेरी इंस्टॉल करें:
pip install pylslLabRecorder सॉफ़्टवेयर डाउनलोड करें। यह एक सरल, निःशुल्क ऐप है जिसे कमांड लाइन से या स्टैंडअलोन डाउनलोड का उपयोग करके चलाया जा सकता है
हमारे प्रयोग के लिए: Python का उपयोग करके ऑडियो चलाने के लिए आवश्यक पैकेज इंस्टॉल करें
pip install sounddevice soundfile
2.2 चरण 3 - EmotivPRO से LSL स्ट्रीम के माध्यम से डेटा भेजें
ऐप के ऊपरी दाएं कोने में "..." ढूंढें, सेटिंग्स (Settings) पर जाएं
'Lab Streaming Layer' अनुभाग और 'Outlet' उप-अनुभाग ढूंढें
उन सभी डेटा प्रकारों (datatypes) का चयन करें जिन्हें आप प्रसारित करना चाहते हैं
डेटा प्रारूप का चयन करें (32-बिट फ़्लोट या 64-बिट डबल)
चुनें कि डेटा को सैंपल-दर-सैंपल भेजना है या सैंपल के टुकड़ों (chunks) में
LSL डेटा स्ट्रीम प्रसारित करने के लिए 'Start' पर क्लिक करें
2.3 चरण 4 - ऑडियो चलाने और ट्रिगर भेजने के लिए Python स्क्रिप्ट का उपयोग करें
निम्नलिखित कोडब्लॉक को कॉपी करके एक python फ़ाइल में पेस्ट करें और इसे अपने कंप्यूटर पर सहेजें।
एक ऑडियो फ़ाइल (आदर्श रूप से एक .wav फ़ाइल) ढूंढें जिसे आप चलाना चाहते हैं और वेरिएबल
audio_filepathको अपने कंप्यूटर पर अपनी ऑडियो फ़ाइल के फ़ाइलपथ में बदलकर स्क्रिप्ट को संपादित करेंकमांड लाइन के साथ इंटरैक्ट करने के लिए एक कमांड प्रॉम्प्ट खोलें और उस फ़ोल्डर पर जाएं जहां आपकी Python फ़ाइल संग्रहीत है
दर्ज करें:
python3 filename.py
• आपके Python इंस्टॉलेशन के आधार पर, आपpython3के बजायpythonका उपयोग कर सकते हैं
नोट:/path/to/audio.wavको उस ऑडियो फ़ाइल के स्थान से बदलें जिसे आप अपने प्रयोग के दौरान चलाना चाहते हैं।
""" LSL Example: Play audio and send a trigger marker <p>This script creates an LSL marker stream, waits for the user to<br>press ENTER, then plays an audio file and sends a marker that<br>can be synchronized with EEG data collected through LabRecorder.<br>"""</p> <p>import sounddevice as sd<br>import soundfile as sf<br>from pylsl import StreamInfo, StreamOutlet</p> <p>def wait_for_keypress():<br>print("Press ENTER to start audio playback and send an LSL marker.")<br>while True:<br>if input() == "":<br>break</p> <p>def play_audio_and_send_marker(audio_file, outlet):<br>data, fs = sf.read(audio_file)</p> <pre><code>print("Playing audio and sending LSL marker...") marker_val = [1] outlet.push_sample(marker_val) sd.play(data, fs) sd.wait() print("Audio playback finished.") </code></pre> <p>if <strong>name</strong> == "<strong>main</strong>":</p> <pre><code>info = StreamInfo( name="AudioMarkers", type="Markers", channel_count=1, nominal_srate=0, channel_format="int32", source_id="uniqueMarkerID12345" ) outlet = StreamOutlet(info) while True: wait_for_keypress() audio_filepath = "/path/to/audio.wav" play_audio_and_send_marker( audio_filepath, outlet )</code></pre><h2 dir="auto">2.4 STEP 5 - Use LabRecorder to view and save all LSL streams</h2><ol dir="auto"><li data-preset-tag="p"><p>Open LabRecorder</p></li><li data-preset-tag="p"><p>Press <code>Update</code>. The available LSL streams should be visible in the stream list<br>• You should be able to see streams from both EmotivPROs (usually called “Emotiv-<br>DataStream”) and the marker stream (called “AudioMarkers”)</p></li><li data-preset-tag="p"><p>Click <code>Browse</code> to select a location to store data (and set other parameters)</p></li><li data-preset-tag="p"><p>Select all streams and press <code>Record</code> to start recording</p></li></ol><h2 dir="auto">3.0 Working with the data</h2><p dir="auto">LabRecorder outputs an XDF file (Extensible Data Format) that contains data from all the streams. XDF files are structured into, streams, each with a different header that describes what it contains (device name, data type, sampling rate, channels, and more). You can use the below codeblock to open your XDF file and display some basic information.</p><p dir="auto"><strong>Note: Replace </strong><code><strong>/path/to/your/file.xdf</strong></code><strong> with the filepath for your LabRecorder XDF output file.</strong></p><pre data-language="JSX"><code>import pyxdf </code></pre> <p>import mne<br>import matplotlib.pyplot as plt<br>import numpy as np</p> <h1>Give the path to your LSL output file here.</h1> <p>data_path = "/path/to/your/file.xdf"</p> <h1>Load the XDF file.</h1> <p>streams, fileheader = pyxdf.load_xdf(data_path)</p> <p>print("XDF File Header:", fileheader)<br>print("Number of streams found:", len(streams))</p> <p>for i, stream in enumerate(streams):<br>print("\nStream", i + 1)<br>print("Stream Name:", stream["info"]["name"][0])<br>print("Stream Type:", stream["info"]["type"][0])<br>print("Number of Channels:", stream["info"]["channel_count"][0])</p> <pre><code>sfreq = float(stream["info"]["nominal_srate"][0]) print("Sampling Rate:", sfreq) print("Number of Samples:", len(stream["time_series"])) print("First 5 data points:", stream["time_series"][:5]) channel_names = [ chan["label"][0] for chan in stream["info"]["desc"][0]["channels"][0]["channel"] ] print("Channel Names:", channel_names) channel_types = "eeg"</code></pre><h3 dir="auto"><br></h3><h2 dir="auto">4.0 Additional Resources</h2><h4 dir="auto">Official Documentation</h4><ol dir="auto"><li data-preset-tag="p"><p>Check out the <a href="1. Check out the online documentation, including the official README file on GitHub 2. Additional resources: • Code to run LSL using Emotiv’s devices, with example scripts • Useful LSL demo on YouTube • SCCN LSL GitHub repository for all associated libraries • LSL GitHub repository for a collection a submodules and apps 3. HyPyP analysis pipeline for Hyperscanning studies" target="_blank">online documentation</a>, including the <a href="https://github.com/sccn/labstreaminglayer/" target="_blank">official README file on GitHub</a></p></li><li data-preset-tag="p"><p>Additional resources:<br>• <a href="https://github.com/Emotiv/labstreaminglayer" target="_blank">Code</a> to run LSL using Emotiv’s devices, with example scripts<br>• Useful <a href="https://www.youtube.com/watch?v=Y1at7yrcFW0&list=PLVnr33MP5RMRhGwY36zHHDOmAaYTB138D" target="_blank">LSL demo on YouTube</a><br>• <a href="https://github.com/sccn/labstreaminglayer" target="_blank">SCCN LSL GitHub repository</a> for all associated libraries<br>• <a href="https://github.com/labstreaminglayer" target="_blank">LSL GitHub repository</a> for a collection a submodules and apps</p></li><li data-preset-tag="p"><p><a href="https://academic.oup.com/scan/article/16/1-2/72/5919711?login=false" target="_blank">HyPyP analysis pipeline</a> for Hyperscanning studies</p></li></ol> </code></pre
""" LSL Example: Play audio and send a trigger marker <p>This script creates an LSL marker stream, waits for the user to<br>press ENTER, then plays an audio file and sends a marker that<br>can be synchronized with EEG data collected through LabRecorder.<br>"""</p> <p>import sounddevice as sd<br>import soundfile as sf<br>from pylsl import StreamInfo, StreamOutlet</p> <p>def wait_for_keypress():<br>print("Press ENTER to start audio playback and send an LSL marker.")<br>while True:<br>if input() == "":<br>break</p> <p>def play_audio_and_send_marker(audio_file, outlet):<br>data, fs = sf.read(audio_file)</p> <pre><code>print("Playing audio and sending LSL marker...") marker_val = [1] outlet.push_sample(marker_val) sd.play(data, fs) sd.wait() print("Audio playback finished.") </code></pre> <p>if <strong>name</strong> == "<strong>main</strong>":</p> <pre><code>info = StreamInfo( name="AudioMarkers", type="Markers", channel_count=1, nominal_srate=0, channel_format="int32", source_id="uniqueMarkerID12345" ) outlet = StreamOutlet(info) while True: wait_for_keypress() audio_filepath = "/path/to/audio.wav" play_audio_and_send_marker( audio_filepath, outlet )</code></pre><h2 dir="auto">2.4 STEP 5 - Use LabRecorder to view and save all LSL streams</h2><ol dir="auto"><li data-preset-tag="p"><p>Open LabRecorder</p></li><li data-preset-tag="p"><p>Press <code>Update</code>. The available LSL streams should be visible in the stream list<br>• You should be able to see streams from both EmotivPROs (usually called “Emotiv-<br>DataStream”) and the marker stream (called “AudioMarkers”)</p></li><li data-preset-tag="p"><p>Click <code>Browse</code> to select a location to store data (and set other parameters)</p></li><li data-preset-tag="p"><p>Select all streams and press <code>Record</code> to start recording</p></li></ol><h2 dir="auto">3.0 Working with the data</h2><p dir="auto">LabRecorder outputs an XDF file (Extensible Data Format) that contains data from all the streams. XDF files are structured into, streams, each with a different header that describes what it contains (device name, data type, sampling rate, channels, and more). You can use the below codeblock to open your XDF file and display some basic information.</p><p dir="auto"><strong>Note: Replace </strong><code><strong>/path/to/your/file.xdf</strong></code><strong> with the filepath for your LabRecorder XDF output file.</strong></p><pre data-language="JSX"><code>import pyxdf </code></pre> <p>import mne<br>import matplotlib.pyplot as plt<br>import numpy as np</p> <h1>Give the path to your LSL output file here.</h1> <p>data_path = "/path/to/your/file.xdf"</p> <h1>Load the XDF file.</h1> <p>streams, fileheader = pyxdf.load_xdf(data_path)</p> <p>print("XDF File Header:", fileheader)<br>print("Number of streams found:", len(streams))</p> <p>for i, stream in enumerate(streams):<br>print("\nStream", i + 1)<br>print("Stream Name:", stream["info"]["name"][0])<br>print("Stream Type:", stream["info"]["type"][0])<br>print("Number of Channels:", stream["info"]["channel_count"][0])</p> <pre><code>sfreq = float(stream["info"]["nominal_srate"][0]) print("Sampling Rate:", sfreq) print("Number of Samples:", len(stream["time_series"])) print("First 5 data points:", stream["time_series"][:5]) channel_names = [ chan["label"][0] for chan in stream["info"]["desc"][0]["channels"][0]["channel"] ] print("Channel Names:", channel_names) channel_types = "eeg"</code></pre><h3 dir="auto"><br></h3><h2 dir="auto">4.0 Additional Resources</h2><h4 dir="auto">Official Documentation</h4><ol dir="auto"><li data-preset-tag="p"><p>Check out the <a href="1. Check out the online documentation, including the official README file on GitHub 2. Additional resources: • Code to run LSL using Emotiv’s devices, with example scripts • Useful LSL demo on YouTube • SCCN LSL GitHub repository for all associated libraries • LSL GitHub repository for a collection a submodules and apps 3. HyPyP analysis pipeline for Hyperscanning studies" target="_blank">online documentation</a>, including the <a href="https://github.com/sccn/labstreaminglayer/" target="_blank">official README file on GitHub</a></p></li><li data-preset-tag="p"><p>Additional resources:<br>• <a href="https://github.com/Emotiv/labstreaminglayer" target="_blank">Code</a> to run LSL using Emotiv’s devices, with example scripts<br>• Useful <a href="https://www.youtube.com/watch?v=Y1at7yrcFW0&list=PLVnr33MP5RMRhGwY36zHHDOmAaYTB138D" target="_blank">LSL demo on YouTube</a><br>• <a href="https://github.com/sccn/labstreaminglayer" target="_blank">SCCN LSL GitHub repository</a> for all associated libraries<br>• <a href="https://github.com/labstreaminglayer" target="_blank">LSL GitHub repository</a> for a collection a submodules and apps</p></li><li data-preset-tag="p"><p><a href="https://academic.oup.com/scan/article/16/1-2/72/5919711?login=false" target="_blank">HyPyP analysis pipeline</a> for Hyperscanning studies</p></li></ol> </code></pre
""" LSL Example: Play audio and send a trigger marker <p>This script creates an LSL marker stream, waits for the user to<br>press ENTER, then plays an audio file and sends a marker that<br>can be synchronized with EEG data collected through LabRecorder.<br>"""</p> <p>import sounddevice as sd<br>import soundfile as sf<br>from pylsl import StreamInfo, StreamOutlet</p> <p>def wait_for_keypress():<br>print("Press ENTER to start audio playback and send an LSL marker.")<br>while True:<br>if input() == "":<br>break</p> <p>def play_audio_and_send_marker(audio_file, outlet):<br>data, fs = sf.read(audio_file)</p> <pre><code>print("Playing audio and sending LSL marker...") marker_val = [1] outlet.push_sample(marker_val) sd.play(data, fs) sd.wait() print("Audio playback finished.") </code></pre> <p>if <strong>name</strong> == "<strong>main</strong>":</p> <pre><code>info = StreamInfo( name="AudioMarkers", type="Markers", channel_count=1, nominal_srate=0, channel_format="int32", source_id="uniqueMarkerID12345" ) outlet = StreamOutlet(info) while True: wait_for_keypress() audio_filepath = "/path/to/audio.wav" play_audio_and_send_marker( audio_filepath, outlet )</code></pre><h2 dir="auto">2.4 STEP 5 - Use LabRecorder to view and save all LSL streams</h2><ol dir="auto"><li data-preset-tag="p"><p>Open LabRecorder</p></li><li data-preset-tag="p"><p>Press <code>Update</code>. The available LSL streams should be visible in the stream list<br>• You should be able to see streams from both EmotivPROs (usually called “Emotiv-<br>DataStream”) and the marker stream (called “AudioMarkers”)</p></li><li data-preset-tag="p"><p>Click <code>Browse</code> to select a location to store data (and set other parameters)</p></li><li data-preset-tag="p"><p>Select all streams and press <code>Record</code> to start recording</p></li></ol><h2 dir="auto">3.0 Working with the data</h2><p dir="auto">LabRecorder outputs an XDF file (Extensible Data Format) that contains data from all the streams. XDF files are structured into, streams, each with a different header that describes what it contains (device name, data type, sampling rate, channels, and more). You can use the below codeblock to open your XDF file and display some basic information.</p><p dir="auto"><strong>Note: Replace </strong><code><strong>/path/to/your/file.xdf</strong></code><strong> with the filepath for your LabRecorder XDF output file.</strong></p><pre data-language="JSX"><code>import pyxdf </code></pre> <p>import mne<br>import matplotlib.pyplot as plt<br>import numpy as np</p> <h1>Give the path to your LSL output file here.</h1> <p>data_path = "/path/to/your/file.xdf"</p> <h1>Load the XDF file.</h1> <p>streams, fileheader = pyxdf.load_xdf(data_path)</p> <p>print("XDF File Header:", fileheader)<br>print("Number of streams found:", len(streams))</p> <p>for i, stream in enumerate(streams):<br>print("\nStream", i + 1)<br>print("Stream Name:", stream["info"]["name"][0])<br>print("Stream Type:", stream["info"]["type"][0])<br>print("Number of Channels:", stream["info"]["channel_count"][0])</p> <pre><code>sfreq = float(stream["info"]["nominal_srate"][0]) print("Sampling Rate:", sfreq) print("Number of Samples:", len(stream["time_series"])) print("First 5 data points:", stream["time_series"][:5]) channel_names = [ chan["label"][0] for chan in stream["info"]["desc"][0]["channels"][0]["channel"] ] print("Channel Names:", channel_names) channel_types = "eeg"</code></pre><h3 dir="auto"><br></h3><h2 dir="auto">4.0 Additional Resources</h2><h4 dir="auto">Official Documentation</h4><ol dir="auto"><li data-preset-tag="p"><p>Check out the <a href="1. Check out the online documentation, including the official README file on GitHub 2. Additional resources: • Code to run LSL using Emotiv’s devices, with example scripts • Useful LSL demo on YouTube • SCCN LSL GitHub repository for all associated libraries • LSL GitHub repository for a collection a submodules and apps 3. HyPyP analysis pipeline for Hyperscanning studies" target="_blank">online documentation</a>, including the <a href="https://github.com/sccn/labstreaminglayer/" target="_blank">official README file on GitHub</a></p></li><li data-preset-tag="p"><p>Additional resources:<br>• <a href="https://github.com/Emotiv/labstreaminglayer" target="_blank">Code</a> to run LSL using Emotiv’s devices, with example scripts<br>• Useful <a href="https://www.youtube.com/watch?v=Y1at7yrcFW0&list=PLVnr33MP5RMRhGwY36zHHDOmAaYTB138D" target="_blank">LSL demo on YouTube</a><br>• <a href="https://github.com/sccn/labstreaminglayer" target="_blank">SCCN LSL GitHub repository</a> for all associated libraries<br>• <a href="https://github.com/labstreaminglayer" target="_blank">LSL GitHub repository</a> for a collection a submodules and apps</p></li><li data-preset-tag="p"><p><a href="https://academic.oup.com/scan/article/16/1-2/72/5919711?login=false" target="_blank">HyPyP analysis pipeline</a> for Hyperscanning studies</p></li></ol> </code></pre
स्वागत है! इस ट्यूटोरियल में हम सीखेंगे कि कई डिवाइसों से Emotiv EEG डेटा एकत्र करने और सिंक्रनाइज़ करने के लिए Python में लैब स्ट्रीमिंग लेयर (LSL) का उपयोग कैसे करें। इसके लिए Python प्रोग्रामिंग भाषा के बुनियादी व्यावहारिक ज्ञान की आवश्यकता होगी।
आप क्या सीखेंगे
लैब स्ट्रीमिंग लेयर (LSL) क्या है और शोधकर्ता इसका उपयोग क्यों करते हैं
एकाधिक Emotiv EEG उपकरणों से सिंक्रनाइज़ डेटा कैसे एकत्र करें
एकत्र किए गए डेटा को कैसे आयात और निरीक्षण करें
1.1 LSL क्या है और यह किस काम आता है?
लैब स्ट्रीमिंग लेयर (LSL) एक ओपन-सोर्स टूलबॉक्स है जिसका उपयोग विभिन्न सेंसर हार्डवेयर से तंत्रिका, शारीरिक और व्यावहारिक डेटा स्ट्रीम भेजने, प्राप्त करने और सिंक्रनाइज़ करने के लिए किया जा सकता है। तेजी से सक्षम, सटीक और मोबाइल मस्तिष्क और शरीर को संवेदन करने वाले हार्डवेयर उपकरण (जैसे Emotiv EEG सिस्टम) न्यूरोसाइंस को लैब से बाहर वास्तविक समय के डेटा की दुनिया में ला रहे हैं। जहां कभी EEG और MEG जैसे मस्तिष्क माप अनुसंधान प्रयोगशालाओं तक सीमित थे, वहीं मोबाइल उपकरण हमें अधिक प्राकृतिक वातावरण में और एक साथ कई लोगों से डेटा एकत्र करने की अनुमति देते हैं।
एक शोधकर्ता एक ही संगीत सुनने वाले दो लोगों के बीच शारीरिक तालमेल में रुचि रख सकता है। LSL हमें दो EEG हेडसेट से अलग-अलग डेटा एकत्र करने में मदद कर सकता है जो ध्वनि की प्रस्तुति के साथ भी सिंक्रनाइज़ होता है।
LSL के अन्य उपयोगों के कुछ उदाहरण:
एक प्रयोग से चल रहे EEG डेटा में इवेंट मार्कर जोड़ें
एक ही प्रतिभागी के लिए कई स्रोतों (जैसे हृदय गति, EMG, EEG) से डेटा को समय-संरेखित करें
एकाधिक प्रतिभागियों के डेटा को समय-संरेखित करें (जैसे EEG हाइपरस्कैनिंग अध्ययन)
1.2 LSL कैसे काम करता है?
लैब स्ट्रीमिंग लेयर कई उपकरणों के बीच समय-श्रृंखला डेटा के वास्तविक समय के आदान-प्रदान के लिए एक प्रोटोकॉल है। Python, MATLAB, C++, Java और अन्य प्रोग्रामिंग भाषाओं के लिए ओपन-सोर्स लाइब्रेरी का उपयोग करके LSL को लागू किया जा सकता है।
मुख्य कार्यक्षमता LSL डेटा स्ट्रीम (data streams) के इर्द-गिर्द घूमती है:
1. एक अधिग्रहण उपकरण/सॉफ़्टवेयर डेटा एकत्र करता है और एक डेटा स्ट्रीम बनाता है - शारीरिक डेटा को EEG रिकॉर्डिंग डिवाइस, आई-ट्रैकर, मोशन कैप्चर सिस्टम, हार्ट रेट मॉनिटर आदि से LSL में स्ट्रीम किया जा सकता है, जिसमें मेटाडेटा (सैंपलिंग दर, डेटा प्रकार, चैनल जानकारी, आदि) शामिल हैं - प्रयोगों से इवेंट मार्कर (जैसे PsychoPy का उपयोग करके) को भी LSL का उपयोग करके डेटा स्ट्रीम के रूप में भेजा जा सकता है।
2. डेटा स्ट्रीम को नेटवर्क पर प्रकाशित (published) किया जाता है - LSL का उपयोग करके डेटा इसी तरह भेजा जाता है; डेटा स्ट्रीम नेटवर्क पर "प्रसारित (broadcast)" होती है - प्रकाशित स्ट्रीम नेटवर्क पर उपलब्ध होती हैं और उसी नेटवर्क पर अन्य LSL-समर्थित उपकरणों द्वारा खोजी जा सकती हैं - LSL एक सामान्य क्लॉक (नेटवर्क टाइम प्रोटोकॉल का पालन करते हुए) के आधार पर प्रत्येक डेटा चंक या सैंपल को एक टाइमस्टैम्प निर्दिष्ट करता है। - स्ट्रीम को एक "आउटलेट" के माध्यम से सैंपल-दर-सैंपल (या चंक-दर-चंक) धकेला जाता है
3. संग्रह उपकरण (Collection devices) डेटा स्ट्रीम की "सदस्यता (subscribe)" लेते हैं - LSL का उपयोग करके डेटा इसी तरह प्राप्त किया जाता है - उसी नेटवर्क पर संग्रह उपकरण "इनलेट्स" के माध्यम से प्रकाशित डेटा स्ट्रीम प्राप्त करते हैं। - प्रत्येक इनलेट केवल एक आउटलेट से स्ट्रीम सैंपल और मेटाडेटा प्राप्त करता है
4. डेटा सहेजें (Save data) - डेटा स्ट्रीम की सदस्यता लेने पर, आप इसे अपनी पसंदीदा प्रोग्रामिंग भाषा में एक वेरिएबल में सहेज सकते हैं, या इसे .xdf जैसे मानक प्रारूप में सहेजने के लिए LSL के प्रदान किए गए सॉफ़्टवेयर LabRecorder का उपयोग कर सकते हैं।
2.0 ट्यूटोरियल अवलोकन
इस ट्यूटोरियल में, हम एक उदाहरण प्रयोगात्मक सेटअप लेंगे और Python में LSL का उपयोग करके इसे लागू करने के लिए आवश्यक चरणों और कोड के माध्यम से आपका मार्गदर्शन करेंगे। हम दो लोगों से EEG डेटा एकत्र करने के दौरान ध्वनि बजाने के लिए Python का उपयोग करेंगे जिन्होंने Emotiv हेडसेट पहने हैं। हम EEG डेटा एकत्र करने के लिए दो कंप्यूटरों का उपयोग करेंगे जिनमें से प्रत्येक पर EmotivPRO चल रहा होगा, और प्रत्येक स्ट्रीम को एक अलग LSL आउटलेट के माध्यम से प्रसारित करेंगे। हम एक ऑडियो फ़ाइल चलाने के लिए एक Python लाइब्रेरी का उपयोग करेंगे और साथ ही हर बार फ़ाइल शुरू होने पर एक ट्रिगर भेजेंगे।
चरण:
1. LSL आउटलेट्स के माध्यम से डेटा स्ट्रीम करने के लिए EmotivPRO का उपयोग करें जिसमें EEG डेटा (और/या मोशन, संपर्क गुणवत्ता, सिग्नल गुणवत्ता आदि) शामिल हैं। 2. Python स्क्रिप्ट का उपयोग करके एक ऑडियो ट्रैक चलाएं, और साथ ही दूसरे LSL के माध्यम से एक ट्रिगर भेजें। एक LSL इनलेट के माध्यम से तीनों डेटा स्ट्रीम को कैप्चर करने और सहेजने के लिए LabRecorder का उपयोग करें।
2.1 चरण 1 - सेटअप और इंस्टॉलेशन
डेटा एकत्र करने के लिए आपको समर्थित डेटा अधिग्रहण उपकरणों की आवश्यकता होगी
• Emotiv के सभी मस्तिष्क हार्डवेयर (brainware) उपकरण EmotivPRO सॉफ़्टवेयर के माध्यम से LSL से जुड़ते हैंअपने डिवाइस पर EmotivPRO इंस्टॉल करें। LSL का उपयोग करने के लिए आपको एक वैध EmotivPRO लाइसेंस की आवश्यकता होगी।
निम्नलिखित कमांड के साथ Python LSL लाइब्रेरी इंस्टॉल करें:
pip install pylslLabRecorder सॉफ़्टवेयर डाउनलोड करें। यह एक सरल, निःशुल्क ऐप है जिसे कमांड लाइन से या स्टैंडअलोन डाउनलोड का उपयोग करके चलाया जा सकता है
हमारे प्रयोग के लिए: Python का उपयोग करके ऑडियो चलाने के लिए आवश्यक पैकेज इंस्टॉल करें
pip install sounddevice soundfile
2.2 चरण 3 - EmotivPRO से LSL स्ट्रीम के माध्यम से डेटा भेजें
ऐप के ऊपरी दाएं कोने में "..." ढूंढें, सेटिंग्स (Settings) पर जाएं
'Lab Streaming Layer' अनुभाग और 'Outlet' उप-अनुभाग ढूंढें
उन सभी डेटा प्रकारों (datatypes) का चयन करें जिन्हें आप प्रसारित करना चाहते हैं
डेटा प्रारूप का चयन करें (32-बिट फ़्लोट या 64-बिट डबल)
चुनें कि डेटा को सैंपल-दर-सैंपल भेजना है या सैंपल के टुकड़ों (chunks) में
LSL डेटा स्ट्रीम प्रसारित करने के लिए 'Start' पर क्लिक करें
2.3 चरण 4 - ऑडियो चलाने और ट्रिगर भेजने के लिए Python स्क्रिप्ट का उपयोग करें
निम्नलिखित कोडब्लॉक को कॉपी करके एक python फ़ाइल में पेस्ट करें और इसे अपने कंप्यूटर पर सहेजें।
एक ऑडियो फ़ाइल (आदर्श रूप से एक .wav फ़ाइल) ढूंढें जिसे आप चलाना चाहते हैं और वेरिएबल
audio_filepathको अपने कंप्यूटर पर अपनी ऑडियो फ़ाइल के फ़ाइलपथ में बदलकर स्क्रिप्ट को संपादित करेंकमांड लाइन के साथ इंटरैक्ट करने के लिए एक कमांड प्रॉम्प्ट खोलें और उस फ़ोल्डर पर जाएं जहां आपकी Python फ़ाइल संग्रहीत है
दर्ज करें:
python3 filename.py
• आपके Python इंस्टॉलेशन के आधार पर, आपpython3के बजायpythonका उपयोग कर सकते हैं
नोट:/path/to/audio.wavको उस ऑडियो फ़ाइल के स्थान से बदलें जिसे आप अपने प्रयोग के दौरान चलाना चाहते हैं।
""" LSL Example: Play audio and send a trigger marker <p>This script creates an LSL marker stream, waits for the user to<br>press ENTER, then plays an audio file and sends a marker that<br>can be synchronized with EEG data collected through LabRecorder.<br>"""</p> <p>import sounddevice as sd<br>import soundfile as sf<br>from pylsl import StreamInfo, StreamOutlet</p> <p>def wait_for_keypress():<br>print("Press ENTER to start audio playback and send an LSL marker.")<br>while True:<br>if input() == "":<br>break</p> <p>def play_audio_and_send_marker(audio_file, outlet):<br>data, fs = sf.read(audio_file)</p> <pre><code>print("Playing audio and sending LSL marker...") marker_val = [1] outlet.push_sample(marker_val) sd.play(data, fs) sd.wait() print("Audio playback finished.") </code></pre> <p>if <strong>name</strong> == "<strong>main</strong>":</p> <pre><code>info = StreamInfo( name="AudioMarkers", type="Markers", channel_count=1, nominal_srate=0, channel_format="int32", source_id="uniqueMarkerID12345" ) outlet = StreamOutlet(info) while True: wait_for_keypress() audio_filepath = "/path/to/audio.wav" play_audio_and_send_marker( audio_filepath, outlet )</code></pre><h2 dir="auto">2.4 STEP 5 - Use LabRecorder to view and save all LSL streams</h2><ol dir="auto"><li data-preset-tag="p"><p>Open LabRecorder</p></li><li data-preset-tag="p"><p>Press <code>Update</code>. The available LSL streams should be visible in the stream list<br>• You should be able to see streams from both EmotivPROs (usually called “Emotiv-<br>DataStream”) and the marker stream (called “AudioMarkers”)</p></li><li data-preset-tag="p"><p>Click <code>Browse</code> to select a location to store data (and set other parameters)</p></li><li data-preset-tag="p"><p>Select all streams and press <code>Record</code> to start recording</p></li></ol><h2 dir="auto">3.0 Working with the data</h2><p dir="auto">LabRecorder outputs an XDF file (Extensible Data Format) that contains data from all the streams. XDF files are structured into, streams, each with a different header that describes what it contains (device name, data type, sampling rate, channels, and more). You can use the below codeblock to open your XDF file and display some basic information.</p><p dir="auto"><strong>Note: Replace </strong><code><strong>/path/to/your/file.xdf</strong></code><strong> with the filepath for your LabRecorder XDF output file.</strong></p><pre data-language="JSX"><code>import pyxdf </code></pre> <p>import mne<br>import matplotlib.pyplot as plt<br>import numpy as np</p> <h1>Give the path to your LSL output file here.</h1> <p>data_path = "/path/to/your/file.xdf"</p> <h1>Load the XDF file.</h1> <p>streams, fileheader = pyxdf.load_xdf(data_path)</p> <p>print("XDF File Header:", fileheader)<br>print("Number of streams found:", len(streams))</p> <p>for i, stream in enumerate(streams):<br>print("\nStream", i + 1)<br>print("Stream Name:", stream["info"]["name"][0])<br>print("Stream Type:", stream["info"]["type"][0])<br>print("Number of Channels:", stream["info"]["channel_count"][0])</p> <pre><code>sfreq = float(stream["info"]["nominal_srate"][0]) print("Sampling Rate:", sfreq) print("Number of Samples:", len(stream["time_series"])) print("First 5 data points:", stream["time_series"][:5]) channel_names = [ chan["label"][0] for chan in stream["info"]["desc"][0]["channels"][0]["channel"] ] print("Channel Names:", channel_names) channel_types = "eeg"</code></pre><h3 dir="auto"><br></h3><h2 dir="auto">4.0 Additional Resources</h2><h4 dir="auto">Official Documentation</h4><ol dir="auto"><li data-preset-tag="p"><p>Check out the <a href="1. Check out the online documentation, including the official README file on GitHub 2. Additional resources: • Code to run LSL using Emotiv’s devices, with example scripts • Useful LSL demo on YouTube • SCCN LSL GitHub repository for all associated libraries • LSL GitHub repository for a collection a submodules and apps 3. HyPyP analysis pipeline for Hyperscanning studies" target="_blank">online documentation</a>, including the <a href="https://github.com/sccn/labstreaminglayer/" target="_blank">official README file on GitHub</a></p></li><li data-preset-tag="p"><p>Additional resources:<br>• <a href="https://github.com/Emotiv/labstreaminglayer" target="_blank">Code</a> to run LSL using Emotiv’s devices, with example scripts<br>• Useful <a href="https://www.youtube.com/watch?v=Y1at7yrcFW0&list=PLVnr33MP5RMRhGwY36zHHDOmAaYTB138D" target="_blank">LSL demo on YouTube</a><br>• <a href="https://github.com/sccn/labstreaminglayer" target="_blank">SCCN LSL GitHub repository</a> for all associated libraries<br>• <a href="https://github.com/labstreaminglayer" target="_blank">LSL GitHub repository</a> for a collection a submodules and apps</p></li><li data-preset-tag="p"><p><a href="https://academic.oup.com/scan/article/16/1-2/72/5919711?login=false" target="_blank">HyPyP analysis pipeline</a> for Hyperscanning studies</p></li></ol> </code></pre
स्वागत है! इस ट्यूटोरियल में हम सीखेंगे कि कई डिवाइसों से Emotiv EEG डेटा एकत्र करने और सिंक्रनाइज़ करने के लिए Python में लैब स्ट्रीमिंग लेयर (LSL) का उपयोग कैसे करें। इसके लिए Python प्रोग्रामिंग भाषा के बुनियादी व्यावहारिक ज्ञान की आवश्यकता होगी।
आप क्या सीखेंगे
लैब स्ट्रीमिंग लेयर (LSL) क्या है और शोधकर्ता इसका उपयोग क्यों करते हैं
एकाधिक Emotiv EEG उपकरणों से सिंक्रनाइज़ डेटा कैसे एकत्र करें
एकत्र किए गए डेटा को कैसे आयात और निरीक्षण करें
1.1 LSL क्या है और यह किस काम आता है?
लैब स्ट्रीमिंग लेयर (LSL) एक ओपन-सोर्स टूलबॉक्स है जिसका उपयोग विभिन्न सेंसर हार्डवेयर से तंत्रिका, शारीरिक और व्यावहारिक डेटा स्ट्रीम भेजने, प्राप्त करने और सिंक्रनाइज़ करने के लिए किया जा सकता है। तेजी से सक्षम, सटीक और मोबाइल मस्तिष्क और शरीर को संवेदन करने वाले हार्डवेयर उपकरण (जैसे Emotiv EEG सिस्टम) न्यूरोसाइंस को लैब से बाहर वास्तविक समय के डेटा की दुनिया में ला रहे हैं। जहां कभी EEG और MEG जैसे मस्तिष्क माप अनुसंधान प्रयोगशालाओं तक सीमित थे, वहीं मोबाइल उपकरण हमें अधिक प्राकृतिक वातावरण में और एक साथ कई लोगों से डेटा एकत्र करने की अनुमति देते हैं।
एक शोधकर्ता एक ही संगीत सुनने वाले दो लोगों के बीच शारीरिक तालमेल में रुचि रख सकता है। LSL हमें दो EEG हेडसेट से अलग-अलग डेटा एकत्र करने में मदद कर सकता है जो ध्वनि की प्रस्तुति के साथ भी सिंक्रनाइज़ होता है।
LSL के अन्य उपयोगों के कुछ उदाहरण:
एक प्रयोग से चल रहे EEG डेटा में इवेंट मार्कर जोड़ें
एक ही प्रतिभागी के लिए कई स्रोतों (जैसे हृदय गति, EMG, EEG) से डेटा को समय-संरेखित करें
एकाधिक प्रतिभागियों के डेटा को समय-संरेखित करें (जैसे EEG हाइपरस्कैनिंग अध्ययन)
1.2 LSL कैसे काम करता है?
लैब स्ट्रीमिंग लेयर कई उपकरणों के बीच समय-श्रृंखला डेटा के वास्तविक समय के आदान-प्रदान के लिए एक प्रोटोकॉल है। Python, MATLAB, C++, Java और अन्य प्रोग्रामिंग भाषाओं के लिए ओपन-सोर्स लाइब्रेरी का उपयोग करके LSL को लागू किया जा सकता है।
मुख्य कार्यक्षमता LSL डेटा स्ट्रीम (data streams) के इर्द-गिर्द घूमती है:
1. एक अधिग्रहण उपकरण/सॉफ़्टवेयर डेटा एकत्र करता है और एक डेटा स्ट्रीम बनाता है - शारीरिक डेटा को EEG रिकॉर्डिंग डिवाइस, आई-ट्रैकर, मोशन कैप्चर सिस्टम, हार्ट रेट मॉनिटर आदि से LSL में स्ट्रीम किया जा सकता है, जिसमें मेटाडेटा (सैंपलिंग दर, डेटा प्रकार, चैनल जानकारी, आदि) शामिल हैं - प्रयोगों से इवेंट मार्कर (जैसे PsychoPy का उपयोग करके) को भी LSL का उपयोग करके डेटा स्ट्रीम के रूप में भेजा जा सकता है।
2. डेटा स्ट्रीम को नेटवर्क पर प्रकाशित (published) किया जाता है - LSL का उपयोग करके डेटा इसी तरह भेजा जाता है; डेटा स्ट्रीम नेटवर्क पर "प्रसारित (broadcast)" होती है - प्रकाशित स्ट्रीम नेटवर्क पर उपलब्ध होती हैं और उसी नेटवर्क पर अन्य LSL-समर्थित उपकरणों द्वारा खोजी जा सकती हैं - LSL एक सामान्य क्लॉक (नेटवर्क टाइम प्रोटोकॉल का पालन करते हुए) के आधार पर प्रत्येक डेटा चंक या सैंपल को एक टाइमस्टैम्प निर्दिष्ट करता है। - स्ट्रीम को एक "आउटलेट" के माध्यम से सैंपल-दर-सैंपल (या चंक-दर-चंक) धकेला जाता है
3. संग्रह उपकरण (Collection devices) डेटा स्ट्रीम की "सदस्यता (subscribe)" लेते हैं - LSL का उपयोग करके डेटा इसी तरह प्राप्त किया जाता है - उसी नेटवर्क पर संग्रह उपकरण "इनलेट्स" के माध्यम से प्रकाशित डेटा स्ट्रीम प्राप्त करते हैं। - प्रत्येक इनलेट केवल एक आउटलेट से स्ट्रीम सैंपल और मेटाडेटा प्राप्त करता है
4. डेटा सहेजें (Save data) - डेटा स्ट्रीम की सदस्यता लेने पर, आप इसे अपनी पसंदीदा प्रोग्रामिंग भाषा में एक वेरिएबल में सहेज सकते हैं, या इसे .xdf जैसे मानक प्रारूप में सहेजने के लिए LSL के प्रदान किए गए सॉफ़्टवेयर LabRecorder का उपयोग कर सकते हैं।
2.0 ट्यूटोरियल अवलोकन
इस ट्यूटोरियल में, हम एक उदाहरण प्रयोगात्मक सेटअप लेंगे और Python में LSL का उपयोग करके इसे लागू करने के लिए आवश्यक चरणों और कोड के माध्यम से आपका मार्गदर्शन करेंगे। हम दो लोगों से EEG डेटा एकत्र करने के दौरान ध्वनि बजाने के लिए Python का उपयोग करेंगे जिन्होंने Emotiv हेडसेट पहने हैं। हम EEG डेटा एकत्र करने के लिए दो कंप्यूटरों का उपयोग करेंगे जिनमें से प्रत्येक पर EmotivPRO चल रहा होगा, और प्रत्येक स्ट्रीम को एक अलग LSL आउटलेट के माध्यम से प्रसारित करेंगे। हम एक ऑडियो फ़ाइल चलाने के लिए एक Python लाइब्रेरी का उपयोग करेंगे और साथ ही हर बार फ़ाइल शुरू होने पर एक ट्रिगर भेजेंगे।
चरण:
1. LSL आउटलेट्स के माध्यम से डेटा स्ट्रीम करने के लिए EmotivPRO का उपयोग करें जिसमें EEG डेटा (और/या मोशन, संपर्क गुणवत्ता, सिग्नल गुणवत्ता आदि) शामिल हैं। 2. Python स्क्रिप्ट का उपयोग करके एक ऑडियो ट्रैक चलाएं, और साथ ही दूसरे LSL के माध्यम से एक ट्रिगर भेजें। एक LSL इनलेट के माध्यम से तीनों डेटा स्ट्रीम को कैप्चर करने और सहेजने के लिए LabRecorder का उपयोग करें।
2.1 चरण 1 - सेटअप और इंस्टॉलेशन
डेटा एकत्र करने के लिए आपको समर्थित डेटा अधिग्रहण उपकरणों की आवश्यकता होगी
• Emotiv के सभी मस्तिष्क हार्डवेयर (brainware) उपकरण EmotivPRO सॉफ़्टवेयर के माध्यम से LSL से जुड़ते हैंअपने डिवाइस पर EmotivPRO इंस्टॉल करें। LSL का उपयोग करने के लिए आपको एक वैध EmotivPRO लाइसेंस की आवश्यकता होगी।
निम्नलिखित कमांड के साथ Python LSL लाइब्रेरी इंस्टॉल करें:
pip install pylslLabRecorder सॉफ़्टवेयर डाउनलोड करें। यह एक सरल, निःशुल्क ऐप है जिसे कमांड लाइन से या स्टैंडअलोन डाउनलोड का उपयोग करके चलाया जा सकता है
हमारे प्रयोग के लिए: Python का उपयोग करके ऑडियो चलाने के लिए आवश्यक पैकेज इंस्टॉल करें
pip install sounddevice soundfile
2.2 चरण 3 - EmotivPRO से LSL स्ट्रीम के माध्यम से डेटा भेजें
ऐप के ऊपरी दाएं कोने में "..." ढूंढें, सेटिंग्स (Settings) पर जाएं
'Lab Streaming Layer' अनुभाग और 'Outlet' उप-अनुभाग ढूंढें
उन सभी डेटा प्रकारों (datatypes) का चयन करें जिन्हें आप प्रसारित करना चाहते हैं
डेटा प्रारूप का चयन करें (32-बिट फ़्लोट या 64-बिट डबल)
चुनें कि डेटा को सैंपल-दर-सैंपल भेजना है या सैंपल के टुकड़ों (chunks) में
LSL डेटा स्ट्रीम प्रसारित करने के लिए 'Start' पर क्लिक करें
2.3 चरण 4 - ऑडियो चलाने और ट्रिगर भेजने के लिए Python स्क्रिप्ट का उपयोग करें
निम्नलिखित कोडब्लॉक को कॉपी करके एक python फ़ाइल में पेस्ट करें और इसे अपने कंप्यूटर पर सहेजें।
एक ऑडियो फ़ाइल (आदर्श रूप से एक .wav फ़ाइल) ढूंढें जिसे आप चलाना चाहते हैं और वेरिएबल
audio_filepathको अपने कंप्यूटर पर अपनी ऑडियो फ़ाइल के फ़ाइलपथ में बदलकर स्क्रिप्ट को संपादित करेंकमांड लाइन के साथ इंटरैक्ट करने के लिए एक कमांड प्रॉम्प्ट खोलें और उस फ़ोल्डर पर जाएं जहां आपकी Python फ़ाइल संग्रहीत है
दर्ज करें:
python3 filename.py
• आपके Python इंस्टॉलेशन के आधार पर, आपpython3के बजायpythonका उपयोग कर सकते हैं
नोट:/path/to/audio.wavको उस ऑडियो फ़ाइल के स्थान से बदलें जिसे आप अपने प्रयोग के दौरान चलाना चाहते हैं।
""" LSL Example: Play audio and send a trigger marker <p>This script creates an LSL marker stream, waits for the user to<br>press ENTER, then plays an audio file and sends a marker that<br>can be synchronized with EEG data collected through LabRecorder.<br>"""</p> <p>import sounddevice as sd<br>import soundfile as sf<br>from pylsl import StreamInfo, StreamOutlet</p> <p>def wait_for_keypress():<br>print("Press ENTER to start audio playback and send an LSL marker.")<br>while True:<br>if input() == "":<br>break</p> <p>def play_audio_and_send_marker(audio_file, outlet):<br>data, fs = sf.read(audio_file)</p> <pre><code>print("Playing audio and sending LSL marker...") marker_val = [1] outlet.push_sample(marker_val) sd.play(data, fs) sd.wait() print("Audio playback finished.") </code></pre> <p>if <strong>name</strong> == "<strong>main</strong>":</p> <pre><code>info = StreamInfo( name="AudioMarkers", type="Markers", channel_count=1, nominal_srate=0, channel_format="int32", source_id="uniqueMarkerID12345" ) outlet = StreamOutlet(info) while True: wait_for_keypress() audio_filepath = "/path/to/audio.wav" play_audio_and_send_marker( audio_filepath, outlet )</code></pre><h2 dir="auto">2.4 STEP 5 - Use LabRecorder to view and save all LSL streams</h2><ol dir="auto"><li data-preset-tag="p"><p>Open LabRecorder</p></li><li data-preset-tag="p"><p>Press <code>Update</code>. The available LSL streams should be visible in the stream list<br>• You should be able to see streams from both EmotivPROs (usually called “Emotiv-<br>DataStream”) and the marker stream (called “AudioMarkers”)</p></li><li data-preset-tag="p"><p>Click <code>Browse</code> to select a location to store data (and set other parameters)</p></li><li data-preset-tag="p"><p>Select all streams and press <code>Record</code> to start recording</p></li></ol><h2 dir="auto">3.0 Working with the data</h2><p dir="auto">LabRecorder outputs an XDF file (Extensible Data Format) that contains data from all the streams. XDF files are structured into, streams, each with a different header that describes what it contains (device name, data type, sampling rate, channels, and more). You can use the below codeblock to open your XDF file and display some basic information.</p><p dir="auto"><strong>Note: Replace </strong><code><strong>/path/to/your/file.xdf</strong></code><strong> with the filepath for your LabRecorder XDF output file.</strong></p><pre data-language="JSX"><code>import pyxdf </code></pre> <p>import mne<br>import matplotlib.pyplot as plt<br>import numpy as np</p> <h1>Give the path to your LSL output file here.</h1> <p>data_path = "/path/to/your/file.xdf"</p> <h1>Load the XDF file.</h1> <p>streams, fileheader = pyxdf.load_xdf(data_path)</p> <p>print("XDF File Header:", fileheader)<br>print("Number of streams found:", len(streams))</p> <p>for i, stream in enumerate(streams):<br>print("\nStream", i + 1)<br>print("Stream Name:", stream["info"]["name"][0])<br>print("Stream Type:", stream["info"]["type"][0])<br>print("Number of Channels:", stream["info"]["channel_count"][0])</p> <pre><code>sfreq = float(stream["info"]["nominal_srate"][0]) print("Sampling Rate:", sfreq) print("Number of Samples:", len(stream["time_series"])) print("First 5 data points:", stream["time_series"][:5]) channel_names = [ chan["label"][0] for chan in stream["info"]["desc"][0]["channels"][0]["channel"] ] print("Channel Names:", channel_names) channel_types = "eeg"</code></pre><h3 dir="auto"><br></h3><h2 dir="auto">4.0 Additional Resources</h2><h4 dir="auto">Official Documentation</h4><ol dir="auto"><li data-preset-tag="p"><p>Check out the <a href="1. Check out the online documentation, including the official README file on GitHub 2. Additional resources: • Code to run LSL using Emotiv’s devices, with example scripts • Useful LSL demo on YouTube • SCCN LSL GitHub repository for all associated libraries • LSL GitHub repository for a collection a submodules and apps 3. HyPyP analysis pipeline for Hyperscanning studies" target="_blank">online documentation</a>, including the <a href="https://github.com/sccn/labstreaminglayer/" target="_blank">official README file on GitHub</a></p></li><li data-preset-tag="p"><p>Additional resources:<br>• <a href="https://github.com/Emotiv/labstreaminglayer" target="_blank">Code</a> to run LSL using Emotiv’s devices, with example scripts<br>• Useful <a href="https://www.youtube.com/watch?v=Y1at7yrcFW0&list=PLVnr33MP5RMRhGwY36zHHDOmAaYTB138D" target="_blank">LSL demo on YouTube</a><br>• <a href="https://github.com/sccn/labstreaminglayer" target="_blank">SCCN LSL GitHub repository</a> for all associated libraries<br>• <a href="https://github.com/labstreaminglayer" target="_blank">LSL GitHub repository</a> for a collection a submodules and apps</p></li><li data-preset-tag="p"><p><a href="https://academic.oup.com/scan/article/16/1-2/72/5919711?login=false" target="_blank">HyPyP analysis pipeline</a> for Hyperscanning studies</p></li></ol> </code></pre
पढ़ना जारी रखें