Lab Streaming Layer (LSL) để đồng bộ hóa nhiều luồng dữ liệu
Tiến sĩ Roshini Randeniya và Lucas Kleine
Đã cập nhật vào
17 thg 5, 2024
Lab Streaming Layer (LSL) để đồng bộ hóa nhiều luồng dữ liệu
Tiến sĩ Roshini Randeniya và Lucas Kleine
Đã cập nhật vào
17 thg 5, 2024
Lab Streaming Layer (LSL) để đồng bộ hóa nhiều luồng dữ liệu
Tiến sĩ Roshini Randeniya và Lucas Kleine
Đã cập nhật vào
17 thg 5, 2024
Chào mừng! Trong hướng dẫn này, chúng ta sẽ tìm hiểu cách sử dụng Lab Streaming Layer (LSL) trong Python để thu thập và đồng bộ hóa dữ liệu EEG của Emotiv từ nhiều thiết bị. Việc này sẽ yêu cầu kiến thức làm việc cơ bản về ngôn ngữ lập trình Python.
Những gì bạn sẽ học
Lab Streaming Layer (LSL) là gì và tại sao các nhà nghiên cứu lại sử dụng nó
Cách thu thập dữ liệu đồng bộ từ nhiều thiết bị EEG của Emotiv
Cách nhập và kiểm tra dữ liệu đã thu thập
1.1 LSL là gì và nó có ích gì?
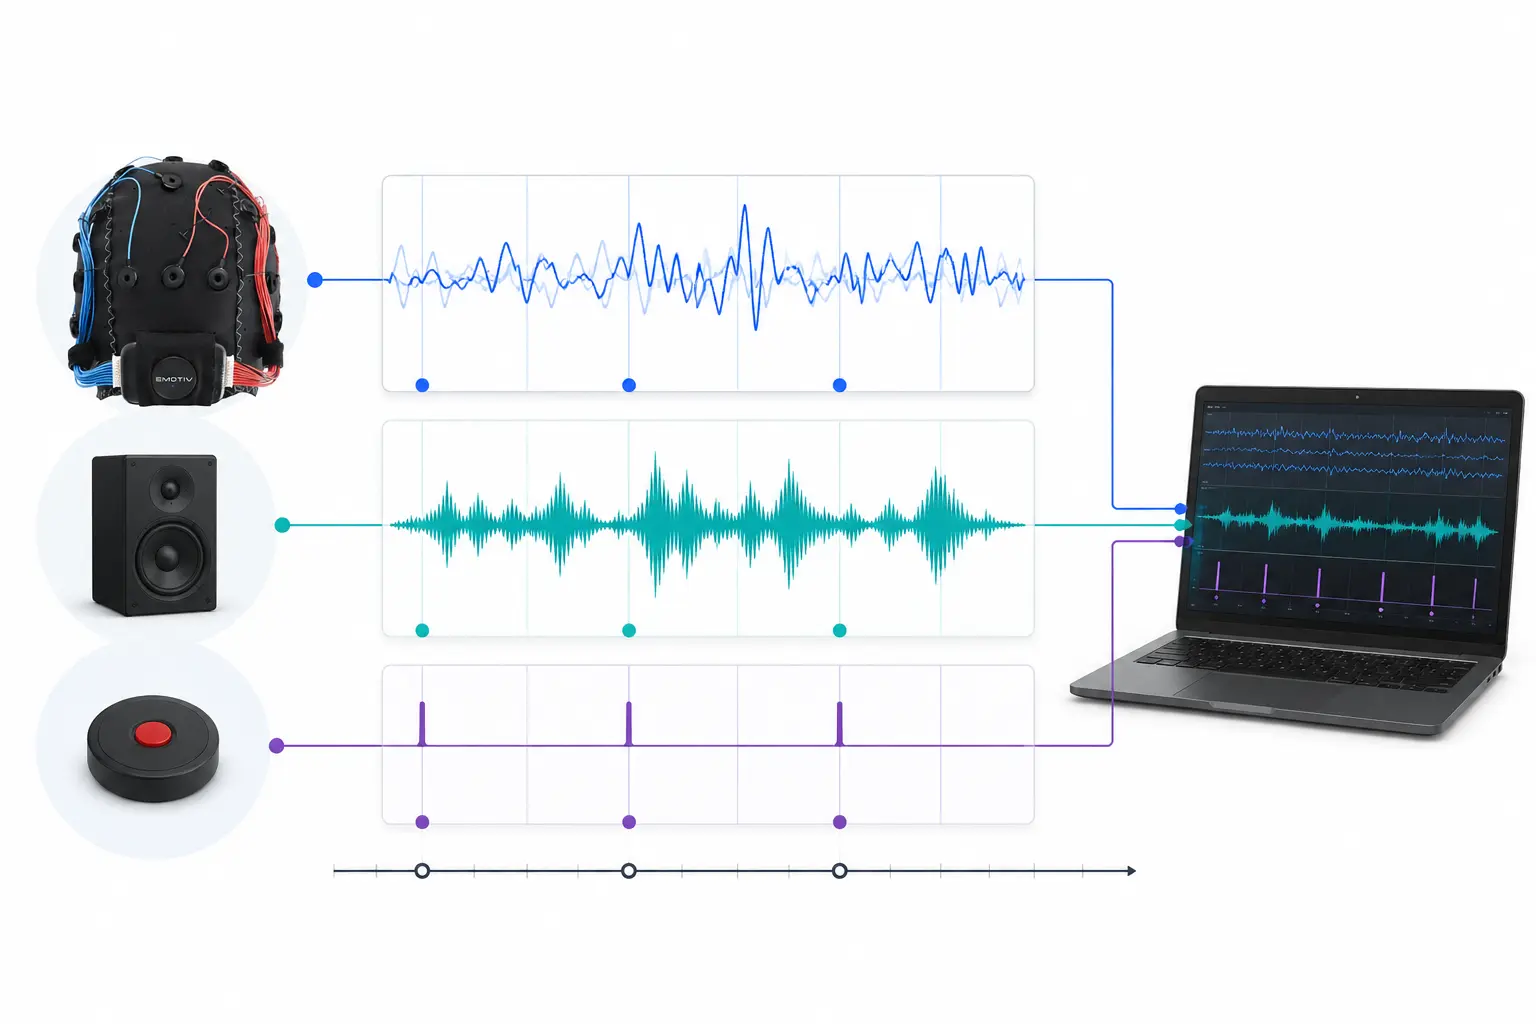
Lab streaming layer (LSL) là một bộ công cụ mã nguồn mở có thể được sử dụng để gửi, nhận & đồng bộ hóa các luồng dữ liệu thần kinh, sinh lý và hành vi từ nhiều phần cứng cảm biến khác nhau. Các thiết bị phần cứng cảm biến cơ thể và não bộ di động, chính xác và ngày càng mạnh mẽ (như hệ thống EEG của Emotiv) đang đưa khoa học thần kinh ra ngoài phòng thí nghiệm vào thế giới dữ liệu thời gian thực. Trong khi các phép đo não như EEG và MEG từng bị giới hạn trong các phòng thí nghiệm nghiên cứu, các thiết bị di động cho phép chúng ta thu thập nhiều dữ liệu trong môi trường tự nhiên hơn và từ nhiều người cùng một lúc.
Một nhà nghiên cứu có thể quan tâm đến sự đồng bộ sinh lý giữa hai người đang nghe cùng một bản nhạc. LSL có thể giúp chúng ta thu thập dữ liệu từ hai thiết bị đeo đầu EEG riêng biệt mà dữ liệu đó cũng được đồng bộ hóa với việc phát âm thanh.
Một số ví dụ về các ứng dụng khác của LSL:
Thêm các điểm đánh dấu sự kiện từ một thử nghiệm vào dữ liệu EEG đang diễn ra
Căn chỉnh thời gian dữ liệu từ nhiều nguồn cho một người tham gia duy nhất (ví dụ: nhịp tim, EMG, EEG)
Căn chỉnh thời gian dữ liệu từ nhiều người tham gia (ví dụ: Các nghiên cứu Hyperscanning EEG)
1.2 LSL hoạt động như thế nào?
Lab Streaming Layer là một giao thức để trao đổi thời gian thực dữ liệu chuỗi thời gian giữa nhiều thiết bị. LSL có thể được triển khai bằng các thư viện mã nguồn mở cho các ngôn ngữ lập trình như Python, MATLAB, C++, Java và các ngôn ngữ khác.
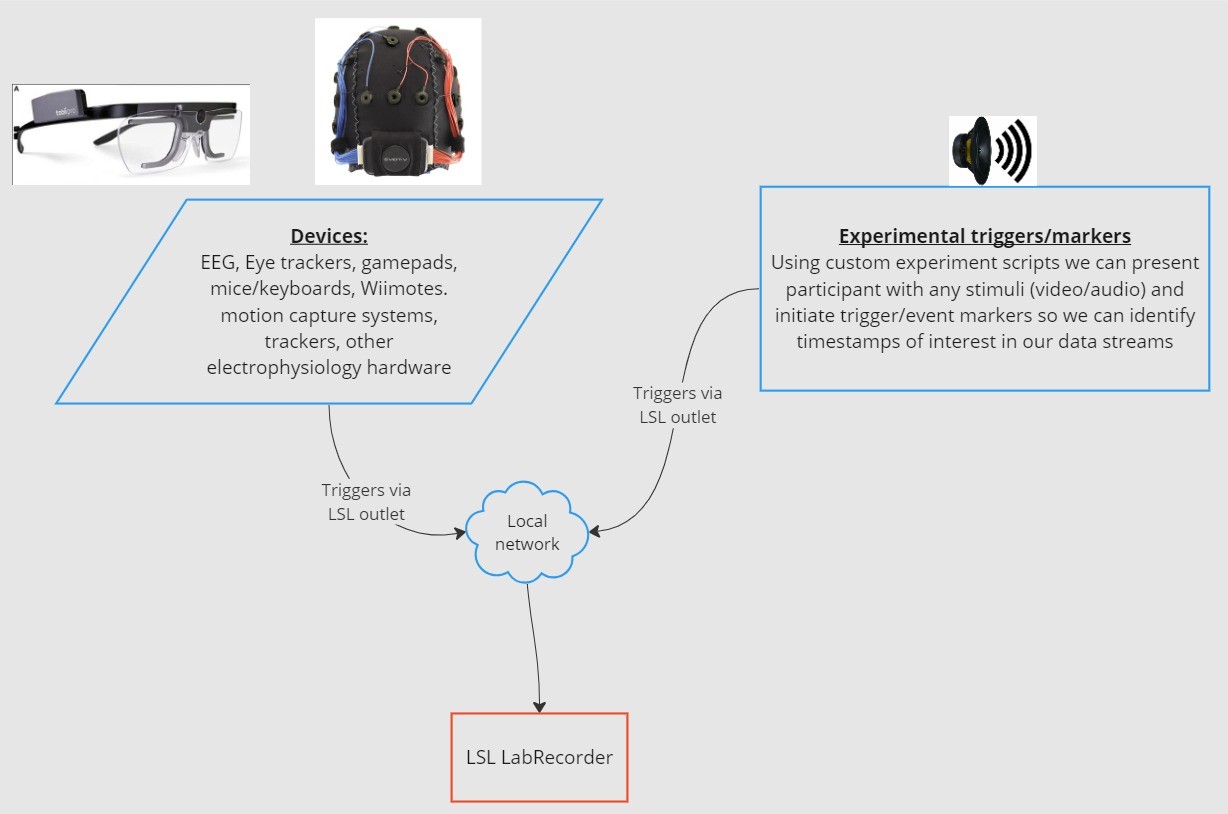
Chức năng cốt lõi xoay quanh các luồng dữ liệu LSL:
1. Một thiết bị/phần mềm thu thập dữ liệu và tạo ra một luồng dữ liệu - Dữ liệu sinh lý có thể được truyền trực tuyến đến LSL từ các thiết bị ghi EEG, thiết bị theo dõi mắt, hệ thống ghi chuyển động, thiết bị theo dõi nhịp tim, v.v., bao gồm cả siêu dữ liệu (tốc độ lấy mẫu, loại dữ liệu, thông tin kênh, v.v.) - Các điểm đánh dấu sự kiện từ các thử nghiệm (ví dụ: sử dụng PsychoPy) cũng có thể được gửi dưới dạng luồng dữ liệu bằng LSL
2. Luồng dữ liệu được xuất bản lên mạng - Đây là cách dữ liệu được gửi bằng LSL; luồng dữ liệu được “phát sóng” lên mạng - Các luồng được xuất bản sẽ có sẵn trên mạng và có thể được phát hiện bởi các thiết bị khác hỗ trợ LSL trên cùng một mạng - LSL gán cho mỗi phân đoạn dữ liệu hoặc mẫu một dấu thời gian dựa trên một đồng hồ chung (theo Giao thức thời gian mạng Network Time Protocol). - Luồng dữ liệu được đẩy theo từng mẫu một (hoặc từng phân đoạn một) qua một “cổng ra” (outlet)
3. (Các) thiết bị thu thập “đăng ký” nhận (các) luồng dữ liệu - Đây là cách dữ liệu được nhận bằng LSL - Các thiết bị thu thập trên cùng một mạng sẽ nhận các luồng dữ liệu được xuất bản thông qua các “cổng vào” (inlets). - Mỗi cổng vào chỉ nhận các mẫu luồng và siêu dữ liệu từ một cổng ra duy nhất
4. Lưu dữ liệu - Khi đăng ký nhận một luồng dữ liệu, bạn có thể lưu nó vào một biến trong ngôn ngữ lập trình ưu thích của mình, hoặc sử dụng phần mềm LabRecorder được cung cấp của LSL để lưu nó dưới dạng định dạng tiêu chuẩn như .xdf.
2.0 Tổng quan về hướng dẫn
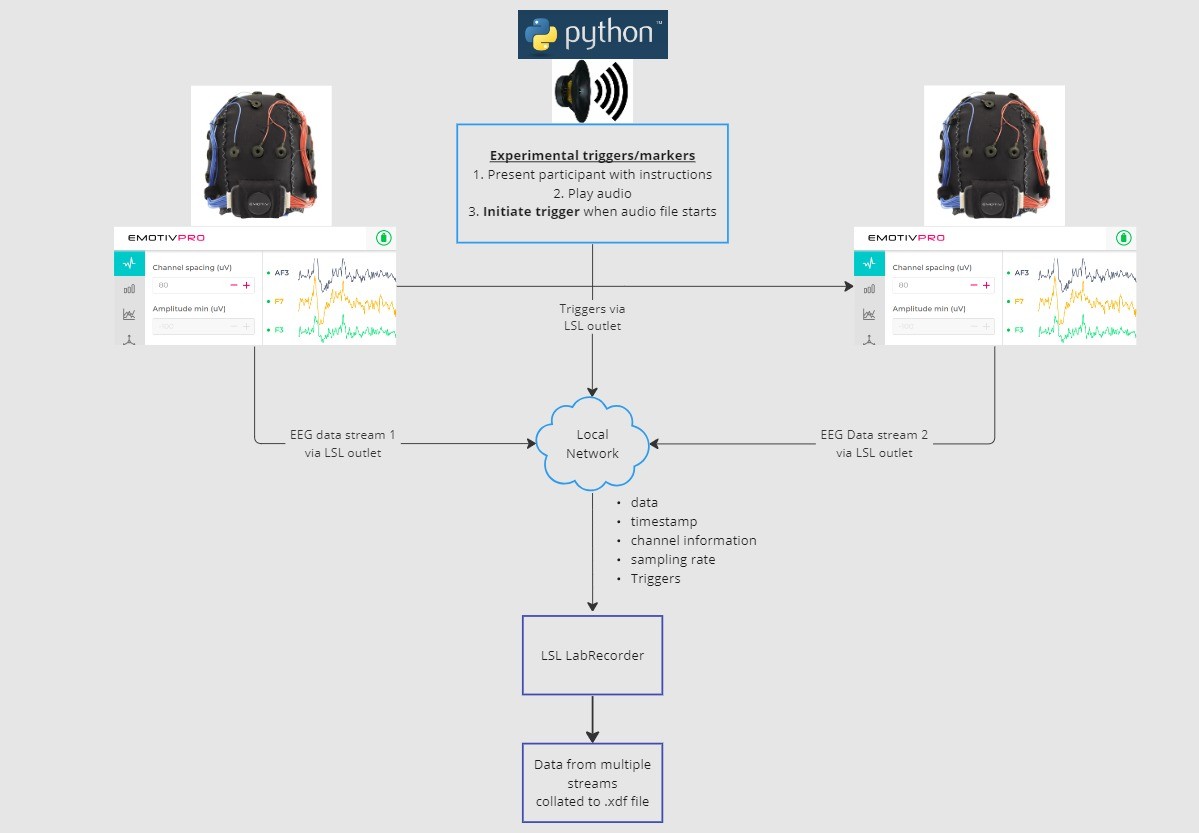
Trong hướng dẫn này, chúng ta sẽ lấy một thiết lập thử nghiệm mẫu và hướng dẫn bạn qua các bước và mã cần thiết để triển khai thiết lập đó bằng LSL trong Python. Chúng ta sẽ sử dụng Python phát một âm thanh trong khi thu thập dữ liệu EEG từ hai người đeo thiết bị đầu của Emotiv. Chúng ta sẽ sử dụng hai máy tính, mỗi máy chạy EmotivPRO để thu thập dữ liệu EEG và phát sóng mỗi luồng qua một cổng ra LSL riêng biệt. Chúng ta sẽ sử dụng một thư viện Python để phát một tệp âm thanh và đồng thời gửi một kích hoạt (trigger) mỗi khi tệp bắt đầu.
CÁC BƯỚC:
1. Sử dụng EmotivPRO để truyền dữ liệu qua các cổng ra LSL bao gồm dữ liệu EEG (và/hoặc chuyển động, chất lượng tiếp xúc, chất lượng tín hiệu, v.v.) 2. Phát một bản nhạc âm thanh bằng tập lệnh Python, và đồng thời gửi một kích hoạt qua một LSL khác. Sử dụng LabRecorder để ghi lại và lưu cả ba luồng dữ liệu thông qua một cổng vào LSL.
2.1 BƯỚC 1 - Thiết lập và cài đặt
Bạn sẽ cần các thiết bị thu thập dữ liệu được hỗ trợ để thu thập dữ liệu
• Tất cả các thiết bị phần cứng não bộ của Emotiv kết nối với LSL thông qua phần mềm EmotivPROCài đặt EmotivPRO trên (các) thiết bị của bạn. Bạn sẽ cần một giấy phép EmotivPRO hợp lệ để sử dụng LSL.
Cài đặt thư viện LSL Python bằng lệnh sau:
pip install pylslTải xuống phần mềm LabRecorder. Đây là một ứng dụng đơn giản, miễn phí có thể chạy từ
giao diện dòng lệnh hoặc sử dụng bản tải xuống độc lậpĐối với thử nghiệm của chúng ta: Cài đặt các gói cần thiết để phát âm thanh bằng Python
pip install sounddevice soundfile
2.2 BƯỚC 3 - Gửi dữ liệu từ EmotivPRO qua một luồng LSL
Tìm biểu tượng “…” ở góc trên cùng bên phải của ứng dụng, điều hướng đến Cài đặt (Settings)
Tìm phần ‘Lab Streaming Layer’ và phần phụ ‘Outlet’
Chọn tất cả các loại dữ liệu mà bạn muốn phát sóng
Chọn định dạng dữ liệu (32-bit float hoặc 64-bit double)
Chọn gửi dữ liệu theo từng mẫu hay theo các phân đoạn mẫu
Nhấp vào ‘Start’ để phát sóng một luồng dữ liệu LSL
2.3 BƯỚC 4 - Sử dụng tập lệnh Python để phát âm thanh và gửi kích hoạt
Sao chép và dán khối mã sau vào một tệp python và lưu nó vào máy tính của bạn.
Tìm một tệp âm thanh (lý tưởng là tệp .wav) mà bạn muốn phát và chỉnh sửa tập lệnh bằng cách thay đổi
biếnaudio_filepaththành đường dẫn tệp đến tệp âm thanh trên máy tính của bạnMở lời nhắc lệnh để tương tác với dòng lệnh và điều hướng đến thư mục nơi
tệp Python của bạn được lưu trữNhập:
python3 filename.py
• Tùy thuộc vào bản cài đặt Python của bạn, bạn có thể sử dụngpythonthay vìpython3
Lưu ý: Thay thế/path/to/audio.wavbằng vị trí của tệp âm thanh bạn muốn phát trong quá trình thử nghiệm của mình.
""" LSL Example: Play audio and send a trigger marker <p>This script creates an LSL marker stream, waits for the user to<br>press ENTER, then plays an audio file and sends a marker that<br>can be synchronized with EEG data collected through LabRecorder.<br>"""</p> <p>import sounddevice as sd<br>import soundfile as sf<br>from pylsl import StreamInfo, StreamOutlet</p> <p>def wait_for_keypress():<br>print("Press ENTER to start audio playback and send an LSL marker.")<br>while True:<br>if input() == "":<br>break</p> <p>def play_audio_and_send_marker(audio_file, outlet):<br>data, fs = sf.read(audio_file)</p> <pre><code>print("Playing audio and sending LSL marker...") marker_val = [1] outlet.push_sample(marker_val) sd.play(data, fs) sd.wait() print("Audio playback finished.") </code></pre> <p>if <strong>name</strong> == "<strong>main</strong>":</p> <pre><code>info = StreamInfo( name="AudioMarkers", type="Markers", channel_count=1, nominal_srate=0, channel_format="int32", source_id="uniqueMarkerID12345" ) outlet = StreamOutlet(info) while True: wait_for_keypress() audio_filepath = "/path/to/audio.wav" play_audio_and_send_marker( audio_filepath, outlet )</code></pre><h2 dir="auto">2.4 STEP 5 - Use LabRecorder to view and save all LSL streams</h2><ol dir="auto"><li data-preset-tag="p"><p>Open LabRecorder</p></li><li data-preset-tag="p"><p>Press <code>Update</code>. The available LSL streams should be visible in the stream list<br>• You should be able to see streams from both EmotivPROs (usually called “Emotiv-<br>DataStream”) and the marker stream (called “AudioMarkers”)</p></li><li data-preset-tag="p"><p>Click <code>Browse</code> to select a location to store data (and set other parameters)</p></li><li data-preset-tag="p"><p>Select all streams and press <code>Record</code> to start recording</p></li></ol><h2 dir="auto">3.0 Working with the data</h2><p dir="auto">LabRecorder outputs an XDF file (Extensible Data Format) that contains data from all the streams. XDF files are structured into, streams, each with a different header that describes what it contains (device name, data type, sampling rate, channels, and more). You can use the below codeblock to open your XDF file and display some basic information.</p><p dir="auto"><strong>Note: Replace </strong><code><strong>/path/to/your/file.xdf</strong></code><strong> with the filepath for your LabRecorder XDF output file.</strong></p><pre data-language="JSX"><code>import pyxdf </code></pre> <p>import mne<br>import matplotlib.pyplot as plt<br>import numpy as np</p> <h1>Give the path to your LSL output file here.</h1> <p>data_path = "/path/to/your/file.xdf"</p> <h1>Load the XDF file.</h1> <p>streams, fileheader = pyxdf.load_xdf(data_path)</p> <p>print("XDF File Header:", fileheader)<br>print("Number of streams found:", len(streams))</p> <p>for i, stream in enumerate(streams):<br>print("\nStream", i + 1)<br>print("Stream Name:", stream["info"]["name"][0])<br>print("Stream Type:", stream["info"]["type"][0])<br>print("Number of Channels:", stream["info"]["channel_count"][0])</p> <pre><code>sfreq = float(stream["info"]["nominal_srate"][0]) print("Sampling Rate:", sfreq) print("Number of Samples:", len(stream["time_series"])) print("First 5 data points:", stream["time_series"][:5]) channel_names = [ chan["label"][0] for chan in stream["info"]["desc"][0]["channels"][0]["channel"] ] print("Channel Names:", channel_names) channel_types = "eeg"</code></pre><h3 dir="auto"><br></h3><h2 dir="auto">4.0 Additional Resources</h2><h4 dir="auto">Official Documentation</h4><ol dir="auto"><li data-preset-tag="p"><p>Check out the <a href="1. Check out the online documentation, including the official README file on GitHub 2. Additional resources: • Code to run LSL using Emotiv’s devices, with example scripts • Useful LSL demo on YouTube • SCCN LSL GitHub repository for all associated libraries • LSL GitHub repository for a collection a submodules and apps 3. HyPyP analysis pipeline for Hyperscanning studies" target="_blank">online documentation</a>, including the <a href="https://github.com/sccn/labstreaminglayer/" target="_blank">official README file on GitHub</a></p></li><li data-preset-tag="p"><p>Additional resources:<br>• <a href="https://github.com/Emotiv/labstreaminglayer" target="_blank">Code</a> to run LSL using Emotiv’s devices, with example scripts<br>• Useful <a href="https://www.youtube.com/watch?v=Y1at7yrcFW0&list=PLVnr33MP5RMRhGwY36zHHDOmAaYTB138D" target="_blank">LSL demo on YouTube</a><br>• <a href="https://github.com/sccn/labstreaminglayer" target="_blank">SCCN LSL GitHub repository</a> for all associated libraries<br>• <a href="https://github.com/labstreaminglayer" target="_blank">LSL GitHub repository</a> for a collection a submodules and apps</p></li><li data-preset-tag="p"><p><a href="https://academic.oup.com/scan/article/16/1-2/72/5919711?login=false" target="_blank">HyPyP analysis pipeline</a> for Hyperscanning studies</p></li></ol> </code></pre
""" LSL Example: Play audio and send a trigger marker <p>This script creates an LSL marker stream, waits for the user to<br>press ENTER, then plays an audio file and sends a marker that<br>can be synchronized with EEG data collected through LabRecorder.<br>"""</p> <p>import sounddevice as sd<br>import soundfile as sf<br>from pylsl import StreamInfo, StreamOutlet</p> <p>def wait_for_keypress():<br>print("Press ENTER to start audio playback and send an LSL marker.")<br>while True:<br>if input() == "":<br>break</p> <p>def play_audio_and_send_marker(audio_file, outlet):<br>data, fs = sf.read(audio_file)</p> <pre><code>print("Playing audio and sending LSL marker...") marker_val = [1] outlet.push_sample(marker_val) sd.play(data, fs) sd.wait() print("Audio playback finished.") </code></pre> <p>if <strong>name</strong> == "<strong>main</strong>":</p> <pre><code>info = StreamInfo( name="AudioMarkers", type="Markers", channel_count=1, nominal_srate=0, channel_format="int32", source_id="uniqueMarkerID12345" ) outlet = StreamOutlet(info) while True: wait_for_keypress() audio_filepath = "/path/to/audio.wav" play_audio_and_send_marker( audio_filepath, outlet )</code></pre><h2 dir="auto">2.4 STEP 5 - Use LabRecorder to view and save all LSL streams</h2><ol dir="auto"><li data-preset-tag="p"><p>Open LabRecorder</p></li><li data-preset-tag="p"><p>Press <code>Update</code>. The available LSL streams should be visible in the stream list<br>• You should be able to see streams from both EmotivPROs (usually called “Emotiv-<br>DataStream”) and the marker stream (called “AudioMarkers”)</p></li><li data-preset-tag="p"><p>Click <code>Browse</code> to select a location to store data (and set other parameters)</p></li><li data-preset-tag="p"><p>Select all streams and press <code>Record</code> to start recording</p></li></ol><h2 dir="auto">3.0 Working with the data</h2><p dir="auto">LabRecorder outputs an XDF file (Extensible Data Format) that contains data from all the streams. XDF files are structured into, streams, each with a different header that describes what it contains (device name, data type, sampling rate, channels, and more). You can use the below codeblock to open your XDF file and display some basic information.</p><p dir="auto"><strong>Note: Replace </strong><code><strong>/path/to/your/file.xdf</strong></code><strong> with the filepath for your LabRecorder XDF output file.</strong></p><pre data-language="JSX"><code>import pyxdf </code></pre> <p>import mne<br>import matplotlib.pyplot as plt<br>import numpy as np</p> <h1>Give the path to your LSL output file here.</h1> <p>data_path = "/path/to/your/file.xdf"</p> <h1>Load the XDF file.</h1> <p>streams, fileheader = pyxdf.load_xdf(data_path)</p> <p>print("XDF File Header:", fileheader)<br>print("Number of streams found:", len(streams))</p> <p>for i, stream in enumerate(streams):<br>print("\nStream", i + 1)<br>print("Stream Name:", stream["info"]["name"][0])<br>print("Stream Type:", stream["info"]["type"][0])<br>print("Number of Channels:", stream["info"]["channel_count"][0])</p> <pre><code>sfreq = float(stream["info"]["nominal_srate"][0]) print("Sampling Rate:", sfreq) print("Number of Samples:", len(stream["time_series"])) print("First 5 data points:", stream["time_series"][:5]) channel_names = [ chan["label"][0] for chan in stream["info"]["desc"][0]["channels"][0]["channel"] ] print("Channel Names:", channel_names) channel_types = "eeg"</code></pre><h3 dir="auto"><br></h3><h2 dir="auto">4.0 Additional Resources</h2><h4 dir="auto">Official Documentation</h4><ol dir="auto"><li data-preset-tag="p"><p>Check out the <a href="1. Check out the online documentation, including the official README file on GitHub 2. Additional resources: • Code to run LSL using Emotiv’s devices, with example scripts • Useful LSL demo on YouTube • SCCN LSL GitHub repository for all associated libraries • LSL GitHub repository for a collection a submodules and apps 3. HyPyP analysis pipeline for Hyperscanning studies" target="_blank">online documentation</a>, including the <a href="https://github.com/sccn/labstreaminglayer/" target="_blank">official README file on GitHub</a></p></li><li data-preset-tag="p"><p>Additional resources:<br>• <a href="https://github.com/Emotiv/labstreaminglayer" target="_blank">Code</a> to run LSL using Emotiv’s devices, with example scripts<br>• Useful <a href="https://www.youtube.com/watch?v=Y1at7yrcFW0&list=PLVnr33MP5RMRhGwY36zHHDOmAaYTB138D" target="_blank">LSL demo on YouTube</a><br>• <a href="https://github.com/sccn/labstreaminglayer" target="_blank">SCCN LSL GitHub repository</a> for all associated libraries<br>• <a href="https://github.com/labstreaminglayer" target="_blank">LSL GitHub repository</a> for a collection a submodules and apps</p></li><li data-preset-tag="p"><p><a href="https://academic.oup.com/scan/article/16/1-2/72/5919711?login=false" target="_blank">HyPyP analysis pipeline</a> for Hyperscanning studies</p></li></ol> </code></pre
""" LSL Example: Play audio and send a trigger marker <p>This script creates an LSL marker stream, waits for the user to<br>press ENTER, then plays an audio file and sends a marker that<br>can be synchronized with EEG data collected through LabRecorder.<br>"""</p> <p>import sounddevice as sd<br>import soundfile as sf<br>from pylsl import StreamInfo, StreamOutlet</p> <p>def wait_for_keypress():<br>print("Press ENTER to start audio playback and send an LSL marker.")<br>while True:<br>if input() == "":<br>break</p> <p>def play_audio_and_send_marker(audio_file, outlet):<br>data, fs = sf.read(audio_file)</p> <pre><code>print("Playing audio and sending LSL marker...") marker_val = [1] outlet.push_sample(marker_val) sd.play(data, fs) sd.wait() print("Audio playback finished.") </code></pre> <p>if <strong>name</strong> == "<strong>main</strong>":</p> <pre><code>info = StreamInfo( name="AudioMarkers", type="Markers", channel_count=1, nominal_srate=0, channel_format="int32", source_id="uniqueMarkerID12345" ) outlet = StreamOutlet(info) while True: wait_for_keypress() audio_filepath = "/path/to/audio.wav" play_audio_and_send_marker( audio_filepath, outlet )</code></pre><h2 dir="auto">2.4 STEP 5 - Use LabRecorder to view and save all LSL streams</h2><ol dir="auto"><li data-preset-tag="p"><p>Open LabRecorder</p></li><li data-preset-tag="p"><p>Press <code>Update</code>. The available LSL streams should be visible in the stream list<br>• You should be able to see streams from both EmotivPROs (usually called “Emotiv-<br>DataStream”) and the marker stream (called “AudioMarkers”)</p></li><li data-preset-tag="p"><p>Click <code>Browse</code> to select a location to store data (and set other parameters)</p></li><li data-preset-tag="p"><p>Select all streams and press <code>Record</code> to start recording</p></li></ol><h2 dir="auto">3.0 Working with the data</h2><p dir="auto">LabRecorder outputs an XDF file (Extensible Data Format) that contains data from all the streams. XDF files are structured into, streams, each with a different header that describes what it contains (device name, data type, sampling rate, channels, and more). You can use the below codeblock to open your XDF file and display some basic information.</p><p dir="auto"><strong>Note: Replace </strong><code><strong>/path/to/your/file.xdf</strong></code><strong> with the filepath for your LabRecorder XDF output file.</strong></p><pre data-language="JSX"><code>import pyxdf </code></pre> <p>import mne<br>import matplotlib.pyplot as plt<br>import numpy as np</p> <h1>Give the path to your LSL output file here.</h1> <p>data_path = "/path/to/your/file.xdf"</p> <h1>Load the XDF file.</h1> <p>streams, fileheader = pyxdf.load_xdf(data_path)</p> <p>print("XDF File Header:", fileheader)<br>print("Number of streams found:", len(streams))</p> <p>for i, stream in enumerate(streams):<br>print("\nStream", i + 1)<br>print("Stream Name:", stream["info"]["name"][0])<br>print("Stream Type:", stream["info"]["type"][0])<br>print("Number of Channels:", stream["info"]["channel_count"][0])</p> <pre><code>sfreq = float(stream["info"]["nominal_srate"][0]) print("Sampling Rate:", sfreq) print("Number of Samples:", len(stream["time_series"])) print("First 5 data points:", stream["time_series"][:5]) channel_names = [ chan["label"][0] for chan in stream["info"]["desc"][0]["channels"][0]["channel"] ] print("Channel Names:", channel_names) channel_types = "eeg"</code></pre><h3 dir="auto"><br></h3><h2 dir="auto">4.0 Additional Resources</h2><h4 dir="auto">Official Documentation</h4><ol dir="auto"><li data-preset-tag="p"><p>Check out the <a href="1. Check out the online documentation, including the official README file on GitHub 2. Additional resources: • Code to run LSL using Emotiv’s devices, with example scripts • Useful LSL demo on YouTube • SCCN LSL GitHub repository for all associated libraries • LSL GitHub repository for a collection a submodules and apps 3. HyPyP analysis pipeline for Hyperscanning studies" target="_blank">online documentation</a>, including the <a href="https://github.com/sccn/labstreaminglayer/" target="_blank">official README file on GitHub</a></p></li><li data-preset-tag="p"><p>Additional resources:<br>• <a href="https://github.com/Emotiv/labstreaminglayer" target="_blank">Code</a> to run LSL using Emotiv’s devices, with example scripts<br>• Useful <a href="https://www.youtube.com/watch?v=Y1at7yrcFW0&list=PLVnr33MP5RMRhGwY36zHHDOmAaYTB138D" target="_blank">LSL demo on YouTube</a><br>• <a href="https://github.com/sccn/labstreaminglayer" target="_blank">SCCN LSL GitHub repository</a> for all associated libraries<br>• <a href="https://github.com/labstreaminglayer" target="_blank">LSL GitHub repository</a> for a collection a submodules and apps</p></li><li data-preset-tag="p"><p><a href="https://academic.oup.com/scan/article/16/1-2/72/5919711?login=false" target="_blank">HyPyP analysis pipeline</a> for Hyperscanning studies</p></li></ol> </code></pre
Chào mừng! Trong hướng dẫn này, chúng ta sẽ tìm hiểu cách sử dụng Lab Streaming Layer (LSL) trong Python để thu thập và đồng bộ hóa dữ liệu EEG của Emotiv từ nhiều thiết bị. Việc này sẽ yêu cầu kiến thức làm việc cơ bản về ngôn ngữ lập trình Python.
Những gì bạn sẽ học
Lab Streaming Layer (LSL) là gì và tại sao các nhà nghiên cứu lại sử dụng nó
Cách thu thập dữ liệu đồng bộ từ nhiều thiết bị EEG của Emotiv
Cách nhập và kiểm tra dữ liệu đã thu thập
1.1 LSL là gì và nó có ích gì?
Lab streaming layer (LSL) là một bộ công cụ mã nguồn mở có thể được sử dụng để gửi, nhận & đồng bộ hóa các luồng dữ liệu thần kinh, sinh lý và hành vi từ nhiều phần cứng cảm biến khác nhau. Các thiết bị phần cứng cảm biến cơ thể và não bộ di động, chính xác và ngày càng mạnh mẽ (như hệ thống EEG của Emotiv) đang đưa khoa học thần kinh ra ngoài phòng thí nghiệm vào thế giới dữ liệu thời gian thực. Trong khi các phép đo não như EEG và MEG từng bị giới hạn trong các phòng thí nghiệm nghiên cứu, các thiết bị di động cho phép chúng ta thu thập nhiều dữ liệu trong môi trường tự nhiên hơn và từ nhiều người cùng một lúc.
Một nhà nghiên cứu có thể quan tâm đến sự đồng bộ sinh lý giữa hai người đang nghe cùng một bản nhạc. LSL có thể giúp chúng ta thu thập dữ liệu từ hai thiết bị đeo đầu EEG riêng biệt mà dữ liệu đó cũng được đồng bộ hóa với việc phát âm thanh.
Một số ví dụ về các ứng dụng khác của LSL:
Thêm các điểm đánh dấu sự kiện từ một thử nghiệm vào dữ liệu EEG đang diễn ra
Căn chỉnh thời gian dữ liệu từ nhiều nguồn cho một người tham gia duy nhất (ví dụ: nhịp tim, EMG, EEG)
Căn chỉnh thời gian dữ liệu từ nhiều người tham gia (ví dụ: Các nghiên cứu Hyperscanning EEG)
1.2 LSL hoạt động như thế nào?
Lab Streaming Layer là một giao thức để trao đổi thời gian thực dữ liệu chuỗi thời gian giữa nhiều thiết bị. LSL có thể được triển khai bằng các thư viện mã nguồn mở cho các ngôn ngữ lập trình như Python, MATLAB, C++, Java và các ngôn ngữ khác.
Chức năng cốt lõi xoay quanh các luồng dữ liệu LSL:
1. Một thiết bị/phần mềm thu thập dữ liệu và tạo ra một luồng dữ liệu - Dữ liệu sinh lý có thể được truyền trực tuyến đến LSL từ các thiết bị ghi EEG, thiết bị theo dõi mắt, hệ thống ghi chuyển động, thiết bị theo dõi nhịp tim, v.v., bao gồm cả siêu dữ liệu (tốc độ lấy mẫu, loại dữ liệu, thông tin kênh, v.v.) - Các điểm đánh dấu sự kiện từ các thử nghiệm (ví dụ: sử dụng PsychoPy) cũng có thể được gửi dưới dạng luồng dữ liệu bằng LSL
2. Luồng dữ liệu được xuất bản lên mạng - Đây là cách dữ liệu được gửi bằng LSL; luồng dữ liệu được “phát sóng” lên mạng - Các luồng được xuất bản sẽ có sẵn trên mạng và có thể được phát hiện bởi các thiết bị khác hỗ trợ LSL trên cùng một mạng - LSL gán cho mỗi phân đoạn dữ liệu hoặc mẫu một dấu thời gian dựa trên một đồng hồ chung (theo Giao thức thời gian mạng Network Time Protocol). - Luồng dữ liệu được đẩy theo từng mẫu một (hoặc từng phân đoạn một) qua một “cổng ra” (outlet)
3. (Các) thiết bị thu thập “đăng ký” nhận (các) luồng dữ liệu - Đây là cách dữ liệu được nhận bằng LSL - Các thiết bị thu thập trên cùng một mạng sẽ nhận các luồng dữ liệu được xuất bản thông qua các “cổng vào” (inlets). - Mỗi cổng vào chỉ nhận các mẫu luồng và siêu dữ liệu từ một cổng ra duy nhất
4. Lưu dữ liệu - Khi đăng ký nhận một luồng dữ liệu, bạn có thể lưu nó vào một biến trong ngôn ngữ lập trình ưu thích của mình, hoặc sử dụng phần mềm LabRecorder được cung cấp của LSL để lưu nó dưới dạng định dạng tiêu chuẩn như .xdf.
2.0 Tổng quan về hướng dẫn
Trong hướng dẫn này, chúng ta sẽ lấy một thiết lập thử nghiệm mẫu và hướng dẫn bạn qua các bước và mã cần thiết để triển khai thiết lập đó bằng LSL trong Python. Chúng ta sẽ sử dụng Python phát một âm thanh trong khi thu thập dữ liệu EEG từ hai người đeo thiết bị đầu của Emotiv. Chúng ta sẽ sử dụng hai máy tính, mỗi máy chạy EmotivPRO để thu thập dữ liệu EEG và phát sóng mỗi luồng qua một cổng ra LSL riêng biệt. Chúng ta sẽ sử dụng một thư viện Python để phát một tệp âm thanh và đồng thời gửi một kích hoạt (trigger) mỗi khi tệp bắt đầu.
CÁC BƯỚC:
1. Sử dụng EmotivPRO để truyền dữ liệu qua các cổng ra LSL bao gồm dữ liệu EEG (và/hoặc chuyển động, chất lượng tiếp xúc, chất lượng tín hiệu, v.v.) 2. Phát một bản nhạc âm thanh bằng tập lệnh Python, và đồng thời gửi một kích hoạt qua một LSL khác. Sử dụng LabRecorder để ghi lại và lưu cả ba luồng dữ liệu thông qua một cổng vào LSL.
2.1 BƯỚC 1 - Thiết lập và cài đặt
Bạn sẽ cần các thiết bị thu thập dữ liệu được hỗ trợ để thu thập dữ liệu
• Tất cả các thiết bị phần cứng não bộ của Emotiv kết nối với LSL thông qua phần mềm EmotivPROCài đặt EmotivPRO trên (các) thiết bị của bạn. Bạn sẽ cần một giấy phép EmotivPRO hợp lệ để sử dụng LSL.
Cài đặt thư viện LSL Python bằng lệnh sau:
pip install pylslTải xuống phần mềm LabRecorder. Đây là một ứng dụng đơn giản, miễn phí có thể chạy từ
giao diện dòng lệnh hoặc sử dụng bản tải xuống độc lậpĐối với thử nghiệm của chúng ta: Cài đặt các gói cần thiết để phát âm thanh bằng Python
pip install sounddevice soundfile
2.2 BƯỚC 3 - Gửi dữ liệu từ EmotivPRO qua một luồng LSL
Tìm biểu tượng “…” ở góc trên cùng bên phải của ứng dụng, điều hướng đến Cài đặt (Settings)
Tìm phần ‘Lab Streaming Layer’ và phần phụ ‘Outlet’
Chọn tất cả các loại dữ liệu mà bạn muốn phát sóng
Chọn định dạng dữ liệu (32-bit float hoặc 64-bit double)
Chọn gửi dữ liệu theo từng mẫu hay theo các phân đoạn mẫu
Nhấp vào ‘Start’ để phát sóng một luồng dữ liệu LSL
2.3 BƯỚC 4 - Sử dụng tập lệnh Python để phát âm thanh và gửi kích hoạt
Sao chép và dán khối mã sau vào một tệp python và lưu nó vào máy tính của bạn.
Tìm một tệp âm thanh (lý tưởng là tệp .wav) mà bạn muốn phát và chỉnh sửa tập lệnh bằng cách thay đổi
biếnaudio_filepaththành đường dẫn tệp đến tệp âm thanh trên máy tính của bạnMở lời nhắc lệnh để tương tác với dòng lệnh và điều hướng đến thư mục nơi
tệp Python của bạn được lưu trữNhập:
python3 filename.py
• Tùy thuộc vào bản cài đặt Python của bạn, bạn có thể sử dụngpythonthay vìpython3
Lưu ý: Thay thế/path/to/audio.wavbằng vị trí của tệp âm thanh bạn muốn phát trong quá trình thử nghiệm của mình.
""" LSL Example: Play audio and send a trigger marker <p>This script creates an LSL marker stream, waits for the user to<br>press ENTER, then plays an audio file and sends a marker that<br>can be synchronized with EEG data collected through LabRecorder.<br>"""</p> <p>import sounddevice as sd<br>import soundfile as sf<br>from pylsl import StreamInfo, StreamOutlet</p> <p>def wait_for_keypress():<br>print("Press ENTER to start audio playback and send an LSL marker.")<br>while True:<br>if input() == "":<br>break</p> <p>def play_audio_and_send_marker(audio_file, outlet):<br>data, fs = sf.read(audio_file)</p> <pre><code>print("Playing audio and sending LSL marker...") marker_val = [1] outlet.push_sample(marker_val) sd.play(data, fs) sd.wait() print("Audio playback finished.") </code></pre> <p>if <strong>name</strong> == "<strong>main</strong>":</p> <pre><code>info = StreamInfo( name="AudioMarkers", type="Markers", channel_count=1, nominal_srate=0, channel_format="int32", source_id="uniqueMarkerID12345" ) outlet = StreamOutlet(info) while True: wait_for_keypress() audio_filepath = "/path/to/audio.wav" play_audio_and_send_marker( audio_filepath, outlet )</code></pre><h2 dir="auto">2.4 STEP 5 - Use LabRecorder to view and save all LSL streams</h2><ol dir="auto"><li data-preset-tag="p"><p>Open LabRecorder</p></li><li data-preset-tag="p"><p>Press <code>Update</code>. The available LSL streams should be visible in the stream list<br>• You should be able to see streams from both EmotivPROs (usually called “Emotiv-<br>DataStream”) and the marker stream (called “AudioMarkers”)</p></li><li data-preset-tag="p"><p>Click <code>Browse</code> to select a location to store data (and set other parameters)</p></li><li data-preset-tag="p"><p>Select all streams and press <code>Record</code> to start recording</p></li></ol><h2 dir="auto">3.0 Working with the data</h2><p dir="auto">LabRecorder outputs an XDF file (Extensible Data Format) that contains data from all the streams. XDF files are structured into, streams, each with a different header that describes what it contains (device name, data type, sampling rate, channels, and more). You can use the below codeblock to open your XDF file and display some basic information.</p><p dir="auto"><strong>Note: Replace </strong><code><strong>/path/to/your/file.xdf</strong></code><strong> with the filepath for your LabRecorder XDF output file.</strong></p><pre data-language="JSX"><code>import pyxdf </code></pre> <p>import mne<br>import matplotlib.pyplot as plt<br>import numpy as np</p> <h1>Give the path to your LSL output file here.</h1> <p>data_path = "/path/to/your/file.xdf"</p> <h1>Load the XDF file.</h1> <p>streams, fileheader = pyxdf.load_xdf(data_path)</p> <p>print("XDF File Header:", fileheader)<br>print("Number of streams found:", len(streams))</p> <p>for i, stream in enumerate(streams):<br>print("\nStream", i + 1)<br>print("Stream Name:", stream["info"]["name"][0])<br>print("Stream Type:", stream["info"]["type"][0])<br>print("Number of Channels:", stream["info"]["channel_count"][0])</p> <pre><code>sfreq = float(stream["info"]["nominal_srate"][0]) print("Sampling Rate:", sfreq) print("Number of Samples:", len(stream["time_series"])) print("First 5 data points:", stream["time_series"][:5]) channel_names = [ chan["label"][0] for chan in stream["info"]["desc"][0]["channels"][0]["channel"] ] print("Channel Names:", channel_names) channel_types = "eeg"</code></pre><h3 dir="auto"><br></h3><h2 dir="auto">4.0 Additional Resources</h2><h4 dir="auto">Official Documentation</h4><ol dir="auto"><li data-preset-tag="p"><p>Check out the <a href="1. Check out the online documentation, including the official README file on GitHub 2. Additional resources: • Code to run LSL using Emotiv’s devices, with example scripts • Useful LSL demo on YouTube • SCCN LSL GitHub repository for all associated libraries • LSL GitHub repository for a collection a submodules and apps 3. HyPyP analysis pipeline for Hyperscanning studies" target="_blank">online documentation</a>, including the <a href="https://github.com/sccn/labstreaminglayer/" target="_blank">official README file on GitHub</a></p></li><li data-preset-tag="p"><p>Additional resources:<br>• <a href="https://github.com/Emotiv/labstreaminglayer" target="_blank">Code</a> to run LSL using Emotiv’s devices, with example scripts<br>• Useful <a href="https://www.youtube.com/watch?v=Y1at7yrcFW0&list=PLVnr33MP5RMRhGwY36zHHDOmAaYTB138D" target="_blank">LSL demo on YouTube</a><br>• <a href="https://github.com/sccn/labstreaminglayer" target="_blank">SCCN LSL GitHub repository</a> for all associated libraries<br>• <a href="https://github.com/labstreaminglayer" target="_blank">LSL GitHub repository</a> for a collection a submodules and apps</p></li><li data-preset-tag="p"><p><a href="https://academic.oup.com/scan/article/16/1-2/72/5919711?login=false" target="_blank">HyPyP analysis pipeline</a> for Hyperscanning studies</p></li></ol> </code></pre
Chào mừng! Trong hướng dẫn này, chúng ta sẽ tìm hiểu cách sử dụng Lab Streaming Layer (LSL) trong Python để thu thập và đồng bộ hóa dữ liệu EEG của Emotiv từ nhiều thiết bị. Việc này sẽ yêu cầu kiến thức làm việc cơ bản về ngôn ngữ lập trình Python.
Những gì bạn sẽ học
Lab Streaming Layer (LSL) là gì và tại sao các nhà nghiên cứu lại sử dụng nó
Cách thu thập dữ liệu đồng bộ từ nhiều thiết bị EEG của Emotiv
Cách nhập và kiểm tra dữ liệu đã thu thập
1.1 LSL là gì và nó có ích gì?
Lab streaming layer (LSL) là một bộ công cụ mã nguồn mở có thể được sử dụng để gửi, nhận & đồng bộ hóa các luồng dữ liệu thần kinh, sinh lý và hành vi từ nhiều phần cứng cảm biến khác nhau. Các thiết bị phần cứng cảm biến cơ thể và não bộ di động, chính xác và ngày càng mạnh mẽ (như hệ thống EEG của Emotiv) đang đưa khoa học thần kinh ra ngoài phòng thí nghiệm vào thế giới dữ liệu thời gian thực. Trong khi các phép đo não như EEG và MEG từng bị giới hạn trong các phòng thí nghiệm nghiên cứu, các thiết bị di động cho phép chúng ta thu thập nhiều dữ liệu trong môi trường tự nhiên hơn và từ nhiều người cùng một lúc.
Một nhà nghiên cứu có thể quan tâm đến sự đồng bộ sinh lý giữa hai người đang nghe cùng một bản nhạc. LSL có thể giúp chúng ta thu thập dữ liệu từ hai thiết bị đeo đầu EEG riêng biệt mà dữ liệu đó cũng được đồng bộ hóa với việc phát âm thanh.
Một số ví dụ về các ứng dụng khác của LSL:
Thêm các điểm đánh dấu sự kiện từ một thử nghiệm vào dữ liệu EEG đang diễn ra
Căn chỉnh thời gian dữ liệu từ nhiều nguồn cho một người tham gia duy nhất (ví dụ: nhịp tim, EMG, EEG)
Căn chỉnh thời gian dữ liệu từ nhiều người tham gia (ví dụ: Các nghiên cứu Hyperscanning EEG)
1.2 LSL hoạt động như thế nào?
Lab Streaming Layer là một giao thức để trao đổi thời gian thực dữ liệu chuỗi thời gian giữa nhiều thiết bị. LSL có thể được triển khai bằng các thư viện mã nguồn mở cho các ngôn ngữ lập trình như Python, MATLAB, C++, Java và các ngôn ngữ khác.
Chức năng cốt lõi xoay quanh các luồng dữ liệu LSL:
1. Một thiết bị/phần mềm thu thập dữ liệu và tạo ra một luồng dữ liệu - Dữ liệu sinh lý có thể được truyền trực tuyến đến LSL từ các thiết bị ghi EEG, thiết bị theo dõi mắt, hệ thống ghi chuyển động, thiết bị theo dõi nhịp tim, v.v., bao gồm cả siêu dữ liệu (tốc độ lấy mẫu, loại dữ liệu, thông tin kênh, v.v.) - Các điểm đánh dấu sự kiện từ các thử nghiệm (ví dụ: sử dụng PsychoPy) cũng có thể được gửi dưới dạng luồng dữ liệu bằng LSL
2. Luồng dữ liệu được xuất bản lên mạng - Đây là cách dữ liệu được gửi bằng LSL; luồng dữ liệu được “phát sóng” lên mạng - Các luồng được xuất bản sẽ có sẵn trên mạng và có thể được phát hiện bởi các thiết bị khác hỗ trợ LSL trên cùng một mạng - LSL gán cho mỗi phân đoạn dữ liệu hoặc mẫu một dấu thời gian dựa trên một đồng hồ chung (theo Giao thức thời gian mạng Network Time Protocol). - Luồng dữ liệu được đẩy theo từng mẫu một (hoặc từng phân đoạn một) qua một “cổng ra” (outlet)
3. (Các) thiết bị thu thập “đăng ký” nhận (các) luồng dữ liệu - Đây là cách dữ liệu được nhận bằng LSL - Các thiết bị thu thập trên cùng một mạng sẽ nhận các luồng dữ liệu được xuất bản thông qua các “cổng vào” (inlets). - Mỗi cổng vào chỉ nhận các mẫu luồng và siêu dữ liệu từ một cổng ra duy nhất
4. Lưu dữ liệu - Khi đăng ký nhận một luồng dữ liệu, bạn có thể lưu nó vào một biến trong ngôn ngữ lập trình ưu thích của mình, hoặc sử dụng phần mềm LabRecorder được cung cấp của LSL để lưu nó dưới dạng định dạng tiêu chuẩn như .xdf.
2.0 Tổng quan về hướng dẫn
Trong hướng dẫn này, chúng ta sẽ lấy một thiết lập thử nghiệm mẫu và hướng dẫn bạn qua các bước và mã cần thiết để triển khai thiết lập đó bằng LSL trong Python. Chúng ta sẽ sử dụng Python phát một âm thanh trong khi thu thập dữ liệu EEG từ hai người đeo thiết bị đầu của Emotiv. Chúng ta sẽ sử dụng hai máy tính, mỗi máy chạy EmotivPRO để thu thập dữ liệu EEG và phát sóng mỗi luồng qua một cổng ra LSL riêng biệt. Chúng ta sẽ sử dụng một thư viện Python để phát một tệp âm thanh và đồng thời gửi một kích hoạt (trigger) mỗi khi tệp bắt đầu.
CÁC BƯỚC:
1. Sử dụng EmotivPRO để truyền dữ liệu qua các cổng ra LSL bao gồm dữ liệu EEG (và/hoặc chuyển động, chất lượng tiếp xúc, chất lượng tín hiệu, v.v.) 2. Phát một bản nhạc âm thanh bằng tập lệnh Python, và đồng thời gửi một kích hoạt qua một LSL khác. Sử dụng LabRecorder để ghi lại và lưu cả ba luồng dữ liệu thông qua một cổng vào LSL.
2.1 BƯỚC 1 - Thiết lập và cài đặt
Bạn sẽ cần các thiết bị thu thập dữ liệu được hỗ trợ để thu thập dữ liệu
• Tất cả các thiết bị phần cứng não bộ của Emotiv kết nối với LSL thông qua phần mềm EmotivPROCài đặt EmotivPRO trên (các) thiết bị của bạn. Bạn sẽ cần một giấy phép EmotivPRO hợp lệ để sử dụng LSL.
Cài đặt thư viện LSL Python bằng lệnh sau:
pip install pylslTải xuống phần mềm LabRecorder. Đây là một ứng dụng đơn giản, miễn phí có thể chạy từ
giao diện dòng lệnh hoặc sử dụng bản tải xuống độc lậpĐối với thử nghiệm của chúng ta: Cài đặt các gói cần thiết để phát âm thanh bằng Python
pip install sounddevice soundfile
2.2 BƯỚC 3 - Gửi dữ liệu từ EmotivPRO qua một luồng LSL
Tìm biểu tượng “…” ở góc trên cùng bên phải của ứng dụng, điều hướng đến Cài đặt (Settings)
Tìm phần ‘Lab Streaming Layer’ và phần phụ ‘Outlet’
Chọn tất cả các loại dữ liệu mà bạn muốn phát sóng
Chọn định dạng dữ liệu (32-bit float hoặc 64-bit double)
Chọn gửi dữ liệu theo từng mẫu hay theo các phân đoạn mẫu
Nhấp vào ‘Start’ để phát sóng một luồng dữ liệu LSL
2.3 BƯỚC 4 - Sử dụng tập lệnh Python để phát âm thanh và gửi kích hoạt
Sao chép và dán khối mã sau vào một tệp python và lưu nó vào máy tính của bạn.
Tìm một tệp âm thanh (lý tưởng là tệp .wav) mà bạn muốn phát và chỉnh sửa tập lệnh bằng cách thay đổi
biếnaudio_filepaththành đường dẫn tệp đến tệp âm thanh trên máy tính của bạnMở lời nhắc lệnh để tương tác với dòng lệnh và điều hướng đến thư mục nơi
tệp Python của bạn được lưu trữNhập:
python3 filename.py
• Tùy thuộc vào bản cài đặt Python của bạn, bạn có thể sử dụngpythonthay vìpython3
Lưu ý: Thay thế/path/to/audio.wavbằng vị trí của tệp âm thanh bạn muốn phát trong quá trình thử nghiệm của mình.
""" LSL Example: Play audio and send a trigger marker <p>This script creates an LSL marker stream, waits for the user to<br>press ENTER, then plays an audio file and sends a marker that<br>can be synchronized with EEG data collected through LabRecorder.<br>"""</p> <p>import sounddevice as sd<br>import soundfile as sf<br>from pylsl import StreamInfo, StreamOutlet</p> <p>def wait_for_keypress():<br>print("Press ENTER to start audio playback and send an LSL marker.")<br>while True:<br>if input() == "":<br>break</p> <p>def play_audio_and_send_marker(audio_file, outlet):<br>data, fs = sf.read(audio_file)</p> <pre><code>print("Playing audio and sending LSL marker...") marker_val = [1] outlet.push_sample(marker_val) sd.play(data, fs) sd.wait() print("Audio playback finished.") </code></pre> <p>if <strong>name</strong> == "<strong>main</strong>":</p> <pre><code>info = StreamInfo( name="AudioMarkers", type="Markers", channel_count=1, nominal_srate=0, channel_format="int32", source_id="uniqueMarkerID12345" ) outlet = StreamOutlet(info) while True: wait_for_keypress() audio_filepath = "/path/to/audio.wav" play_audio_and_send_marker( audio_filepath, outlet )</code></pre><h2 dir="auto">2.4 STEP 5 - Use LabRecorder to view and save all LSL streams</h2><ol dir="auto"><li data-preset-tag="p"><p>Open LabRecorder</p></li><li data-preset-tag="p"><p>Press <code>Update</code>. The available LSL streams should be visible in the stream list<br>• You should be able to see streams from both EmotivPROs (usually called “Emotiv-<br>DataStream”) and the marker stream (called “AudioMarkers”)</p></li><li data-preset-tag="p"><p>Click <code>Browse</code> to select a location to store data (and set other parameters)</p></li><li data-preset-tag="p"><p>Select all streams and press <code>Record</code> to start recording</p></li></ol><h2 dir="auto">3.0 Working with the data</h2><p dir="auto">LabRecorder outputs an XDF file (Extensible Data Format) that contains data from all the streams. XDF files are structured into, streams, each with a different header that describes what it contains (device name, data type, sampling rate, channels, and more). You can use the below codeblock to open your XDF file and display some basic information.</p><p dir="auto"><strong>Note: Replace </strong><code><strong>/path/to/your/file.xdf</strong></code><strong> with the filepath for your LabRecorder XDF output file.</strong></p><pre data-language="JSX"><code>import pyxdf </code></pre> <p>import mne<br>import matplotlib.pyplot as plt<br>import numpy as np</p> <h1>Give the path to your LSL output file here.</h1> <p>data_path = "/path/to/your/file.xdf"</p> <h1>Load the XDF file.</h1> <p>streams, fileheader = pyxdf.load_xdf(data_path)</p> <p>print("XDF File Header:", fileheader)<br>print("Number of streams found:", len(streams))</p> <p>for i, stream in enumerate(streams):<br>print("\nStream", i + 1)<br>print("Stream Name:", stream["info"]["name"][0])<br>print("Stream Type:", stream["info"]["type"][0])<br>print("Number of Channels:", stream["info"]["channel_count"][0])</p> <pre><code>sfreq = float(stream["info"]["nominal_srate"][0]) print("Sampling Rate:", sfreq) print("Number of Samples:", len(stream["time_series"])) print("First 5 data points:", stream["time_series"][:5]) channel_names = [ chan["label"][0] for chan in stream["info"]["desc"][0]["channels"][0]["channel"] ] print("Channel Names:", channel_names) channel_types = "eeg"</code></pre><h3 dir="auto"><br></h3><h2 dir="auto">4.0 Additional Resources</h2><h4 dir="auto">Official Documentation</h4><ol dir="auto"><li data-preset-tag="p"><p>Check out the <a href="1. Check out the online documentation, including the official README file on GitHub 2. Additional resources: • Code to run LSL using Emotiv’s devices, with example scripts • Useful LSL demo on YouTube • SCCN LSL GitHub repository for all associated libraries • LSL GitHub repository for a collection a submodules and apps 3. HyPyP analysis pipeline for Hyperscanning studies" target="_blank">online documentation</a>, including the <a href="https://github.com/sccn/labstreaminglayer/" target="_blank">official README file on GitHub</a></p></li><li data-preset-tag="p"><p>Additional resources:<br>• <a href="https://github.com/Emotiv/labstreaminglayer" target="_blank">Code</a> to run LSL using Emotiv’s devices, with example scripts<br>• Useful <a href="https://www.youtube.com/watch?v=Y1at7yrcFW0&list=PLVnr33MP5RMRhGwY36zHHDOmAaYTB138D" target="_blank">LSL demo on YouTube</a><br>• <a href="https://github.com/sccn/labstreaminglayer" target="_blank">SCCN LSL GitHub repository</a> for all associated libraries<br>• <a href="https://github.com/labstreaminglayer" target="_blank">LSL GitHub repository</a> for a collection a submodules and apps</p></li><li data-preset-tag="p"><p><a href="https://academic.oup.com/scan/article/16/1-2/72/5919711?login=false" target="_blank">HyPyP analysis pipeline</a> for Hyperscanning studies</p></li></ol> </code></pre
Tiếp tục đọc