Lab Streaming Layer (LSL) สำหรับการซิงโครไนซ์สตรีมข้อมูลหลายแหล่ง
ดร. โรชินี รันเดนิยา และลูคัส ไคลน์
อัปเดตเมื่อ
17 พ.ค. 2567
Lab Streaming Layer (LSL) สำหรับการซิงโครไนซ์สตรีมข้อมูลหลายแหล่ง
ดร. โรชินี รันเดนิยา และลูคัส ไคลน์
อัปเดตเมื่อ
17 พ.ค. 2567
Lab Streaming Layer (LSL) สำหรับการซิงโครไนซ์สตรีมข้อมูลหลายแหล่ง
ดร. โรชินี รันเดนิยา และลูคัส ไคลน์
อัปเดตเมื่อ
17 พ.ค. 2567
ยินดีต้อนรับ! ในบทช่วยสอนนี้ เราจะเรียนรู้วิธีการใช้ Lab Streaming Layer (LSL) ใน Python เพื่อรวบรวมและซิงโครไนซ์ข้อมูล Emotiv EEG จากอุปกรณ์หลายเครื่อง ซึ่งจำเป็นต้องมีความรู้พื้นฐานด้านการเขียนโปรแกรมภาษา Python
สิ่งที่คุณจะได้เรียนรู้
Lab Streaming Layer (LSL) คืออะไร และทำไมผู้วิจัยจึงนิยมใช้งาน
วิธีการรวบรวมข้อมูลที่ซิงโครไนซ์จากอุปกรณ์ Emotiv EEG หลายเครื่อง
วิธีการนำเข้าและตรวจสอบข้อมูลที่รวบรวมได้
1.1 LSL คืออะไร และมีประโยชน์อย่างไร?
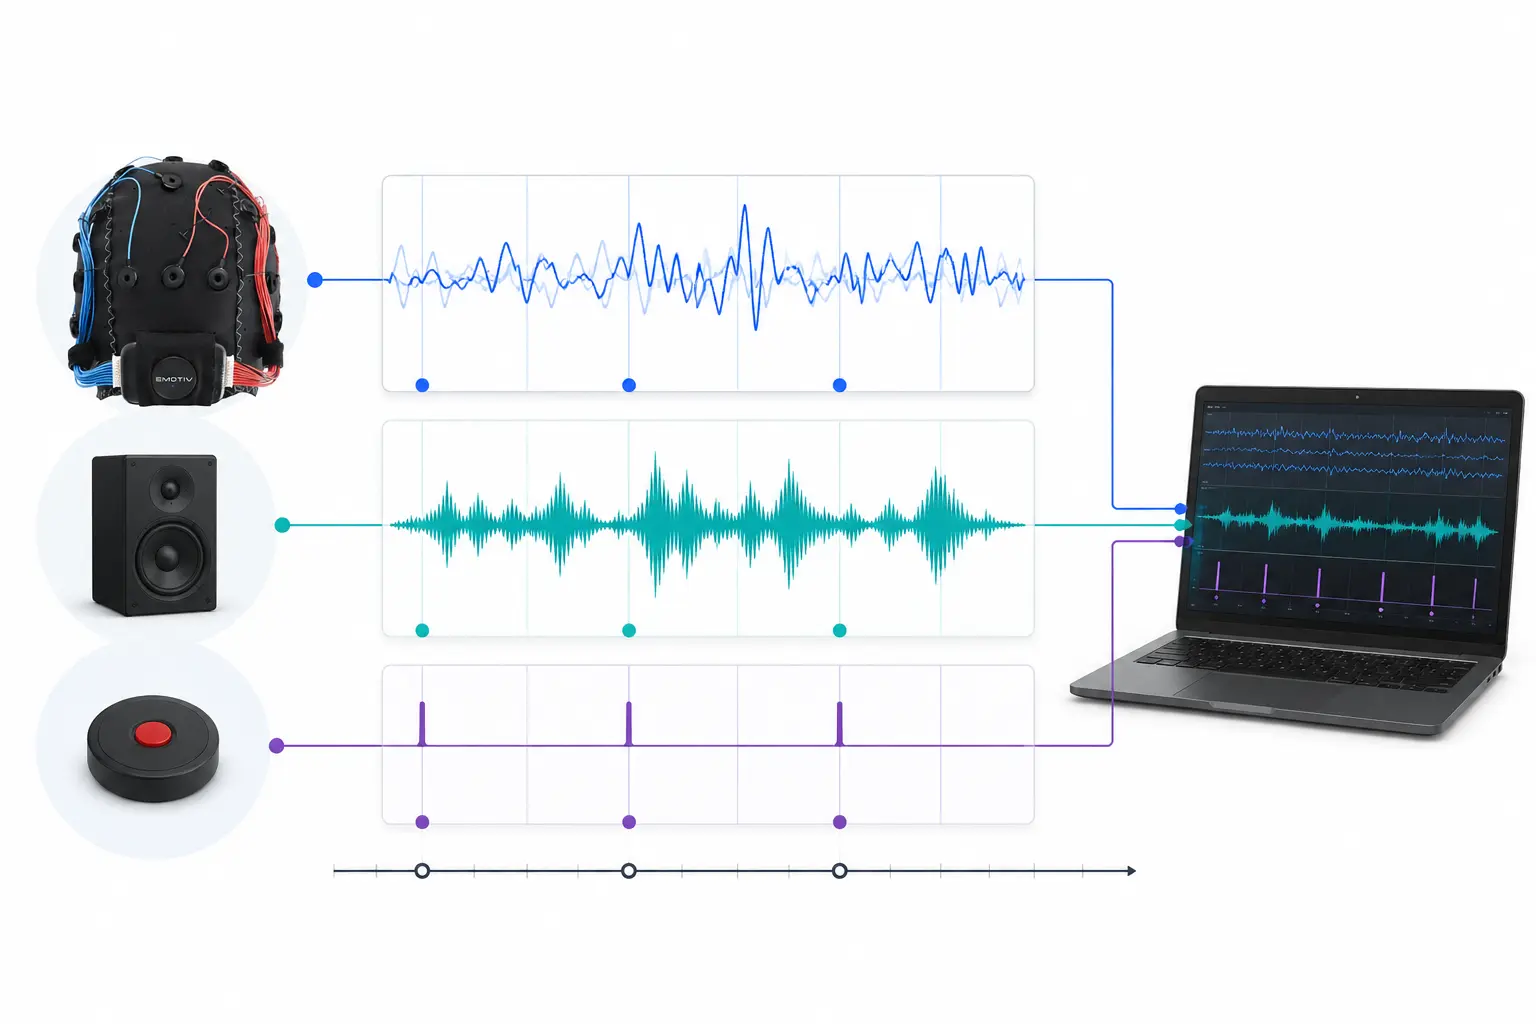
Lab Streaming Layer (LSL) เป็นกล่องเครื่องมือโอเพนซอร์ส (open-source) ที่ใช้สำหรับการส่ง รับ และซิงโครไนซ์กระแสข้อมูลประสาท ทางสรีรวิทยา และพฤติกรรมจากฮาร์ดแวร์เซนเซอร์ที่หลากหลาย ปัจจุบัน ฮาร์ดแวร์วัดสัญญาณสมองและร่างกายที่มีความแม่นยำสูงและพกพาสะดวกยิ่งขึ้น (เช่น ระบบ Emotiv EEG) กำลังนำพาประสาทวิทยาศาสตร์ออกจากห้องปฏิบัติการไปสู่โลกของการรวบรวมข้อมูลแบบเรียลไทม์ ในอดีต การวัดสัญญาณสมองเช่น EEG และ MEG ถูกจำกัดอยู่เฉพาะในห้องปฏิบัติการวิจัย แต่อุปกรณ์พกพาช่วยให้เราสามารถรวบรวมข้อมูลจำนวนมากในสภาพแวดล้อมที่เป็นธรรมชาติมากขึ้น และจากบุคคลหลายคนพร้อมกันได้
ผู้วิจัยอาจสนใจศึกษาความสอดคล้องทางสรีรวิทยา (physiological synchrony) ระหว่างคนสองคนที่กำลังฟังเพลงเดียวกัน LSL สามารถช่วยเราเก็บข้อมูลจากชุดหูฟัง EEG สองชุดแยกกัน ซึ่งข้อมูลจะได้รับการซิงโครไนซ์ให้ตรงกับการนำเสนอของเสียงด้วย
ตัวอย่างการใช้งานอื่นๆ ของ LSL:
การเพิ่มสัญลักษณ์ระบุเหตุการณ์ (event markers) จากการทดลองลงในข้อมูล EEG ที่กำลังบันทึก
การปรับเวลาข้อมูล (Time-align) จากหลายแหล่งให้ตรงกันสำหรับผู้ร่วมการทดลองรายเดียว (เช่น อัตราการเต้นของหัวใจ, EMG, EEG)
การปรับเวลาข้อมูลของผู้ร่วมการทดลองหลายคนให้ตรงกัน (เช่น การศึกษา EEG Hyperscanning)
1.2 LSL ทำงานอย่างไร?
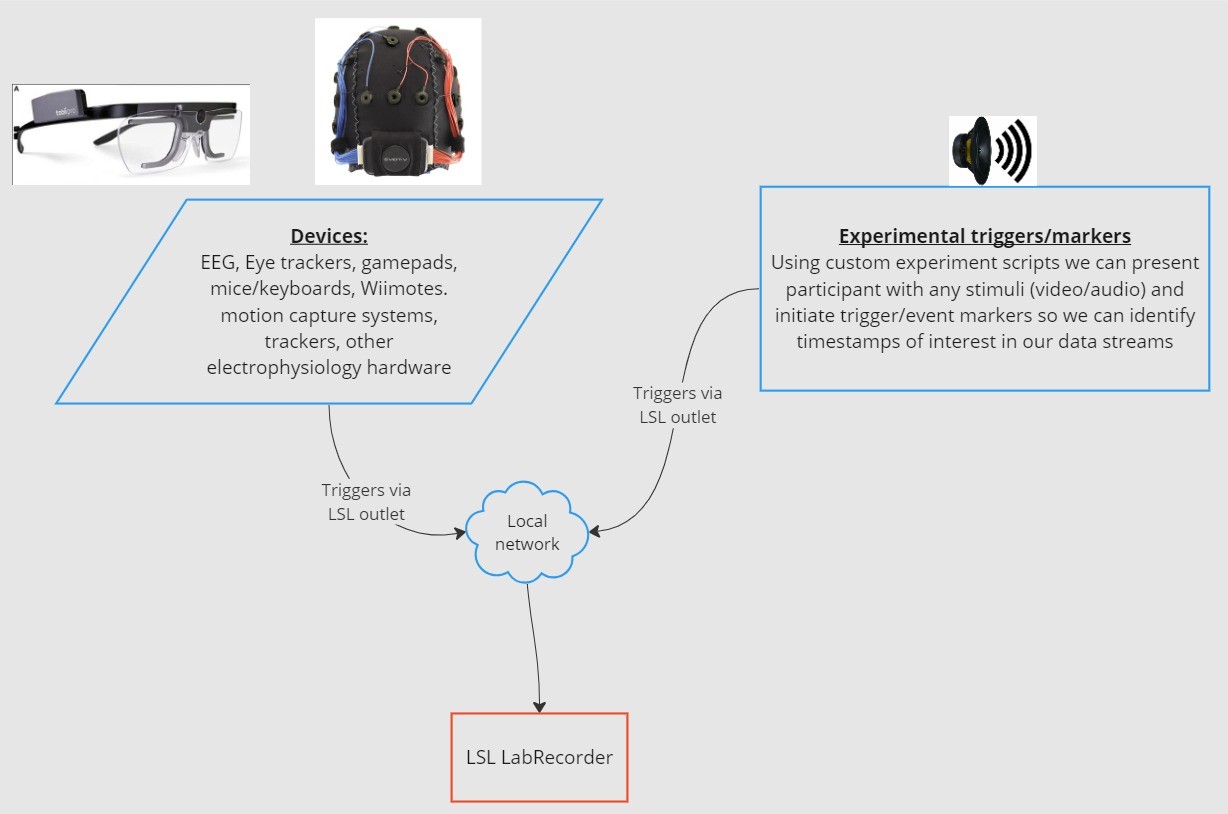
Lab Streaming Layer เป็นโปรโตคอลสำหรับการแลกเปลี่ยนข้อมูลอนุกรมเวลา (time-series) แบบเรียลไทม์ระหว่างอุปกรณ์หลายเครื่อง LSL สามารถใช้งานได้ผ่านห้องสมุดโอเพนซอร์สสำหรับภาษาโปรแกรมต่างๆ เช่น Python, MATLAB, C++, Java และอื่นๆ
ฟังก์ชันการทำงานหลักจะเกี่ยวข้องกับกระแสข้อมูล (data streams) ของ LSL:
1. อุปกรณ์/ซอฟต์แวร์เก็บข้อมูลจะรวบรวมข้อมูลและสร้างกระแสข้อมูล - ข้อมูลทางสรีรวิทยาสามารถสตรีมไปยัง LSL ได้จากอุปกรณ์บันทึกสัญญาณ EEG, เครื่องติดตามดวงตา (eye-trackers), ระบบตรวจจับการเคลื่อนไหว, เครื่องวัดอัตราการเต้นของหัวใจ และอื่นๆ รวมถึงข้อมูลเมตา (อัตราการสุ่มตัวอย่าง, ประเภทข้อมูล, ข้อมูลช่องสัญญาณ ฯลฯ) - สัญลักษณ์ระบุเหตุการณ์จากการทดลอง (เช่น การใช้งานผ่าน PsychoPy) สามารถส่งเป็นกระแสข้อมูลโดยใช้ LSL ได้เช่นกัน
2. กระแสข้อมูลจะถูกเผยแพร่ (published) ไปยังเครือข่าย - นี่คือวิธีการส่งข้อมูลผ่าน LSL โดยกระแสข้อมูลจะถูก "แพร่สัญญาณ (broadcast)" ไปยังเครือข่าย - กระแสข้อมูลที่เผยแพร่นั้นจะพร้อมใช้งานบนเครือข่าย และอุปกรณ์อื่นๆ ที่รองรับ LSL ในเครือข่ายเดียวกันจะสามารถตรวจพบได้ - LSL จะกำหนดเวลาประทับ (timestamp) ให้กับข้อมูลแต่ละกลุ่มหรือแต่ละตัวอย่างตามนาฬิกาส่วนกลาง (ตามโปรโตคอลเวลาเครือข่าย Network Time Protocol) - กระแสข้อมูลจะถูกผลักออกไปทีละตัวอย่าง (หรือทีละกลุ่ม) ผ่านโครงสร้าง "ช่องทางออก (outlet)"
3. อุปกรณ์รวบรวมข้อมูลจะ "สมัครรับ (subscribe)" กระแสข้อมูล - นี่คือวิธีการรับข้อมูลโดยใช้ LSL - อุปกรณ์รวบรวมข้อมูลบนเครือข่ายเดียวกันจะรับกระแสข้อมูลที่เผยแพร่ผ่านช่องทาง "ช่องทางเข้า (inlets)" - ช่องทางเข้าแต่ละช่องจะรับตัวอย่างสตรีมและข้อมูลเมตาจากช่องทางออกเพียงช่องเดียวเท่านั้น
4. บันทึกข้อมูล - เมื่อสมัครรับกระแสข้อมูลแล้ว คุณสามารถบันทึกข้อมูลลงในตัวแปรของภาษาโปรแกรมที่คุณต้องการ หรือใช้ซอฟต์แวร์ LabRecorder ที่ LSL จัดเตรียมไว้เพื่อบันทึกข้อมูลในรูปแบบมาตรฐาน เช่น .xdf
2.0 ภาพรวมของบทช่วยสอน
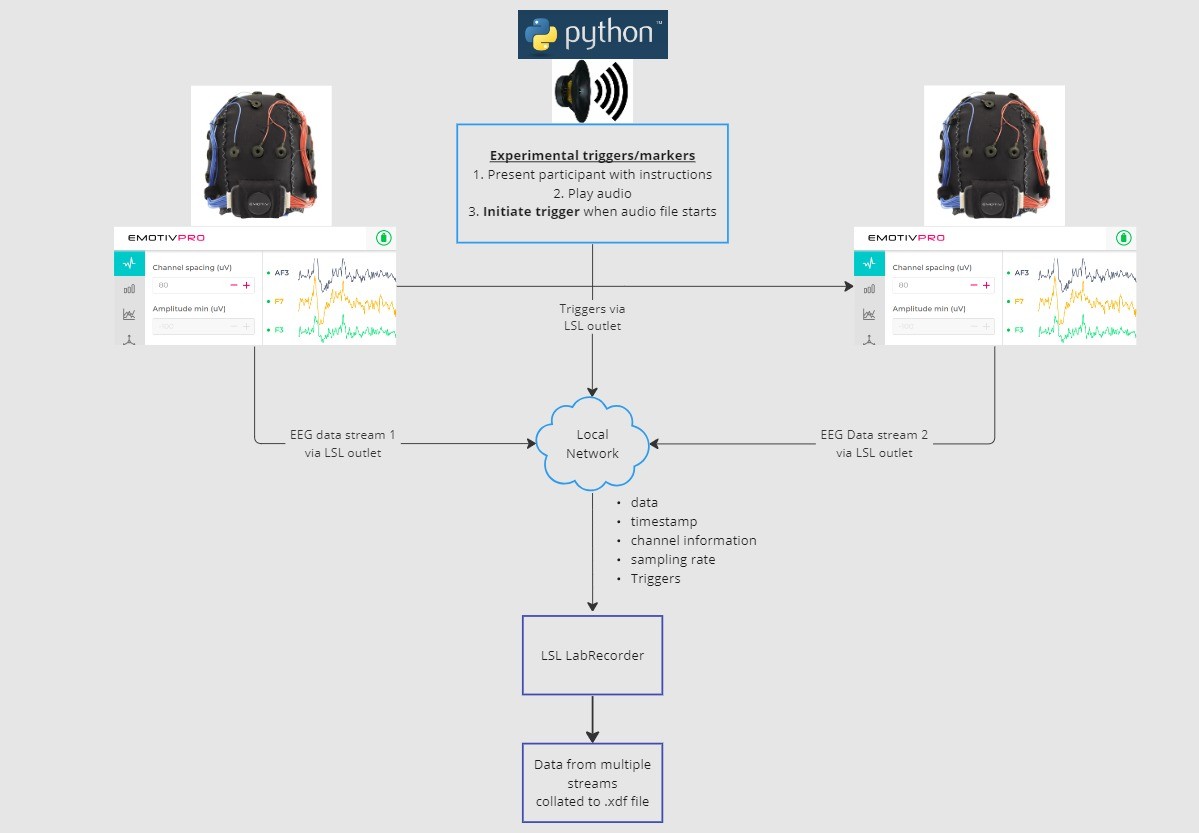
ในบทช่วยสอนนี้ เราจะยกตัวอย่างการตั้งค่าการทดลองและแนะนำขั้นตอนพร้อมโค้ดที่จำเป็นสำหรับการนำไปใช้โดยใช้ LSL ใน Python เราจะใช้ Python ในการเล่นเสียงไปพร้อมๆ กับเก็บข้อมูล EEG จากคนสองคนที่สวมชุดหูฟัง Emotiv เราจะใช้คอมพิวเตอร์สองเครื่องที่รันโปรแกรม EmotivPRO เพื่อรวบรวมข้อมูล EEG และบรอดแคสต์ข้อมูลแต่ละสตรีมผ่าน LSL outlet แยกกัน เราจะใช้ไลบรารี Python เพื่อเล่นไฟล์เสียงและส่งสัญญาณทริกเกอร์ (trigger) พร้อมกันทุกครั้งที่ไฟล์เสียงเริ่มเล่น
ขั้นตอน:
1. ใช้ EmotivPRO สำหรับสตรีมข้อมูลผ่าน LSL outlets ซึ่งรวมถึงข้อมูล EEG (และ/หรือ การเคลื่อนไหว, คุณภาพการเชื่อมต่อ, คุณภาพของสัญญาณ ฯลฯ) 2. เล่นไฟล์เสียงโดยใช้สคริปต์ Python และส่งสัญญาณทริกเกอร์ผ่าน LSL อื่นไปพร้อมๆ กัน ใช้ LabRecorder เพื่อตรวจจับและบันทึกกระแสข้อมูลทั้งสามกระแสผ่าน LSL inlet
2.1 ขั้นตอนที่ 1 - การตั้งค่าและติดตั้ง
คุณจำเป็นต้องมีอุปกรณ์รับข้อมูลที่รองรับเพื่อใช้สำหรับเก็บข้อมูล
• อุปกรณ์วัดสัญญาณสมองของ Emotiv ทั้งหมดเชื่อมต่อกับ LSL ผ่านซอฟต์แวร์ EmotivPROติดตั้ง EmotivPRO บนอุปกรณ์ของคุณ คุณจำเป็นต้องมีใบอนุญาต EmotivPRO ที่ถูกต้องเพื่อใช้ LSL
ติดตั้งไลบรารี Python LSL ด้วยคำสั่งต่อไปนี้:
pip install pylslดาวน์โหลดซอฟต์แวร์ LabRecorder ซึ่งเป็นแอปฟรีที่ไม่ซับซ้อน สามารถใช้งานได้ผ่าน
บรรทัดคำสั่ง (command line) หรือดาวน์โหลดโปรแกรมแบบสแตนด์อโลนสำหรับการทดลองของเรา: ติดตั้งแพ็กเกจที่จำเป็นสำหรับเล่นเสียงโดยใช้ Python
pip install sounddevice soundfile
2.2 ขั้นตอนที่ 3 - การส่งข้อมูลจาก EmotivPRO ผ่านทาง LSL stream
ค้นหาปุ่ม “…” ที่มุมขวาบนของแอปพลิเคชัน แล้วไปที่ Settings (การตั้งค่า)
มองหาหัวข้อ ‘Lab Streaming Layer’ และหัวข้อย่อย ‘Outlet’
เลือกชนิดของข้อมูลทั้งหมดที่คุณต้องการแพร่สัญญาณ (broadcast)
เลือกรูปแบบข้อมูล (float แบบ 32 บิต หรือ double แบบ 64 บิต)
เลือกว่าจะส่งข้อมูลทีละตัวอย่าง (sample-by-sample) หรือส่งแบบเป็นกลุ่มตัวอย่าง (chunks)
คลิก ‘Start’ เพื่อเริ่มต้นแพร่สัญญาณกระแสข้อมูล LSL
2.3 ขั้นตอนที่ 4 - การใช้สคริปต์ Python เพื่อเล่นเสียงและส่งสัญญาณทริกเกอร์
คัดลอกและวางบล็อกโค้ดต่อไปนี้ลงในไฟล์ Python และบันทึกไว้ในคอมพิวเตอร์ของคุณ
ค้นหาไฟล์เสียง (แนะนำเป็นไฟล์คอร์แมต .wav) ที่คุณต้องการใช้เล่น และแก้ไขสคริปต์โดยเปลี่ยน
ตัวแปรaudio_filepathให้เป็นที่อยู่พาธของไฟล์เสียงนั้นในคอมพิวเตอร์ของคุณเปิดหน้าต่าง command prompt เพื่อสั่งการ และไปยังโฟลเดอร์ที่
ไฟล์ Python ของคุณถูกจัดเก็บอยู่พิมพ์คำสั่ง:
python3 filename.py
• วิธีการเรียกใช้อาจแตกต่างกันไปตามการติดตั้ง Python ของคุณ โดยอาจใช้คำสั่งpythonแทนpython3
หมายเหตุ: แทนที่/path/to/audio.wavด้วยพาธจัดเก็บไฟล์เสียงที่คุณต้องการเล่นระหว่างการทดลอง
""" LSL Example: Play audio and send a trigger marker <p>This script creates an LSL marker stream, waits for the user to<br>press ENTER, then plays an audio file and sends a marker that<br>can be synchronized with EEG data collected through LabRecorder.<br>"""</p> <p>import sounddevice as sd<br>import soundfile as sf<br>from pylsl import StreamInfo, StreamOutlet</p> <p>def wait_for_keypress():<br>print("Press ENTER to start audio playback and send an LSL marker.")<br>while True:<br>if input() == "":<br>break</p> <p>def play_audio_and_send_marker(audio_file, outlet):<br>data, fs = sf.read(audio_file)</p> <pre><code>print("Playing audio and sending LSL marker...") marker_val = [1] outlet.push_sample(marker_val) sd.play(data, fs) sd.wait() print("Audio playback finished.") </code></pre> <p>if <strong>name</strong> == "<strong>main</strong>":</p> <pre><code>info = StreamInfo( name="AudioMarkers", type="Markers", channel_count=1, nominal_srate=0, channel_format="int32", source_id="uniqueMarkerID12345" ) outlet = StreamOutlet(info) while True: wait_for_keypress() audio_filepath = "/path/to/audio.wav" play_audio_and_send_marker( audio_filepath, outlet )</code></pre><h2 dir="auto">2.4 STEP 5 - Use LabRecorder to view and save all LSL streams</h2><ol dir="auto"><li data-preset-tag="p"><p>Open LabRecorder</p></li><li data-preset-tag="p"><p>Press <code>Update</code>. The available LSL streams should be visible in the stream list<br>• You should be able to see streams from both EmotivPROs (usually called “Emotiv-<br>DataStream”) and the marker stream (called “AudioMarkers”)</p></li><li data-preset-tag="p"><p>Click <code>Browse</code> to select a location to store data (and set other parameters)</p></li><li data-preset-tag="p"><p>Select all streams and press <code>Record</code> to start recording</p></li></ol><h2 dir="auto">3.0 Working with the data</h2><p dir="auto">LabRecorder outputs an XDF file (Extensible Data Format) that contains data from all the streams. XDF files are structured into, streams, each with a different header that describes what it contains (device name, data type, sampling rate, channels, and more). You can use the below codeblock to open your XDF file and display some basic information.</p><p dir="auto"><strong>Note: Replace </strong><code><strong>/path/to/your/file.xdf</strong></code><strong> with the filepath for your LabRecorder XDF output file.</strong></p><pre data-language="JSX"><code>import pyxdf </code></pre> <p>import mne<br>import matplotlib.pyplot as plt<br>import numpy as np</p> <h1>Give the path to your LSL output file here.</h1> <p>data_path = "/path/to/your/file.xdf"</p> <h1>Load the XDF file.</h1> <p>streams, fileheader = pyxdf.load_xdf(data_path)</p> <p>print("XDF File Header:", fileheader)<br>print("Number of streams found:", len(streams))</p> <p>for i, stream in enumerate(streams):<br>print("\nStream", i + 1)<br>print("Stream Name:", stream["info"]["name"][0])<br>print("Stream Type:", stream["info"]["type"][0])<br>print("Number of Channels:", stream["info"]["channel_count"][0])</p> <pre><code>sfreq = float(stream["info"]["nominal_srate"][0]) print("Sampling Rate:", sfreq) print("Number of Samples:", len(stream["time_series"])) print("First 5 data points:", stream["time_series"][:5]) channel_names = [ chan["label"][0] for chan in stream["info"]["desc"][0]["channels"][0]["channel"] ] print("Channel Names:", channel_names) channel_types = "eeg"</code></pre><h3 dir="auto"><br></h3><h2 dir="auto">4.0 Additional Resources</h2><h4 dir="auto">Official Documentation</h4><ol dir="auto"><li data-preset-tag="p"><p>Check out the <a href="1. Check out the online documentation, including the official README file on GitHub 2. Additional resources: • Code to run LSL using Emotiv’s devices, with example scripts • Useful LSL demo on YouTube • SCCN LSL GitHub repository for all associated libraries • LSL GitHub repository for a collection a submodules and apps 3. HyPyP analysis pipeline for Hyperscanning studies" target="_blank">online documentation</a>, including the <a href="https://github.com/sccn/labstreaminglayer/" target="_blank">official README file on GitHub</a></p></li><li data-preset-tag="p"><p>Additional resources:<br>• <a href="https://github.com/Emotiv/labstreaminglayer" target="_blank">Code</a> to run LSL using Emotiv’s devices, with example scripts<br>• Useful <a href="https://www.youtube.com/watch?v=Y1at7yrcFW0&list=PLVnr33MP5RMRhGwY36zHHDOmAaYTB138D" target="_blank">LSL demo on YouTube</a><br>• <a href="https://github.com/sccn/labstreaminglayer" target="_blank">SCCN LSL GitHub repository</a> for all associated libraries<br>• <a href="https://github.com/labstreaminglayer" target="_blank">LSL GitHub repository</a> for a collection a submodules and apps</p></li><li data-preset-tag="p"><p><a href="https://academic.oup.com/scan/article/16/1-2/72/5919711?login=false" target="_blank">HyPyP analysis pipeline</a> for Hyperscanning studies</p></li></ol> </code></pre
""" LSL Example: Play audio and send a trigger marker <p>This script creates an LSL marker stream, waits for the user to<br>press ENTER, then plays an audio file and sends a marker that<br>can be synchronized with EEG data collected through LabRecorder.<br>"""</p> <p>import sounddevice as sd<br>import soundfile as sf<br>from pylsl import StreamInfo, StreamOutlet</p> <p>def wait_for_keypress():<br>print("Press ENTER to start audio playback and send an LSL marker.")<br>while True:<br>if input() == "":<br>break</p> <p>def play_audio_and_send_marker(audio_file, outlet):<br>data, fs = sf.read(audio_file)</p> <pre><code>print("Playing audio and sending LSL marker...") marker_val = [1] outlet.push_sample(marker_val) sd.play(data, fs) sd.wait() print("Audio playback finished.") </code></pre> <p>if <strong>name</strong> == "<strong>main</strong>":</p> <pre><code>info = StreamInfo( name="AudioMarkers", type="Markers", channel_count=1, nominal_srate=0, channel_format="int32", source_id="uniqueMarkerID12345" ) outlet = StreamOutlet(info) while True: wait_for_keypress() audio_filepath = "/path/to/audio.wav" play_audio_and_send_marker( audio_filepath, outlet )</code></pre><h2 dir="auto">2.4 STEP 5 - Use LabRecorder to view and save all LSL streams</h2><ol dir="auto"><li data-preset-tag="p"><p>Open LabRecorder</p></li><li data-preset-tag="p"><p>Press <code>Update</code>. The available LSL streams should be visible in the stream list<br>• You should be able to see streams from both EmotivPROs (usually called “Emotiv-<br>DataStream”) and the marker stream (called “AudioMarkers”)</p></li><li data-preset-tag="p"><p>Click <code>Browse</code> to select a location to store data (and set other parameters)</p></li><li data-preset-tag="p"><p>Select all streams and press <code>Record</code> to start recording</p></li></ol><h2 dir="auto">3.0 Working with the data</h2><p dir="auto">LabRecorder outputs an XDF file (Extensible Data Format) that contains data from all the streams. XDF files are structured into, streams, each with a different header that describes what it contains (device name, data type, sampling rate, channels, and more). You can use the below codeblock to open your XDF file and display some basic information.</p><p dir="auto"><strong>Note: Replace </strong><code><strong>/path/to/your/file.xdf</strong></code><strong> with the filepath for your LabRecorder XDF output file.</strong></p><pre data-language="JSX"><code>import pyxdf </code></pre> <p>import mne<br>import matplotlib.pyplot as plt<br>import numpy as np</p> <h1>Give the path to your LSL output file here.</h1> <p>data_path = "/path/to/your/file.xdf"</p> <h1>Load the XDF file.</h1> <p>streams, fileheader = pyxdf.load_xdf(data_path)</p> <p>print("XDF File Header:", fileheader)<br>print("Number of streams found:", len(streams))</p> <p>for i, stream in enumerate(streams):<br>print("\nStream", i + 1)<br>print("Stream Name:", stream["info"]["name"][0])<br>print("Stream Type:", stream["info"]["type"][0])<br>print("Number of Channels:", stream["info"]["channel_count"][0])</p> <pre><code>sfreq = float(stream["info"]["nominal_srate"][0]) print("Sampling Rate:", sfreq) print("Number of Samples:", len(stream["time_series"])) print("First 5 data points:", stream["time_series"][:5]) channel_names = [ chan["label"][0] for chan in stream["info"]["desc"][0]["channels"][0]["channel"] ] print("Channel Names:", channel_names) channel_types = "eeg"</code></pre><h3 dir="auto"><br></h3><h2 dir="auto">4.0 Additional Resources</h2><h4 dir="auto">Official Documentation</h4><ol dir="auto"><li data-preset-tag="p"><p>Check out the <a href="1. Check out the online documentation, including the official README file on GitHub 2. Additional resources: • Code to run LSL using Emotiv’s devices, with example scripts • Useful LSL demo on YouTube • SCCN LSL GitHub repository for all associated libraries • LSL GitHub repository for a collection a submodules and apps 3. HyPyP analysis pipeline for Hyperscanning studies" target="_blank">online documentation</a>, including the <a href="https://github.com/sccn/labstreaminglayer/" target="_blank">official README file on GitHub</a></p></li><li data-preset-tag="p"><p>Additional resources:<br>• <a href="https://github.com/Emotiv/labstreaminglayer" target="_blank">Code</a> to run LSL using Emotiv’s devices, with example scripts<br>• Useful <a href="https://www.youtube.com/watch?v=Y1at7yrcFW0&list=PLVnr33MP5RMRhGwY36zHHDOmAaYTB138D" target="_blank">LSL demo on YouTube</a><br>• <a href="https://github.com/sccn/labstreaminglayer" target="_blank">SCCN LSL GitHub repository</a> for all associated libraries<br>• <a href="https://github.com/labstreaminglayer" target="_blank">LSL GitHub repository</a> for a collection a submodules and apps</p></li><li data-preset-tag="p"><p><a href="https://academic.oup.com/scan/article/16/1-2/72/5919711?login=false" target="_blank">HyPyP analysis pipeline</a> for Hyperscanning studies</p></li></ol> </code></pre
""" LSL Example: Play audio and send a trigger marker <p>This script creates an LSL marker stream, waits for the user to<br>press ENTER, then plays an audio file and sends a marker that<br>can be synchronized with EEG data collected through LabRecorder.<br>"""</p> <p>import sounddevice as sd<br>import soundfile as sf<br>from pylsl import StreamInfo, StreamOutlet</p> <p>def wait_for_keypress():<br>print("Press ENTER to start audio playback and send an LSL marker.")<br>while True:<br>if input() == "":<br>break</p> <p>def play_audio_and_send_marker(audio_file, outlet):<br>data, fs = sf.read(audio_file)</p> <pre><code>print("Playing audio and sending LSL marker...") marker_val = [1] outlet.push_sample(marker_val) sd.play(data, fs) sd.wait() print("Audio playback finished.") </code></pre> <p>if <strong>name</strong> == "<strong>main</strong>":</p> <pre><code>info = StreamInfo( name="AudioMarkers", type="Markers", channel_count=1, nominal_srate=0, channel_format="int32", source_id="uniqueMarkerID12345" ) outlet = StreamOutlet(info) while True: wait_for_keypress() audio_filepath = "/path/to/audio.wav" play_audio_and_send_marker( audio_filepath, outlet )</code></pre><h2 dir="auto">2.4 STEP 5 - Use LabRecorder to view and save all LSL streams</h2><ol dir="auto"><li data-preset-tag="p"><p>Open LabRecorder</p></li><li data-preset-tag="p"><p>Press <code>Update</code>. The available LSL streams should be visible in the stream list<br>• You should be able to see streams from both EmotivPROs (usually called “Emotiv-<br>DataStream”) and the marker stream (called “AudioMarkers”)</p></li><li data-preset-tag="p"><p>Click <code>Browse</code> to select a location to store data (and set other parameters)</p></li><li data-preset-tag="p"><p>Select all streams and press <code>Record</code> to start recording</p></li></ol><h2 dir="auto">3.0 Working with the data</h2><p dir="auto">LabRecorder outputs an XDF file (Extensible Data Format) that contains data from all the streams. XDF files are structured into, streams, each with a different header that describes what it contains (device name, data type, sampling rate, channels, and more). You can use the below codeblock to open your XDF file and display some basic information.</p><p dir="auto"><strong>Note: Replace </strong><code><strong>/path/to/your/file.xdf</strong></code><strong> with the filepath for your LabRecorder XDF output file.</strong></p><pre data-language="JSX"><code>import pyxdf </code></pre> <p>import mne<br>import matplotlib.pyplot as plt<br>import numpy as np</p> <h1>Give the path to your LSL output file here.</h1> <p>data_path = "/path/to/your/file.xdf"</p> <h1>Load the XDF file.</h1> <p>streams, fileheader = pyxdf.load_xdf(data_path)</p> <p>print("XDF File Header:", fileheader)<br>print("Number of streams found:", len(streams))</p> <p>for i, stream in enumerate(streams):<br>print("\nStream", i + 1)<br>print("Stream Name:", stream["info"]["name"][0])<br>print("Stream Type:", stream["info"]["type"][0])<br>print("Number of Channels:", stream["info"]["channel_count"][0])</p> <pre><code>sfreq = float(stream["info"]["nominal_srate"][0]) print("Sampling Rate:", sfreq) print("Number of Samples:", len(stream["time_series"])) print("First 5 data points:", stream["time_series"][:5]) channel_names = [ chan["label"][0] for chan in stream["info"]["desc"][0]["channels"][0]["channel"] ] print("Channel Names:", channel_names) channel_types = "eeg"</code></pre><h3 dir="auto"><br></h3><h2 dir="auto">4.0 Additional Resources</h2><h4 dir="auto">Official Documentation</h4><ol dir="auto"><li data-preset-tag="p"><p>Check out the <a href="1. Check out the online documentation, including the official README file on GitHub 2. Additional resources: • Code to run LSL using Emotiv’s devices, with example scripts • Useful LSL demo on YouTube • SCCN LSL GitHub repository for all associated libraries • LSL GitHub repository for a collection a submodules and apps 3. HyPyP analysis pipeline for Hyperscanning studies" target="_blank">online documentation</a>, including the <a href="https://github.com/sccn/labstreaminglayer/" target="_blank">official README file on GitHub</a></p></li><li data-preset-tag="p"><p>Additional resources:<br>• <a href="https://github.com/Emotiv/labstreaminglayer" target="_blank">Code</a> to run LSL using Emotiv’s devices, with example scripts<br>• Useful <a href="https://www.youtube.com/watch?v=Y1at7yrcFW0&list=PLVnr33MP5RMRhGwY36zHHDOmAaYTB138D" target="_blank">LSL demo on YouTube</a><br>• <a href="https://github.com/sccn/labstreaminglayer" target="_blank">SCCN LSL GitHub repository</a> for all associated libraries<br>• <a href="https://github.com/labstreaminglayer" target="_blank">LSL GitHub repository</a> for a collection a submodules and apps</p></li><li data-preset-tag="p"><p><a href="https://academic.oup.com/scan/article/16/1-2/72/5919711?login=false" target="_blank">HyPyP analysis pipeline</a> for Hyperscanning studies</p></li></ol> </code></pre
ยินดีต้อนรับ! ในบทช่วยสอนนี้ เราจะเรียนรู้วิธีการใช้ Lab Streaming Layer (LSL) ใน Python เพื่อรวบรวมและซิงโครไนซ์ข้อมูล Emotiv EEG จากอุปกรณ์หลายเครื่อง ซึ่งจำเป็นต้องมีความรู้พื้นฐานด้านการเขียนโปรแกรมภาษา Python
สิ่งที่คุณจะได้เรียนรู้
Lab Streaming Layer (LSL) คืออะไร และทำไมผู้วิจัยจึงนิยมใช้งาน
วิธีการรวบรวมข้อมูลที่ซิงโครไนซ์จากอุปกรณ์ Emotiv EEG หลายเครื่อง
วิธีการนำเข้าและตรวจสอบข้อมูลที่รวบรวมได้
1.1 LSL คืออะไร และมีประโยชน์อย่างไร?
Lab Streaming Layer (LSL) เป็นกล่องเครื่องมือโอเพนซอร์ส (open-source) ที่ใช้สำหรับการส่ง รับ และซิงโครไนซ์กระแสข้อมูลประสาท ทางสรีรวิทยา และพฤติกรรมจากฮาร์ดแวร์เซนเซอร์ที่หลากหลาย ปัจจุบัน ฮาร์ดแวร์วัดสัญญาณสมองและร่างกายที่มีความแม่นยำสูงและพกพาสะดวกยิ่งขึ้น (เช่น ระบบ Emotiv EEG) กำลังนำพาประสาทวิทยาศาสตร์ออกจากห้องปฏิบัติการไปสู่โลกของการรวบรวมข้อมูลแบบเรียลไทม์ ในอดีต การวัดสัญญาณสมองเช่น EEG และ MEG ถูกจำกัดอยู่เฉพาะในห้องปฏิบัติการวิจัย แต่อุปกรณ์พกพาช่วยให้เราสามารถรวบรวมข้อมูลจำนวนมากในสภาพแวดล้อมที่เป็นธรรมชาติมากขึ้น และจากบุคคลหลายคนพร้อมกันได้
ผู้วิจัยอาจสนใจศึกษาความสอดคล้องทางสรีรวิทยา (physiological synchrony) ระหว่างคนสองคนที่กำลังฟังเพลงเดียวกัน LSL สามารถช่วยเราเก็บข้อมูลจากชุดหูฟัง EEG สองชุดแยกกัน ซึ่งข้อมูลจะได้รับการซิงโครไนซ์ให้ตรงกับการนำเสนอของเสียงด้วย
ตัวอย่างการใช้งานอื่นๆ ของ LSL:
การเพิ่มสัญลักษณ์ระบุเหตุการณ์ (event markers) จากการทดลองลงในข้อมูล EEG ที่กำลังบันทึก
การปรับเวลาข้อมูล (Time-align) จากหลายแหล่งให้ตรงกันสำหรับผู้ร่วมการทดลองรายเดียว (เช่น อัตราการเต้นของหัวใจ, EMG, EEG)
การปรับเวลาข้อมูลของผู้ร่วมการทดลองหลายคนให้ตรงกัน (เช่น การศึกษา EEG Hyperscanning)
1.2 LSL ทำงานอย่างไร?
Lab Streaming Layer เป็นโปรโตคอลสำหรับการแลกเปลี่ยนข้อมูลอนุกรมเวลา (time-series) แบบเรียลไทม์ระหว่างอุปกรณ์หลายเครื่อง LSL สามารถใช้งานได้ผ่านห้องสมุดโอเพนซอร์สสำหรับภาษาโปรแกรมต่างๆ เช่น Python, MATLAB, C++, Java และอื่นๆ
ฟังก์ชันการทำงานหลักจะเกี่ยวข้องกับกระแสข้อมูล (data streams) ของ LSL:
1. อุปกรณ์/ซอฟต์แวร์เก็บข้อมูลจะรวบรวมข้อมูลและสร้างกระแสข้อมูล - ข้อมูลทางสรีรวิทยาสามารถสตรีมไปยัง LSL ได้จากอุปกรณ์บันทึกสัญญาณ EEG, เครื่องติดตามดวงตา (eye-trackers), ระบบตรวจจับการเคลื่อนไหว, เครื่องวัดอัตราการเต้นของหัวใจ และอื่นๆ รวมถึงข้อมูลเมตา (อัตราการสุ่มตัวอย่าง, ประเภทข้อมูล, ข้อมูลช่องสัญญาณ ฯลฯ) - สัญลักษณ์ระบุเหตุการณ์จากการทดลอง (เช่น การใช้งานผ่าน PsychoPy) สามารถส่งเป็นกระแสข้อมูลโดยใช้ LSL ได้เช่นกัน
2. กระแสข้อมูลจะถูกเผยแพร่ (published) ไปยังเครือข่าย - นี่คือวิธีการส่งข้อมูลผ่าน LSL โดยกระแสข้อมูลจะถูก "แพร่สัญญาณ (broadcast)" ไปยังเครือข่าย - กระแสข้อมูลที่เผยแพร่นั้นจะพร้อมใช้งานบนเครือข่าย และอุปกรณ์อื่นๆ ที่รองรับ LSL ในเครือข่ายเดียวกันจะสามารถตรวจพบได้ - LSL จะกำหนดเวลาประทับ (timestamp) ให้กับข้อมูลแต่ละกลุ่มหรือแต่ละตัวอย่างตามนาฬิกาส่วนกลาง (ตามโปรโตคอลเวลาเครือข่าย Network Time Protocol) - กระแสข้อมูลจะถูกผลักออกไปทีละตัวอย่าง (หรือทีละกลุ่ม) ผ่านโครงสร้าง "ช่องทางออก (outlet)"
3. อุปกรณ์รวบรวมข้อมูลจะ "สมัครรับ (subscribe)" กระแสข้อมูล - นี่คือวิธีการรับข้อมูลโดยใช้ LSL - อุปกรณ์รวบรวมข้อมูลบนเครือข่ายเดียวกันจะรับกระแสข้อมูลที่เผยแพร่ผ่านช่องทาง "ช่องทางเข้า (inlets)" - ช่องทางเข้าแต่ละช่องจะรับตัวอย่างสตรีมและข้อมูลเมตาจากช่องทางออกเพียงช่องเดียวเท่านั้น
4. บันทึกข้อมูล - เมื่อสมัครรับกระแสข้อมูลแล้ว คุณสามารถบันทึกข้อมูลลงในตัวแปรของภาษาโปรแกรมที่คุณต้องการ หรือใช้ซอฟต์แวร์ LabRecorder ที่ LSL จัดเตรียมไว้เพื่อบันทึกข้อมูลในรูปแบบมาตรฐาน เช่น .xdf
2.0 ภาพรวมของบทช่วยสอน
ในบทช่วยสอนนี้ เราจะยกตัวอย่างการตั้งค่าการทดลองและแนะนำขั้นตอนพร้อมโค้ดที่จำเป็นสำหรับการนำไปใช้โดยใช้ LSL ใน Python เราจะใช้ Python ในการเล่นเสียงไปพร้อมๆ กับเก็บข้อมูล EEG จากคนสองคนที่สวมชุดหูฟัง Emotiv เราจะใช้คอมพิวเตอร์สองเครื่องที่รันโปรแกรม EmotivPRO เพื่อรวบรวมข้อมูล EEG และบรอดแคสต์ข้อมูลแต่ละสตรีมผ่าน LSL outlet แยกกัน เราจะใช้ไลบรารี Python เพื่อเล่นไฟล์เสียงและส่งสัญญาณทริกเกอร์ (trigger) พร้อมกันทุกครั้งที่ไฟล์เสียงเริ่มเล่น
ขั้นตอน:
1. ใช้ EmotivPRO สำหรับสตรีมข้อมูลผ่าน LSL outlets ซึ่งรวมถึงข้อมูล EEG (และ/หรือ การเคลื่อนไหว, คุณภาพการเชื่อมต่อ, คุณภาพของสัญญาณ ฯลฯ) 2. เล่นไฟล์เสียงโดยใช้สคริปต์ Python และส่งสัญญาณทริกเกอร์ผ่าน LSL อื่นไปพร้อมๆ กัน ใช้ LabRecorder เพื่อตรวจจับและบันทึกกระแสข้อมูลทั้งสามกระแสผ่าน LSL inlet
2.1 ขั้นตอนที่ 1 - การตั้งค่าและติดตั้ง
คุณจำเป็นต้องมีอุปกรณ์รับข้อมูลที่รองรับเพื่อใช้สำหรับเก็บข้อมูล
• อุปกรณ์วัดสัญญาณสมองของ Emotiv ทั้งหมดเชื่อมต่อกับ LSL ผ่านซอฟต์แวร์ EmotivPROติดตั้ง EmotivPRO บนอุปกรณ์ของคุณ คุณจำเป็นต้องมีใบอนุญาต EmotivPRO ที่ถูกต้องเพื่อใช้ LSL
ติดตั้งไลบรารี Python LSL ด้วยคำสั่งต่อไปนี้:
pip install pylslดาวน์โหลดซอฟต์แวร์ LabRecorder ซึ่งเป็นแอปฟรีที่ไม่ซับซ้อน สามารถใช้งานได้ผ่าน
บรรทัดคำสั่ง (command line) หรือดาวน์โหลดโปรแกรมแบบสแตนด์อโลนสำหรับการทดลองของเรา: ติดตั้งแพ็กเกจที่จำเป็นสำหรับเล่นเสียงโดยใช้ Python
pip install sounddevice soundfile
2.2 ขั้นตอนที่ 3 - การส่งข้อมูลจาก EmotivPRO ผ่านทาง LSL stream
ค้นหาปุ่ม “…” ที่มุมขวาบนของแอปพลิเคชัน แล้วไปที่ Settings (การตั้งค่า)
มองหาหัวข้อ ‘Lab Streaming Layer’ และหัวข้อย่อย ‘Outlet’
เลือกชนิดของข้อมูลทั้งหมดที่คุณต้องการแพร่สัญญาณ (broadcast)
เลือกรูปแบบข้อมูล (float แบบ 32 บิต หรือ double แบบ 64 บิต)
เลือกว่าจะส่งข้อมูลทีละตัวอย่าง (sample-by-sample) หรือส่งแบบเป็นกลุ่มตัวอย่าง (chunks)
คลิก ‘Start’ เพื่อเริ่มต้นแพร่สัญญาณกระแสข้อมูล LSL
2.3 ขั้นตอนที่ 4 - การใช้สคริปต์ Python เพื่อเล่นเสียงและส่งสัญญาณทริกเกอร์
คัดลอกและวางบล็อกโค้ดต่อไปนี้ลงในไฟล์ Python และบันทึกไว้ในคอมพิวเตอร์ของคุณ
ค้นหาไฟล์เสียง (แนะนำเป็นไฟล์คอร์แมต .wav) ที่คุณต้องการใช้เล่น และแก้ไขสคริปต์โดยเปลี่ยน
ตัวแปรaudio_filepathให้เป็นที่อยู่พาธของไฟล์เสียงนั้นในคอมพิวเตอร์ของคุณเปิดหน้าต่าง command prompt เพื่อสั่งการ และไปยังโฟลเดอร์ที่
ไฟล์ Python ของคุณถูกจัดเก็บอยู่พิมพ์คำสั่ง:
python3 filename.py
• วิธีการเรียกใช้อาจแตกต่างกันไปตามการติดตั้ง Python ของคุณ โดยอาจใช้คำสั่งpythonแทนpython3
หมายเหตุ: แทนที่/path/to/audio.wavด้วยพาธจัดเก็บไฟล์เสียงที่คุณต้องการเล่นระหว่างการทดลอง
""" LSL Example: Play audio and send a trigger marker <p>This script creates an LSL marker stream, waits for the user to<br>press ENTER, then plays an audio file and sends a marker that<br>can be synchronized with EEG data collected through LabRecorder.<br>"""</p> <p>import sounddevice as sd<br>import soundfile as sf<br>from pylsl import StreamInfo, StreamOutlet</p> <p>def wait_for_keypress():<br>print("Press ENTER to start audio playback and send an LSL marker.")<br>while True:<br>if input() == "":<br>break</p> <p>def play_audio_and_send_marker(audio_file, outlet):<br>data, fs = sf.read(audio_file)</p> <pre><code>print("Playing audio and sending LSL marker...") marker_val = [1] outlet.push_sample(marker_val) sd.play(data, fs) sd.wait() print("Audio playback finished.") </code></pre> <p>if <strong>name</strong> == "<strong>main</strong>":</p> <pre><code>info = StreamInfo( name="AudioMarkers", type="Markers", channel_count=1, nominal_srate=0, channel_format="int32", source_id="uniqueMarkerID12345" ) outlet = StreamOutlet(info) while True: wait_for_keypress() audio_filepath = "/path/to/audio.wav" play_audio_and_send_marker( audio_filepath, outlet )</code></pre><h2 dir="auto">2.4 STEP 5 - Use LabRecorder to view and save all LSL streams</h2><ol dir="auto"><li data-preset-tag="p"><p>Open LabRecorder</p></li><li data-preset-tag="p"><p>Press <code>Update</code>. The available LSL streams should be visible in the stream list<br>• You should be able to see streams from both EmotivPROs (usually called “Emotiv-<br>DataStream”) and the marker stream (called “AudioMarkers”)</p></li><li data-preset-tag="p"><p>Click <code>Browse</code> to select a location to store data (and set other parameters)</p></li><li data-preset-tag="p"><p>Select all streams and press <code>Record</code> to start recording</p></li></ol><h2 dir="auto">3.0 Working with the data</h2><p dir="auto">LabRecorder outputs an XDF file (Extensible Data Format) that contains data from all the streams. XDF files are structured into, streams, each with a different header that describes what it contains (device name, data type, sampling rate, channels, and more). You can use the below codeblock to open your XDF file and display some basic information.</p><p dir="auto"><strong>Note: Replace </strong><code><strong>/path/to/your/file.xdf</strong></code><strong> with the filepath for your LabRecorder XDF output file.</strong></p><pre data-language="JSX"><code>import pyxdf </code></pre> <p>import mne<br>import matplotlib.pyplot as plt<br>import numpy as np</p> <h1>Give the path to your LSL output file here.</h1> <p>data_path = "/path/to/your/file.xdf"</p> <h1>Load the XDF file.</h1> <p>streams, fileheader = pyxdf.load_xdf(data_path)</p> <p>print("XDF File Header:", fileheader)<br>print("Number of streams found:", len(streams))</p> <p>for i, stream in enumerate(streams):<br>print("\nStream", i + 1)<br>print("Stream Name:", stream["info"]["name"][0])<br>print("Stream Type:", stream["info"]["type"][0])<br>print("Number of Channels:", stream["info"]["channel_count"][0])</p> <pre><code>sfreq = float(stream["info"]["nominal_srate"][0]) print("Sampling Rate:", sfreq) print("Number of Samples:", len(stream["time_series"])) print("First 5 data points:", stream["time_series"][:5]) channel_names = [ chan["label"][0] for chan in stream["info"]["desc"][0]["channels"][0]["channel"] ] print("Channel Names:", channel_names) channel_types = "eeg"</code></pre><h3 dir="auto"><br></h3><h2 dir="auto">4.0 Additional Resources</h2><h4 dir="auto">Official Documentation</h4><ol dir="auto"><li data-preset-tag="p"><p>Check out the <a href="1. Check out the online documentation, including the official README file on GitHub 2. Additional resources: • Code to run LSL using Emotiv’s devices, with example scripts • Useful LSL demo on YouTube • SCCN LSL GitHub repository for all associated libraries • LSL GitHub repository for a collection a submodules and apps 3. HyPyP analysis pipeline for Hyperscanning studies" target="_blank">online documentation</a>, including the <a href="https://github.com/sccn/labstreaminglayer/" target="_blank">official README file on GitHub</a></p></li><li data-preset-tag="p"><p>Additional resources:<br>• <a href="https://github.com/Emotiv/labstreaminglayer" target="_blank">Code</a> to run LSL using Emotiv’s devices, with example scripts<br>• Useful <a href="https://www.youtube.com/watch?v=Y1at7yrcFW0&list=PLVnr33MP5RMRhGwY36zHHDOmAaYTB138D" target="_blank">LSL demo on YouTube</a><br>• <a href="https://github.com/sccn/labstreaminglayer" target="_blank">SCCN LSL GitHub repository</a> for all associated libraries<br>• <a href="https://github.com/labstreaminglayer" target="_blank">LSL GitHub repository</a> for a collection a submodules and apps</p></li><li data-preset-tag="p"><p><a href="https://academic.oup.com/scan/article/16/1-2/72/5919711?login=false" target="_blank">HyPyP analysis pipeline</a> for Hyperscanning studies</p></li></ol> </code></pre
ยินดีต้อนรับ! ในบทช่วยสอนนี้ เราจะเรียนรู้วิธีการใช้ Lab Streaming Layer (LSL) ใน Python เพื่อรวบรวมและซิงโครไนซ์ข้อมูล Emotiv EEG จากอุปกรณ์หลายเครื่อง ซึ่งจำเป็นต้องมีความรู้พื้นฐานด้านการเขียนโปรแกรมภาษา Python
สิ่งที่คุณจะได้เรียนรู้
Lab Streaming Layer (LSL) คืออะไร และทำไมผู้วิจัยจึงนิยมใช้งาน
วิธีการรวบรวมข้อมูลที่ซิงโครไนซ์จากอุปกรณ์ Emotiv EEG หลายเครื่อง
วิธีการนำเข้าและตรวจสอบข้อมูลที่รวบรวมได้
1.1 LSL คืออะไร และมีประโยชน์อย่างไร?
Lab Streaming Layer (LSL) เป็นกล่องเครื่องมือโอเพนซอร์ส (open-source) ที่ใช้สำหรับการส่ง รับ และซิงโครไนซ์กระแสข้อมูลประสาท ทางสรีรวิทยา และพฤติกรรมจากฮาร์ดแวร์เซนเซอร์ที่หลากหลาย ปัจจุบัน ฮาร์ดแวร์วัดสัญญาณสมองและร่างกายที่มีความแม่นยำสูงและพกพาสะดวกยิ่งขึ้น (เช่น ระบบ Emotiv EEG) กำลังนำพาประสาทวิทยาศาสตร์ออกจากห้องปฏิบัติการไปสู่โลกของการรวบรวมข้อมูลแบบเรียลไทม์ ในอดีต การวัดสัญญาณสมองเช่น EEG และ MEG ถูกจำกัดอยู่เฉพาะในห้องปฏิบัติการวิจัย แต่อุปกรณ์พกพาช่วยให้เราสามารถรวบรวมข้อมูลจำนวนมากในสภาพแวดล้อมที่เป็นธรรมชาติมากขึ้น และจากบุคคลหลายคนพร้อมกันได้
ผู้วิจัยอาจสนใจศึกษาความสอดคล้องทางสรีรวิทยา (physiological synchrony) ระหว่างคนสองคนที่กำลังฟังเพลงเดียวกัน LSL สามารถช่วยเราเก็บข้อมูลจากชุดหูฟัง EEG สองชุดแยกกัน ซึ่งข้อมูลจะได้รับการซิงโครไนซ์ให้ตรงกับการนำเสนอของเสียงด้วย
ตัวอย่างการใช้งานอื่นๆ ของ LSL:
การเพิ่มสัญลักษณ์ระบุเหตุการณ์ (event markers) จากการทดลองลงในข้อมูล EEG ที่กำลังบันทึก
การปรับเวลาข้อมูล (Time-align) จากหลายแหล่งให้ตรงกันสำหรับผู้ร่วมการทดลองรายเดียว (เช่น อัตราการเต้นของหัวใจ, EMG, EEG)
การปรับเวลาข้อมูลของผู้ร่วมการทดลองหลายคนให้ตรงกัน (เช่น การศึกษา EEG Hyperscanning)
1.2 LSL ทำงานอย่างไร?
Lab Streaming Layer เป็นโปรโตคอลสำหรับการแลกเปลี่ยนข้อมูลอนุกรมเวลา (time-series) แบบเรียลไทม์ระหว่างอุปกรณ์หลายเครื่อง LSL สามารถใช้งานได้ผ่านห้องสมุดโอเพนซอร์สสำหรับภาษาโปรแกรมต่างๆ เช่น Python, MATLAB, C++, Java และอื่นๆ
ฟังก์ชันการทำงานหลักจะเกี่ยวข้องกับกระแสข้อมูล (data streams) ของ LSL:
1. อุปกรณ์/ซอฟต์แวร์เก็บข้อมูลจะรวบรวมข้อมูลและสร้างกระแสข้อมูล - ข้อมูลทางสรีรวิทยาสามารถสตรีมไปยัง LSL ได้จากอุปกรณ์บันทึกสัญญาณ EEG, เครื่องติดตามดวงตา (eye-trackers), ระบบตรวจจับการเคลื่อนไหว, เครื่องวัดอัตราการเต้นของหัวใจ และอื่นๆ รวมถึงข้อมูลเมตา (อัตราการสุ่มตัวอย่าง, ประเภทข้อมูล, ข้อมูลช่องสัญญาณ ฯลฯ) - สัญลักษณ์ระบุเหตุการณ์จากการทดลอง (เช่น การใช้งานผ่าน PsychoPy) สามารถส่งเป็นกระแสข้อมูลโดยใช้ LSL ได้เช่นกัน
2. กระแสข้อมูลจะถูกเผยแพร่ (published) ไปยังเครือข่าย - นี่คือวิธีการส่งข้อมูลผ่าน LSL โดยกระแสข้อมูลจะถูก "แพร่สัญญาณ (broadcast)" ไปยังเครือข่าย - กระแสข้อมูลที่เผยแพร่นั้นจะพร้อมใช้งานบนเครือข่าย และอุปกรณ์อื่นๆ ที่รองรับ LSL ในเครือข่ายเดียวกันจะสามารถตรวจพบได้ - LSL จะกำหนดเวลาประทับ (timestamp) ให้กับข้อมูลแต่ละกลุ่มหรือแต่ละตัวอย่างตามนาฬิกาส่วนกลาง (ตามโปรโตคอลเวลาเครือข่าย Network Time Protocol) - กระแสข้อมูลจะถูกผลักออกไปทีละตัวอย่าง (หรือทีละกลุ่ม) ผ่านโครงสร้าง "ช่องทางออก (outlet)"
3. อุปกรณ์รวบรวมข้อมูลจะ "สมัครรับ (subscribe)" กระแสข้อมูล - นี่คือวิธีการรับข้อมูลโดยใช้ LSL - อุปกรณ์รวบรวมข้อมูลบนเครือข่ายเดียวกันจะรับกระแสข้อมูลที่เผยแพร่ผ่านช่องทาง "ช่องทางเข้า (inlets)" - ช่องทางเข้าแต่ละช่องจะรับตัวอย่างสตรีมและข้อมูลเมตาจากช่องทางออกเพียงช่องเดียวเท่านั้น
4. บันทึกข้อมูล - เมื่อสมัครรับกระแสข้อมูลแล้ว คุณสามารถบันทึกข้อมูลลงในตัวแปรของภาษาโปรแกรมที่คุณต้องการ หรือใช้ซอฟต์แวร์ LabRecorder ที่ LSL จัดเตรียมไว้เพื่อบันทึกข้อมูลในรูปแบบมาตรฐาน เช่น .xdf
2.0 ภาพรวมของบทช่วยสอน
ในบทช่วยสอนนี้ เราจะยกตัวอย่างการตั้งค่าการทดลองและแนะนำขั้นตอนพร้อมโค้ดที่จำเป็นสำหรับการนำไปใช้โดยใช้ LSL ใน Python เราจะใช้ Python ในการเล่นเสียงไปพร้อมๆ กับเก็บข้อมูล EEG จากคนสองคนที่สวมชุดหูฟัง Emotiv เราจะใช้คอมพิวเตอร์สองเครื่องที่รันโปรแกรม EmotivPRO เพื่อรวบรวมข้อมูล EEG และบรอดแคสต์ข้อมูลแต่ละสตรีมผ่าน LSL outlet แยกกัน เราจะใช้ไลบรารี Python เพื่อเล่นไฟล์เสียงและส่งสัญญาณทริกเกอร์ (trigger) พร้อมกันทุกครั้งที่ไฟล์เสียงเริ่มเล่น
ขั้นตอน:
1. ใช้ EmotivPRO สำหรับสตรีมข้อมูลผ่าน LSL outlets ซึ่งรวมถึงข้อมูล EEG (และ/หรือ การเคลื่อนไหว, คุณภาพการเชื่อมต่อ, คุณภาพของสัญญาณ ฯลฯ) 2. เล่นไฟล์เสียงโดยใช้สคริปต์ Python และส่งสัญญาณทริกเกอร์ผ่าน LSL อื่นไปพร้อมๆ กัน ใช้ LabRecorder เพื่อตรวจจับและบันทึกกระแสข้อมูลทั้งสามกระแสผ่าน LSL inlet
2.1 ขั้นตอนที่ 1 - การตั้งค่าและติดตั้ง
คุณจำเป็นต้องมีอุปกรณ์รับข้อมูลที่รองรับเพื่อใช้สำหรับเก็บข้อมูล
• อุปกรณ์วัดสัญญาณสมองของ Emotiv ทั้งหมดเชื่อมต่อกับ LSL ผ่านซอฟต์แวร์ EmotivPROติดตั้ง EmotivPRO บนอุปกรณ์ของคุณ คุณจำเป็นต้องมีใบอนุญาต EmotivPRO ที่ถูกต้องเพื่อใช้ LSL
ติดตั้งไลบรารี Python LSL ด้วยคำสั่งต่อไปนี้:
pip install pylslดาวน์โหลดซอฟต์แวร์ LabRecorder ซึ่งเป็นแอปฟรีที่ไม่ซับซ้อน สามารถใช้งานได้ผ่าน
บรรทัดคำสั่ง (command line) หรือดาวน์โหลดโปรแกรมแบบสแตนด์อโลนสำหรับการทดลองของเรา: ติดตั้งแพ็กเกจที่จำเป็นสำหรับเล่นเสียงโดยใช้ Python
pip install sounddevice soundfile
2.2 ขั้นตอนที่ 3 - การส่งข้อมูลจาก EmotivPRO ผ่านทาง LSL stream
ค้นหาปุ่ม “…” ที่มุมขวาบนของแอปพลิเคชัน แล้วไปที่ Settings (การตั้งค่า)
มองหาหัวข้อ ‘Lab Streaming Layer’ และหัวข้อย่อย ‘Outlet’
เลือกชนิดของข้อมูลทั้งหมดที่คุณต้องการแพร่สัญญาณ (broadcast)
เลือกรูปแบบข้อมูล (float แบบ 32 บิต หรือ double แบบ 64 บิต)
เลือกว่าจะส่งข้อมูลทีละตัวอย่าง (sample-by-sample) หรือส่งแบบเป็นกลุ่มตัวอย่าง (chunks)
คลิก ‘Start’ เพื่อเริ่มต้นแพร่สัญญาณกระแสข้อมูล LSL
2.3 ขั้นตอนที่ 4 - การใช้สคริปต์ Python เพื่อเล่นเสียงและส่งสัญญาณทริกเกอร์
คัดลอกและวางบล็อกโค้ดต่อไปนี้ลงในไฟล์ Python และบันทึกไว้ในคอมพิวเตอร์ของคุณ
ค้นหาไฟล์เสียง (แนะนำเป็นไฟล์คอร์แมต .wav) ที่คุณต้องการใช้เล่น และแก้ไขสคริปต์โดยเปลี่ยน
ตัวแปรaudio_filepathให้เป็นที่อยู่พาธของไฟล์เสียงนั้นในคอมพิวเตอร์ของคุณเปิดหน้าต่าง command prompt เพื่อสั่งการ และไปยังโฟลเดอร์ที่
ไฟล์ Python ของคุณถูกจัดเก็บอยู่พิมพ์คำสั่ง:
python3 filename.py
• วิธีการเรียกใช้อาจแตกต่างกันไปตามการติดตั้ง Python ของคุณ โดยอาจใช้คำสั่งpythonแทนpython3
หมายเหตุ: แทนที่/path/to/audio.wavด้วยพาธจัดเก็บไฟล์เสียงที่คุณต้องการเล่นระหว่างการทดลอง
""" LSL Example: Play audio and send a trigger marker <p>This script creates an LSL marker stream, waits for the user to<br>press ENTER, then plays an audio file and sends a marker that<br>can be synchronized with EEG data collected through LabRecorder.<br>"""</p> <p>import sounddevice as sd<br>import soundfile as sf<br>from pylsl import StreamInfo, StreamOutlet</p> <p>def wait_for_keypress():<br>print("Press ENTER to start audio playback and send an LSL marker.")<br>while True:<br>if input() == "":<br>break</p> <p>def play_audio_and_send_marker(audio_file, outlet):<br>data, fs = sf.read(audio_file)</p> <pre><code>print("Playing audio and sending LSL marker...") marker_val = [1] outlet.push_sample(marker_val) sd.play(data, fs) sd.wait() print("Audio playback finished.") </code></pre> <p>if <strong>name</strong> == "<strong>main</strong>":</p> <pre><code>info = StreamInfo( name="AudioMarkers", type="Markers", channel_count=1, nominal_srate=0, channel_format="int32", source_id="uniqueMarkerID12345" ) outlet = StreamOutlet(info) while True: wait_for_keypress() audio_filepath = "/path/to/audio.wav" play_audio_and_send_marker( audio_filepath, outlet )</code></pre><h2 dir="auto">2.4 STEP 5 - Use LabRecorder to view and save all LSL streams</h2><ol dir="auto"><li data-preset-tag="p"><p>Open LabRecorder</p></li><li data-preset-tag="p"><p>Press <code>Update</code>. The available LSL streams should be visible in the stream list<br>• You should be able to see streams from both EmotivPROs (usually called “Emotiv-<br>DataStream”) and the marker stream (called “AudioMarkers”)</p></li><li data-preset-tag="p"><p>Click <code>Browse</code> to select a location to store data (and set other parameters)</p></li><li data-preset-tag="p"><p>Select all streams and press <code>Record</code> to start recording</p></li></ol><h2 dir="auto">3.0 Working with the data</h2><p dir="auto">LabRecorder outputs an XDF file (Extensible Data Format) that contains data from all the streams. XDF files are structured into, streams, each with a different header that describes what it contains (device name, data type, sampling rate, channels, and more). You can use the below codeblock to open your XDF file and display some basic information.</p><p dir="auto"><strong>Note: Replace </strong><code><strong>/path/to/your/file.xdf</strong></code><strong> with the filepath for your LabRecorder XDF output file.</strong></p><pre data-language="JSX"><code>import pyxdf </code></pre> <p>import mne<br>import matplotlib.pyplot as plt<br>import numpy as np</p> <h1>Give the path to your LSL output file here.</h1> <p>data_path = "/path/to/your/file.xdf"</p> <h1>Load the XDF file.</h1> <p>streams, fileheader = pyxdf.load_xdf(data_path)</p> <p>print("XDF File Header:", fileheader)<br>print("Number of streams found:", len(streams))</p> <p>for i, stream in enumerate(streams):<br>print("\nStream", i + 1)<br>print("Stream Name:", stream["info"]["name"][0])<br>print("Stream Type:", stream["info"]["type"][0])<br>print("Number of Channels:", stream["info"]["channel_count"][0])</p> <pre><code>sfreq = float(stream["info"]["nominal_srate"][0]) print("Sampling Rate:", sfreq) print("Number of Samples:", len(stream["time_series"])) print("First 5 data points:", stream["time_series"][:5]) channel_names = [ chan["label"][0] for chan in stream["info"]["desc"][0]["channels"][0]["channel"] ] print("Channel Names:", channel_names) channel_types = "eeg"</code></pre><h3 dir="auto"><br></h3><h2 dir="auto">4.0 Additional Resources</h2><h4 dir="auto">Official Documentation</h4><ol dir="auto"><li data-preset-tag="p"><p>Check out the <a href="1. Check out the online documentation, including the official README file on GitHub 2. Additional resources: • Code to run LSL using Emotiv’s devices, with example scripts • Useful LSL demo on YouTube • SCCN LSL GitHub repository for all associated libraries • LSL GitHub repository for a collection a submodules and apps 3. HyPyP analysis pipeline for Hyperscanning studies" target="_blank">online documentation</a>, including the <a href="https://github.com/sccn/labstreaminglayer/" target="_blank">official README file on GitHub</a></p></li><li data-preset-tag="p"><p>Additional resources:<br>• <a href="https://github.com/Emotiv/labstreaminglayer" target="_blank">Code</a> to run LSL using Emotiv’s devices, with example scripts<br>• Useful <a href="https://www.youtube.com/watch?v=Y1at7yrcFW0&list=PLVnr33MP5RMRhGwY36zHHDOmAaYTB138D" target="_blank">LSL demo on YouTube</a><br>• <a href="https://github.com/sccn/labstreaminglayer" target="_blank">SCCN LSL GitHub repository</a> for all associated libraries<br>• <a href="https://github.com/labstreaminglayer" target="_blank">LSL GitHub repository</a> for a collection a submodules and apps</p></li><li data-preset-tag="p"><p><a href="https://academic.oup.com/scan/article/16/1-2/72/5919711?login=false" target="_blank">HyPyP analysis pipeline</a> for Hyperscanning studies</p></li></ol> </code></pre
อ่านต่อ