
Lab Streaming Layer (LSL) para la sincronización de múltiples flujos de datos
Dra. Roshini Randeniya y Lucas Kleine
Actualizado el
17 may 2024
Lab Streaming Layer (LSL) para la sincronización de múltiples flujos de datos
Dra. Roshini Randeniya y Lucas Kleine
Actualizado el
17 may 2024
Lab Streaming Layer (LSL) para la sincronización de múltiples flujos de datos
Dra. Roshini Randeniya y Lucas Kleine
Actualizado el
17 may 2024
¡Bienvenido! En este tutorial aprenderemos cómo usar Lab Streaming Layer (LSL) en Python para recopilar y sincronizar datos de EEG de Emotiv procedentes de múltiples dispositivos. Requiere un conocimiento práctico básico del lenguaje de programación Python.
Lo que aprenderás
Qué es Lab Streaming Layer (LSL) y por qué lo usan los investigadores
Cómo recopilar datos sincronizados de múltiples dispositivos de EEG de Emotiv
Cómo importar e inspeccionar los datos recopilados
1.1 ¿Qué es LSL y para qué sirve?
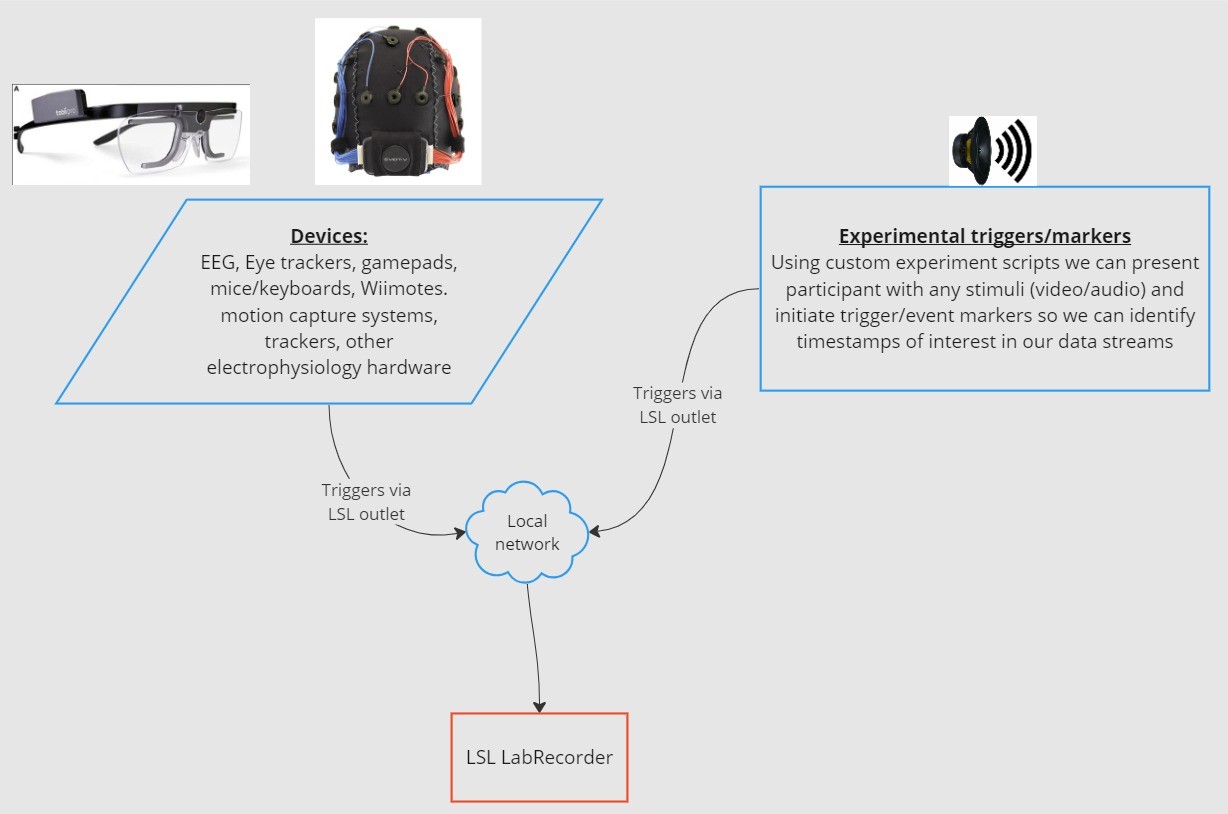
Lab streaming layer (LSL) es una caja de herramientas de código abierto que se puede utilizar para enviar, recibir y sincronizar flujos de datos neuronales, fisiológicos y de comportamiento desde diversos dispositivos de hardware de sensores. Dispositivos de hardware móviles de detección corporal y cerebral, cada vez más capaces y precisos (como los sistemas de EEG de Emotiv), están llevando la neurociencia fuera del laboratorio al mundo de los datos en tiempo real. Mientras que antes las mediciones cerebrales como EEG y MEG se limitaban a los laboratorios de investigación, los dispositivos móviles nos permiten recopilar múltiples datos en entornos más naturales y de varias personas a la vez.
Un investigador puede estar interesado en la sincronía fisiológica entre dos personas que escuchan la misma música. LSL puede ayudarnos a recopilar datos de dos diademas de EEG por separado y alinearlos para que también estén sincronizados con la presentación del sonido.
Algunos ejemplos de otros usos para LSL:
Agregar marcadores de eventos de un experimento a datos de EEG en curso
Alinear temporalmente datos de múltiples fuentes para un solo participante (p. ej., frecuencia cardíaca, EMG, EEG)
Alinear temporalmente datos de múltiples participantes (p. ej., estudios de hiperescaneo de EEG)
1.2 ¿Cómo funciona LSL?
Lab Streaming Layer es un protocolo para el intercambio en tiempo real de datos de series temporales entre múltiples dispositivos. LSL se puede implementar utilizando bibliotecas de código abierto para lenguajes de programación como Python, MATLAB, C++, Java, entre otros.
La funcionalidad principal gira en torno a los flujos de datos (data streams) de LSL:
1. Un dispositivo o software de adquisición recopila datos y crea un flujo de datos - Los datos fisiológicos se pueden transmitir a LSL desde dispositivos de grabación de EEG, rastreadores oculares, sistemas de captura de movimiento, monitores de frecuencia cardíaca, etc., incluidos los metadatos (frecuencia de muestreo, tipo de datos, información del canal, etc.) - Los marcadores de eventos de experimentos (p. ej., usando PsychoPy) también se pueden enviar como un flujo de datos usando LSL
2. El flujo de datos se publica en la red - Así es como se envían los datos utilizando LSL; el flujo de datos se "transmite" a la red - Los flujos publicados están disponibles en la red y son detectables por otros dispositivos compatibles con LSL en la misma red - LSL asigna a cada fragmento o muestra de datos una marca de tiempo basada en un reloj común (siguiendo el Protocolo de Tiempo de Red, NTP). - El flujo se distribuye muestra por muestra (o fragmento por fragmento) a través de una "salida" (outlet)
3. Los dispositivos de recopilación se “suscriben” a los flujos de datos - Así es como se reciben los datos usando LSL - Los dispositivos de recopilación en la misma red reciben flujos de datos publicados a través de "entradas" (inlets). - Cada entrada recibe las muestras del flujo y los metadatos de una sola salida
4. Guardar datos - Al suscribirte a un flujo de datos, puedes guardarlo en una variable en tu lenguaje de programación preferido, o usar el software provisto por LSL LabRecorder para guardarlo en un formato estándar como .xdf.
2.0 Descripción general del tutorial
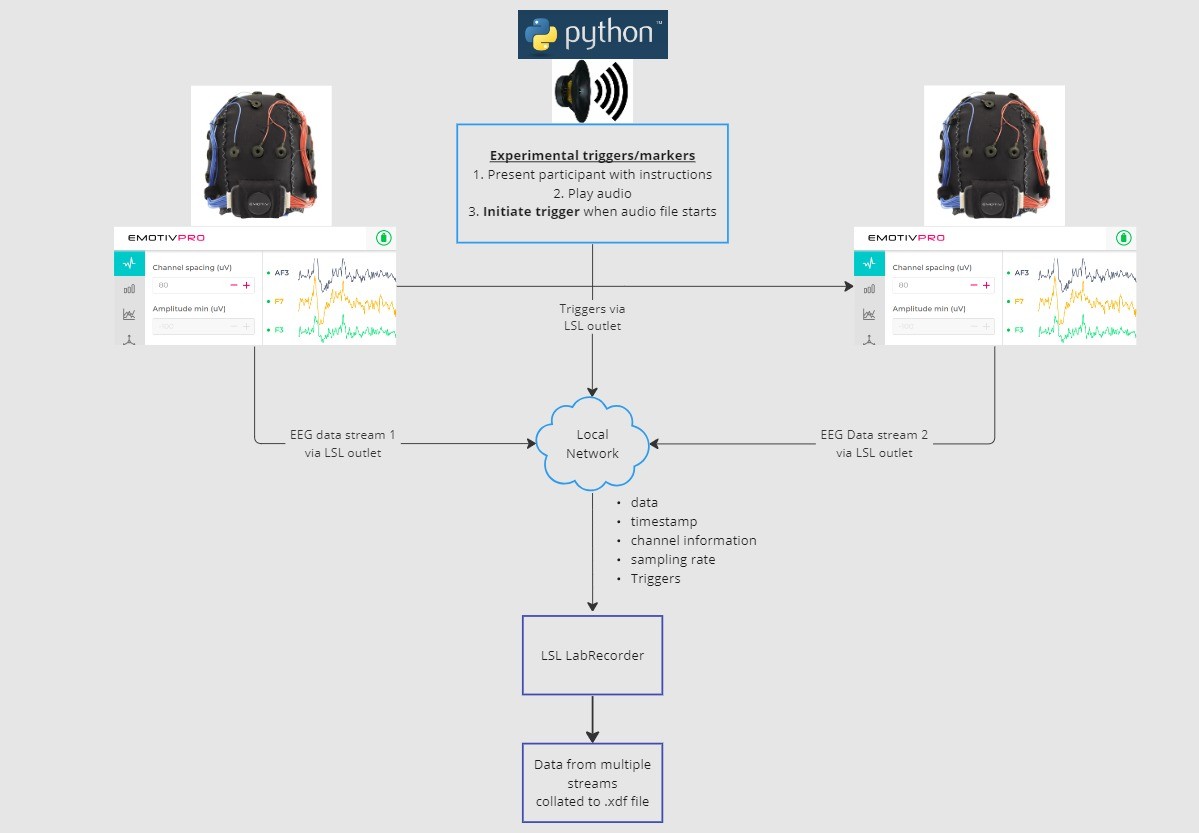
In este tutorial, tomaremos un ejemplo de configuración experimental y te guiaremos a través de los pasos y el código necesarios para implementarlo usando LSL en Python. Usaremos Python para reproducir un sonido mientras recopilamos datos de EEG de dos personas que llevan puestos auriculares de Emotiv. Usaremos dos ordenadores, cada uno ejecutando EmotivPRO para recopilar los datos de EEG, y transmitiremos cada flujo a través de una salida LSL independiente. Usaremos una biblioteca de Python para reproducir un archivo de audio y, al mismo tiempo, enviar un activador (trigger) cada vez que comience el archivo.
PASOS:
1. Usa EmotivPRO para transmitir datos a través de salidas LSL que incluyan datos de EEG (y/o movimiento, calidad del contacto, calidad de la señal, etc.) 2. Reproduce una pista de audio usando un script de Python y, simultáneamente, envía un activador a través de otro LSL. El uso de LabRecorder sirve para capturar y guardar los tres flujos de datos a través de una entrada LSL.
2.1 PASO 1 - Configuración e instalación
Necesitarás dispositivos de adquisición de datos compatibles para recopilar datos
• Todos los dispositivos brainware de Emotiv se conectan a LSL a través del software EmotivPROInstala EmotivPRO en tu(s) dispositivo(s). Necesitarás una licencia válida de EmotivPRO para usar LSL.
Instala la biblioteca LSL de Python con el siguiente comando:
pip install pylslDescarga el software LabRecorder. Esta es una aplicación sencilla y gratuita que se puede ejecutar desde
la línea de comandos o mediante una descarga independientePara nuestro experimento: instala los paquetes necesarios para reproducir audio usando Python
pip install sounddevice soundfile
2.2 PASO 3 - Envía los datos desde EmotivPRO a través de un flujo LSL
Localiza los "..." en la esquina superior derecha de la aplicación y navega a Configuración (Settings)
Busca la sección 'Lab Streaming Layer' y la subsección 'Outlet'
Selecciona todos los tipos de datos que te gustaría transmitir
Selecciona el formato de datos (flotante de 32 bits o doble de 64 bits)
Selecciona si deseas enviar los datos muestra por muestra o en fragmentos de muestras
Haz clic en 'Start' para transmitir un flujo de datos LSL
2.3 PASO 4 - Utiliza un script de Python para reproducir audio y enviar activadores
Copia y pega el siguiente bloque de código en un archivo de Python y guárdalo en tu ordenador.
Busca un archivo de audio (idealmente un archivo .wav) que quieras reproducir y edita el script cambiando la
variableaudio_filepathpor la ruta de acceso de tu archivo de audio en tu ordenadorAbre un símbolo del sistema para interactuar con la línea de comandos y navega hasta la carpeta donde
está guardado tu archivo de PythonEscribe:
python3 filename.py
• Según tu instalación de Python, es posible que usespythonen lugar depython3
Nota: Reemplaza/path/to/audio.wavcon la ubicación del archivo de audio que deseas reproducir durante tu experimento.
""" LSL Example: Play audio and send a trigger marker <p>This script creates an LSL marker stream, waits for the user to<br>press ENTER, then plays an audio file and sends a marker that<br>can be synchronized with EEG data collected through LabRecorder.<br>"""</p> <p>import sounddevice as sd<br>import soundfile as sf<br>from pylsl import StreamInfo, StreamOutlet</p> <p>def wait_for_keypress():<br>print("Press ENTER to start audio playback and send an LSL marker.")<br>while True:<br>if input() == "":<br>break</p> <p>def play_audio_and_send_marker(audio_file, outlet):<br>data, fs = sf.read(audio_file)</p> <pre><code>print("Playing audio and sending LSL marker...") marker_val = [1] outlet.push_sample(marker_val) sd.play(data, fs) sd.wait() print("Audio playback finished.") </code></pre> <p>if <strong>name</strong> == "<strong>main</strong>":</p> <pre><code>info = StreamInfo( name="AudioMarkers", type="Markers", channel_count=1, nominal_srate=0, channel_format="int32", source_id="uniqueMarkerID12345" ) outlet = StreamOutlet(info) while True: wait_for_keypress() audio_filepath = "/path/to/audio.wav" play_audio_and_send_marker( audio_filepath, outlet )</code></pre><h2 dir="auto">2.4 STEP 5 - Use LabRecorder to view and save all LSL streams</h2><ol dir="auto"><li data-preset-tag="p"><p>Open LabRecorder</p></li><li data-preset-tag="p"><p>Press <code>Update</code>. The available LSL streams should be visible in the stream list<br>• You should be able to see streams from both EmotivPROs (usually called “Emotiv-<br>DataStream”) and the marker stream (called “AudioMarkers”)</p></li><li data-preset-tag="p"><p>Click <code>Browse</code> to select a location to store data (and set other parameters)</p></li><li data-preset-tag="p"><p>Select all streams and press <code>Record</code> to start recording</p></li></ol><h2 dir="auto">3.0 Working with the data</h2><p dir="auto">LabRecorder outputs an XDF file (Extensible Data Format) that contains data from all the streams. XDF files are structured into, streams, each with a different header that describes what it contains (device name, data type, sampling rate, channels, and more). You can use the below codeblock to open your XDF file and display some basic information.</p><p dir="auto"><strong>Note: Replace </strong><code><strong>/path/to/your/file.xdf</strong></code><strong> with the filepath for your LabRecorder XDF output file.</strong></p><pre data-language="JSX"><code>import pyxdf </code></pre> <p>import mne<br>import matplotlib.pyplot as plt<br>import numpy as np</p> <h1>Give the path to your LSL output file here.</h1> <p>data_path = "/path/to/your/file.xdf"</p> <h1>Load the XDF file.</h1> <p>streams, fileheader = pyxdf.load_xdf(data_path)</p> <p>print("XDF File Header:", fileheader)<br>print("Number of streams found:", len(streams))</p> <p>for i, stream in enumerate(streams):<br>print("\nStream", i + 1)<br>print("Stream Name:", stream["info"]["name"][0])<br>print("Stream Type:", stream["info"]["type"][0])<br>print("Number of Channels:", stream["info"]["channel_count"][0])</p> <pre><code>sfreq = float(stream["info"]["nominal_srate"][0]) print("Sampling Rate:", sfreq) print("Number of Samples:", len(stream["time_series"])) print("First 5 data points:", stream["time_series"][:5]) channel_names = [ chan["label"][0] for chan in stream["info"]["desc"][0]["channels"][0]["channel"] ] print("Channel Names:", channel_names) channel_types = "eeg"</code></pre><h3 dir="auto"><br></h3><h2 dir="auto">4.0 Additional Resources</h2><h4 dir="auto">Official Documentation</h4><ol dir="auto"><li data-preset-tag="p"><p>Check out the <a href="1. Check out the online documentation, including the official README file on GitHub 2. Additional resources: • Code to run LSL using Emotiv’s devices, with example scripts • Useful LSL demo on YouTube • SCCN LSL GitHub repository for all associated libraries • LSL GitHub repository for a collection a submodules and apps 3. HyPyP analysis pipeline for Hyperscanning studies" target="_blank">online documentation</a>, including the <a href="https://github.com/sccn/labstreaminglayer/" target="_blank">official README file on GitHub</a></p></li><li data-preset-tag="p"><p>Additional resources:<br>• <a href="https://github.com/Emotiv/labstreaminglayer" target="_blank">Code</a> to run LSL using Emotiv’s devices, with example scripts<br>• Useful <a href="https://www.youtube.com/watch?v=Y1at7yrcFW0&list=PLVnr33MP5RMRhGwY36zHHDOmAaYTB138D" target="_blank">LSL demo on YouTube</a><br>• <a href="https://github.com/sccn/labstreaminglayer" target="_blank">SCCN LSL GitHub repository</a> for all associated libraries<br>• <a href="https://github.com/labstreaminglayer" target="_blank">LSL GitHub repository</a> for a collection a submodules and apps</p></li><li data-preset-tag="p"><p><a href="https://academic.oup.com/scan/article/16/1-2/72/5919711?login=false" target="_blank">HyPyP analysis pipeline</a> for Hyperscanning studies</p></li></ol> </code></pre
""" LSL Example: Play audio and send a trigger marker <p>This script creates an LSL marker stream, waits for the user to<br>press ENTER, then plays an audio file and sends a marker that<br>can be synchronized with EEG data collected through LabRecorder.<br>"""</p> <p>import sounddevice as sd<br>import soundfile as sf<br>from pylsl import StreamInfo, StreamOutlet</p> <p>def wait_for_keypress():<br>print("Press ENTER to start audio playback and send an LSL marker.")<br>while True:<br>if input() == "":<br>break</p> <p>def play_audio_and_send_marker(audio_file, outlet):<br>data, fs = sf.read(audio_file)</p> <pre><code>print("Playing audio and sending LSL marker...") marker_val = [1] outlet.push_sample(marker_val) sd.play(data, fs) sd.wait() print("Audio playback finished.") </code></pre> <p>if <strong>name</strong> == "<strong>main</strong>":</p> <pre><code>info = StreamInfo( name="AudioMarkers", type="Markers", channel_count=1, nominal_srate=0, channel_format="int32", source_id="uniqueMarkerID12345" ) outlet = StreamOutlet(info) while True: wait_for_keypress() audio_filepath = "/path/to/audio.wav" play_audio_and_send_marker( audio_filepath, outlet )</code></pre><h2 dir="auto">2.4 STEP 5 - Use LabRecorder to view and save all LSL streams</h2><ol dir="auto"><li data-preset-tag="p"><p>Open LabRecorder</p></li><li data-preset-tag="p"><p>Press <code>Update</code>. The available LSL streams should be visible in the stream list<br>• You should be able to see streams from both EmotivPROs (usually called “Emotiv-<br>DataStream”) and the marker stream (called “AudioMarkers”)</p></li><li data-preset-tag="p"><p>Click <code>Browse</code> to select a location to store data (and set other parameters)</p></li><li data-preset-tag="p"><p>Select all streams and press <code>Record</code> to start recording</p></li></ol><h2 dir="auto">3.0 Working with the data</h2><p dir="auto">LabRecorder outputs an XDF file (Extensible Data Format) that contains data from all the streams. XDF files are structured into, streams, each with a different header that describes what it contains (device name, data type, sampling rate, channels, and more). You can use the below codeblock to open your XDF file and display some basic information.</p><p dir="auto"><strong>Note: Replace </strong><code><strong>/path/to/your/file.xdf</strong></code><strong> with the filepath for your LabRecorder XDF output file.</strong></p><pre data-language="JSX"><code>import pyxdf </code></pre> <p>import mne<br>import matplotlib.pyplot as plt<br>import numpy as np</p> <h1>Give the path to your LSL output file here.</h1> <p>data_path = "/path/to/your/file.xdf"</p> <h1>Load the XDF file.</h1> <p>streams, fileheader = pyxdf.load_xdf(data_path)</p> <p>print("XDF File Header:", fileheader)<br>print("Number of streams found:", len(streams))</p> <p>for i, stream in enumerate(streams):<br>print("\nStream", i + 1)<br>print("Stream Name:", stream["info"]["name"][0])<br>print("Stream Type:", stream["info"]["type"][0])<br>print("Number of Channels:", stream["info"]["channel_count"][0])</p> <pre><code>sfreq = float(stream["info"]["nominal_srate"][0]) print("Sampling Rate:", sfreq) print("Number of Samples:", len(stream["time_series"])) print("First 5 data points:", stream["time_series"][:5]) channel_names = [ chan["label"][0] for chan in stream["info"]["desc"][0]["channels"][0]["channel"] ] print("Channel Names:", channel_names) channel_types = "eeg"</code></pre><h3 dir="auto"><br></h3><h2 dir="auto">4.0 Additional Resources</h2><h4 dir="auto">Official Documentation</h4><ol dir="auto"><li data-preset-tag="p"><p>Check out the <a href="1. Check out the online documentation, including the official README file on GitHub 2. Additional resources: • Code to run LSL using Emotiv’s devices, with example scripts • Useful LSL demo on YouTube • SCCN LSL GitHub repository for all associated libraries • LSL GitHub repository for a collection a submodules and apps 3. HyPyP analysis pipeline for Hyperscanning studies" target="_blank">online documentation</a>, including the <a href="https://github.com/sccn/labstreaminglayer/" target="_blank">official README file on GitHub</a></p></li><li data-preset-tag="p"><p>Additional resources:<br>• <a href="https://github.com/Emotiv/labstreaminglayer" target="_blank">Code</a> to run LSL using Emotiv’s devices, with example scripts<br>• Useful <a href="https://www.youtube.com/watch?v=Y1at7yrcFW0&list=PLVnr33MP5RMRhGwY36zHHDOmAaYTB138D" target="_blank">LSL demo on YouTube</a><br>• <a href="https://github.com/sccn/labstreaminglayer" target="_blank">SCCN LSL GitHub repository</a> for all associated libraries<br>• <a href="https://github.com/labstreaminglayer" target="_blank">LSL GitHub repository</a> for a collection a submodules and apps</p></li><li data-preset-tag="p"><p><a href="https://academic.oup.com/scan/article/16/1-2/72/5919711?login=false" target="_blank">HyPyP analysis pipeline</a> for Hyperscanning studies</p></li></ol> </code></pre
""" LSL Example: Play audio and send a trigger marker <p>This script creates an LSL marker stream, waits for the user to<br>press ENTER, then plays an audio file and sends a marker that<br>can be synchronized with EEG data collected through LabRecorder.<br>"""</p> <p>import sounddevice as sd<br>import soundfile as sf<br>from pylsl import StreamInfo, StreamOutlet</p> <p>def wait_for_keypress():<br>print("Press ENTER to start audio playback and send an LSL marker.")<br>while True:<br>if input() == "":<br>break</p> <p>def play_audio_and_send_marker(audio_file, outlet):<br>data, fs = sf.read(audio_file)</p> <pre><code>print("Playing audio and sending LSL marker...") marker_val = [1] outlet.push_sample(marker_val) sd.play(data, fs) sd.wait() print("Audio playback finished.") </code></pre> <p>if <strong>name</strong> == "<strong>main</strong>":</p> <pre><code>info = StreamInfo( name="AudioMarkers", type="Markers", channel_count=1, nominal_srate=0, channel_format="int32", source_id="uniqueMarkerID12345" ) outlet = StreamOutlet(info) while True: wait_for_keypress() audio_filepath = "/path/to/audio.wav" play_audio_and_send_marker( audio_filepath, outlet )</code></pre><h2 dir="auto">2.4 STEP 5 - Use LabRecorder to view and save all LSL streams</h2><ol dir="auto"><li data-preset-tag="p"><p>Open LabRecorder</p></li><li data-preset-tag="p"><p>Press <code>Update</code>. The available LSL streams should be visible in the stream list<br>• You should be able to see streams from both EmotivPROs (usually called “Emotiv-<br>DataStream”) and the marker stream (called “AudioMarkers”)</p></li><li data-preset-tag="p"><p>Click <code>Browse</code> to select a location to store data (and set other parameters)</p></li><li data-preset-tag="p"><p>Select all streams and press <code>Record</code> to start recording</p></li></ol><h2 dir="auto">3.0 Working with the data</h2><p dir="auto">LabRecorder outputs an XDF file (Extensible Data Format) that contains data from all the streams. XDF files are structured into, streams, each with a different header that describes what it contains (device name, data type, sampling rate, channels, and more). You can use the below codeblock to open your XDF file and display some basic information.</p><p dir="auto"><strong>Note: Replace </strong><code><strong>/path/to/your/file.xdf</strong></code><strong> with the filepath for your LabRecorder XDF output file.</strong></p><pre data-language="JSX"><code>import pyxdf </code></pre> <p>import mne<br>import matplotlib.pyplot as plt<br>import numpy as np</p> <h1>Give the path to your LSL output file here.</h1> <p>data_path = "/path/to/your/file.xdf"</p> <h1>Load the XDF file.</h1> <p>streams, fileheader = pyxdf.load_xdf(data_path)</p> <p>print("XDF File Header:", fileheader)<br>print("Number of streams found:", len(streams))</p> <p>for i, stream in enumerate(streams):<br>print("\nStream", i + 1)<br>print("Stream Name:", stream["info"]["name"][0])<br>print("Stream Type:", stream["info"]["type"][0])<br>print("Number of Channels:", stream["info"]["channel_count"][0])</p> <pre><code>sfreq = float(stream["info"]["nominal_srate"][0]) print("Sampling Rate:", sfreq) print("Number of Samples:", len(stream["time_series"])) print("First 5 data points:", stream["time_series"][:5]) channel_names = [ chan["label"][0] for chan in stream["info"]["desc"][0]["channels"][0]["channel"] ] print("Channel Names:", channel_names) channel_types = "eeg"</code></pre><h3 dir="auto"><br></h3><h2 dir="auto">4.0 Additional Resources</h2><h4 dir="auto">Official Documentation</h4><ol dir="auto"><li data-preset-tag="p"><p>Check out the <a href="1. Check out the online documentation, including the official README file on GitHub 2. Additional resources: • Code to run LSL using Emotiv’s devices, with example scripts • Useful LSL demo on YouTube • SCCN LSL GitHub repository for all associated libraries • LSL GitHub repository for a collection a submodules and apps 3. HyPyP analysis pipeline for Hyperscanning studies" target="_blank">online documentation</a>, including the <a href="https://github.com/sccn/labstreaminglayer/" target="_blank">official README file on GitHub</a></p></li><li data-preset-tag="p"><p>Additional resources:<br>• <a href="https://github.com/Emotiv/labstreaminglayer" target="_blank">Code</a> to run LSL using Emotiv’s devices, with example scripts<br>• Useful <a href="https://www.youtube.com/watch?v=Y1at7yrcFW0&list=PLVnr33MP5RMRhGwY36zHHDOmAaYTB138D" target="_blank">LSL demo on YouTube</a><br>• <a href="https://github.com/sccn/labstreaminglayer" target="_blank">SCCN LSL GitHub repository</a> for all associated libraries<br>• <a href="https://github.com/labstreaminglayer" target="_blank">LSL GitHub repository</a> for a collection a submodules and apps</p></li><li data-preset-tag="p"><p><a href="https://academic.oup.com/scan/article/16/1-2/72/5919711?login=false" target="_blank">HyPyP analysis pipeline</a> for Hyperscanning studies</p></li></ol> </code></pre
¡Bienvenido! En este tutorial aprenderemos cómo usar Lab Streaming Layer (LSL) en Python para recopilar y sincronizar datos de EEG de Emotiv procedentes de múltiples dispositivos. Requiere un conocimiento práctico básico del lenguaje de programación Python.
Lo que aprenderás
Qué es Lab Streaming Layer (LSL) y por qué lo usan los investigadores
Cómo recopilar datos sincronizados de múltiples dispositivos de EEG de Emotiv
Cómo importar e inspeccionar los datos recopilados
1.1 ¿Qué es LSL y para qué sirve?
Lab streaming layer (LSL) es una caja de herramientas de código abierto que se puede utilizar para enviar, recibir y sincronizar flujos de datos neuronales, fisiológicos y de comportamiento desde diversos dispositivos de hardware de sensores. Dispositivos de hardware móviles de detección corporal y cerebral, cada vez más capaces y precisos (como los sistemas de EEG de Emotiv), están llevando la neurociencia fuera del laboratorio al mundo de los datos en tiempo real. Mientras que antes las mediciones cerebrales como EEG y MEG se limitaban a los laboratorios de investigación, los dispositivos móviles nos permiten recopilar múltiples datos en entornos más naturales y de varias personas a la vez.
Un investigador puede estar interesado en la sincronía fisiológica entre dos personas que escuchan la misma música. LSL puede ayudarnos a recopilar datos de dos diademas de EEG por separado y alinearlos para que también estén sincronizados con la presentación del sonido.
Algunos ejemplos de otros usos para LSL:
Agregar marcadores de eventos de un experimento a datos de EEG en curso
Alinear temporalmente datos de múltiples fuentes para un solo participante (p. ej., frecuencia cardíaca, EMG, EEG)
Alinear temporalmente datos de múltiples participantes (p. ej., estudios de hiperescaneo de EEG)
1.2 ¿Cómo funciona LSL?
Lab Streaming Layer es un protocolo para el intercambio en tiempo real de datos de series temporales entre múltiples dispositivos. LSL se puede implementar utilizando bibliotecas de código abierto para lenguajes de programación como Python, MATLAB, C++, Java, entre otros.
La funcionalidad principal gira en torno a los flujos de datos (data streams) de LSL:
1. Un dispositivo o software de adquisición recopila datos y crea un flujo de datos - Los datos fisiológicos se pueden transmitir a LSL desde dispositivos de grabación de EEG, rastreadores oculares, sistemas de captura de movimiento, monitores de frecuencia cardíaca, etc., incluidos los metadatos (frecuencia de muestreo, tipo de datos, información del canal, etc.) - Los marcadores de eventos de experimentos (p. ej., usando PsychoPy) también se pueden enviar como un flujo de datos usando LSL
2. El flujo de datos se publica en la red - Así es como se envían los datos utilizando LSL; el flujo de datos se "transmite" a la red - Los flujos publicados están disponibles en la red y son detectables por otros dispositivos compatibles con LSL en la misma red - LSL asigna a cada fragmento o muestra de datos una marca de tiempo basada en un reloj común (siguiendo el Protocolo de Tiempo de Red, NTP). - El flujo se distribuye muestra por muestra (o fragmento por fragmento) a través de una "salida" (outlet)
3. Los dispositivos de recopilación se “suscriben” a los flujos de datos - Así es como se reciben los datos usando LSL - Los dispositivos de recopilación en la misma red reciben flujos de datos publicados a través de "entradas" (inlets). - Cada entrada recibe las muestras del flujo y los metadatos de una sola salida
4. Guardar datos - Al suscribirte a un flujo de datos, puedes guardarlo en una variable en tu lenguaje de programación preferido, o usar el software provisto por LSL LabRecorder para guardarlo en un formato estándar como .xdf.
2.0 Descripción general del tutorial
In este tutorial, tomaremos un ejemplo de configuración experimental y te guiaremos a través de los pasos y el código necesarios para implementarlo usando LSL en Python. Usaremos Python para reproducir un sonido mientras recopilamos datos de EEG de dos personas que llevan puestos auriculares de Emotiv. Usaremos dos ordenadores, cada uno ejecutando EmotivPRO para recopilar los datos de EEG, y transmitiremos cada flujo a través de una salida LSL independiente. Usaremos una biblioteca de Python para reproducir un archivo de audio y, al mismo tiempo, enviar un activador (trigger) cada vez que comience el archivo.
PASOS:
1. Usa EmotivPRO para transmitir datos a través de salidas LSL que incluyan datos de EEG (y/o movimiento, calidad del contacto, calidad de la señal, etc.) 2. Reproduce una pista de audio usando un script de Python y, simultáneamente, envía un activador a través de otro LSL. El uso de LabRecorder sirve para capturar y guardar los tres flujos de datos a través de una entrada LSL.
2.1 PASO 1 - Configuración e instalación
Necesitarás dispositivos de adquisición de datos compatibles para recopilar datos
• Todos los dispositivos brainware de Emotiv se conectan a LSL a través del software EmotivPROInstala EmotivPRO en tu(s) dispositivo(s). Necesitarás una licencia válida de EmotivPRO para usar LSL.
Instala la biblioteca LSL de Python con el siguiente comando:
pip install pylslDescarga el software LabRecorder. Esta es una aplicación sencilla y gratuita que se puede ejecutar desde
la línea de comandos o mediante una descarga independientePara nuestro experimento: instala los paquetes necesarios para reproducir audio usando Python
pip install sounddevice soundfile
2.2 PASO 3 - Envía los datos desde EmotivPRO a través de un flujo LSL
Localiza los "..." en la esquina superior derecha de la aplicación y navega a Configuración (Settings)
Busca la sección 'Lab Streaming Layer' y la subsección 'Outlet'
Selecciona todos los tipos de datos que te gustaría transmitir
Selecciona el formato de datos (flotante de 32 bits o doble de 64 bits)
Selecciona si deseas enviar los datos muestra por muestra o en fragmentos de muestras
Haz clic en 'Start' para transmitir un flujo de datos LSL
2.3 PASO 4 - Utiliza un script de Python para reproducir audio y enviar activadores
Copia y pega el siguiente bloque de código en un archivo de Python y guárdalo en tu ordenador.
Busca un archivo de audio (idealmente un archivo .wav) que quieras reproducir y edita el script cambiando la
variableaudio_filepathpor la ruta de acceso de tu archivo de audio en tu ordenadorAbre un símbolo del sistema para interactuar con la línea de comandos y navega hasta la carpeta donde
está guardado tu archivo de PythonEscribe:
python3 filename.py
• Según tu instalación de Python, es posible que usespythonen lugar depython3
Nota: Reemplaza/path/to/audio.wavcon la ubicación del archivo de audio que deseas reproducir durante tu experimento.
""" LSL Example: Play audio and send a trigger marker <p>This script creates an LSL marker stream, waits for the user to<br>press ENTER, then plays an audio file and sends a marker that<br>can be synchronized with EEG data collected through LabRecorder.<br>"""</p> <p>import sounddevice as sd<br>import soundfile as sf<br>from pylsl import StreamInfo, StreamOutlet</p> <p>def wait_for_keypress():<br>print("Press ENTER to start audio playback and send an LSL marker.")<br>while True:<br>if input() == "":<br>break</p> <p>def play_audio_and_send_marker(audio_file, outlet):<br>data, fs = sf.read(audio_file)</p> <pre><code>print("Playing audio and sending LSL marker...") marker_val = [1] outlet.push_sample(marker_val) sd.play(data, fs) sd.wait() print("Audio playback finished.") </code></pre> <p>if <strong>name</strong> == "<strong>main</strong>":</p> <pre><code>info = StreamInfo( name="AudioMarkers", type="Markers", channel_count=1, nominal_srate=0, channel_format="int32", source_id="uniqueMarkerID12345" ) outlet = StreamOutlet(info) while True: wait_for_keypress() audio_filepath = "/path/to/audio.wav" play_audio_and_send_marker( audio_filepath, outlet )</code></pre><h2 dir="auto">2.4 STEP 5 - Use LabRecorder to view and save all LSL streams</h2><ol dir="auto"><li data-preset-tag="p"><p>Open LabRecorder</p></li><li data-preset-tag="p"><p>Press <code>Update</code>. The available LSL streams should be visible in the stream list<br>• You should be able to see streams from both EmotivPROs (usually called “Emotiv-<br>DataStream”) and the marker stream (called “AudioMarkers”)</p></li><li data-preset-tag="p"><p>Click <code>Browse</code> to select a location to store data (and set other parameters)</p></li><li data-preset-tag="p"><p>Select all streams and press <code>Record</code> to start recording</p></li></ol><h2 dir="auto">3.0 Working with the data</h2><p dir="auto">LabRecorder outputs an XDF file (Extensible Data Format) that contains data from all the streams. XDF files are structured into, streams, each with a different header that describes what it contains (device name, data type, sampling rate, channels, and more). You can use the below codeblock to open your XDF file and display some basic information.</p><p dir="auto"><strong>Note: Replace </strong><code><strong>/path/to/your/file.xdf</strong></code><strong> with the filepath for your LabRecorder XDF output file.</strong></p><pre data-language="JSX"><code>import pyxdf </code></pre> <p>import mne<br>import matplotlib.pyplot as plt<br>import numpy as np</p> <h1>Give the path to your LSL output file here.</h1> <p>data_path = "/path/to/your/file.xdf"</p> <h1>Load the XDF file.</h1> <p>streams, fileheader = pyxdf.load_xdf(data_path)</p> <p>print("XDF File Header:", fileheader)<br>print("Number of streams found:", len(streams))</p> <p>for i, stream in enumerate(streams):<br>print("\nStream", i + 1)<br>print("Stream Name:", stream["info"]["name"][0])<br>print("Stream Type:", stream["info"]["type"][0])<br>print("Number of Channels:", stream["info"]["channel_count"][0])</p> <pre><code>sfreq = float(stream["info"]["nominal_srate"][0]) print("Sampling Rate:", sfreq) print("Number of Samples:", len(stream["time_series"])) print("First 5 data points:", stream["time_series"][:5]) channel_names = [ chan["label"][0] for chan in stream["info"]["desc"][0]["channels"][0]["channel"] ] print("Channel Names:", channel_names) channel_types = "eeg"</code></pre><h3 dir="auto"><br></h3><h2 dir="auto">4.0 Additional Resources</h2><h4 dir="auto">Official Documentation</h4><ol dir="auto"><li data-preset-tag="p"><p>Check out the <a href="1. Check out the online documentation, including the official README file on GitHub 2. Additional resources: • Code to run LSL using Emotiv’s devices, with example scripts • Useful LSL demo on YouTube • SCCN LSL GitHub repository for all associated libraries • LSL GitHub repository for a collection a submodules and apps 3. HyPyP analysis pipeline for Hyperscanning studies" target="_blank">online documentation</a>, including the <a href="https://github.com/sccn/labstreaminglayer/" target="_blank">official README file on GitHub</a></p></li><li data-preset-tag="p"><p>Additional resources:<br>• <a href="https://github.com/Emotiv/labstreaminglayer" target="_blank">Code</a> to run LSL using Emotiv’s devices, with example scripts<br>• Useful <a href="https://www.youtube.com/watch?v=Y1at7yrcFW0&list=PLVnr33MP5RMRhGwY36zHHDOmAaYTB138D" target="_blank">LSL demo on YouTube</a><br>• <a href="https://github.com/sccn/labstreaminglayer" target="_blank">SCCN LSL GitHub repository</a> for all associated libraries<br>• <a href="https://github.com/labstreaminglayer" target="_blank">LSL GitHub repository</a> for a collection a submodules and apps</p></li><li data-preset-tag="p"><p><a href="https://academic.oup.com/scan/article/16/1-2/72/5919711?login=false" target="_blank">HyPyP analysis pipeline</a> for Hyperscanning studies</p></li></ol> </code></pre
Continúa leyendo