用于同步多个数据流的实验室流图层 (Lab Streaming Layer, LSL)
Roshini Randeniya 博士和 Lucas Kleine
更新于
2024年5月17日
用于同步多个数据流的实验室流图层 (Lab Streaming Layer, LSL)
Roshini Randeniya 博士和 Lucas Kleine
更新于
2024年5月17日
用于同步多个数据流的实验室流图层 (Lab Streaming Layer, LSL)
Roshini Randeniya 博士和 Lucas Kleine
更新于
2024年5月17日
欢迎!在本教程中,我们将学习如何使用Python中的实验室串流层(LSL)来收集并同步来自多个设备的Emotiv脑电(EEG)数据。这需要具备Python编程语言的基础实用知识。
您将学到什么
什么是实验室串流层(LSL)以及为什么研究人员使用它
如何从多个Emotiv脑电(EEG)设备收集同步数据
如何导入并检查收集的数据
1.1 什么是 LSL?它有什么用途?
实验室串流层(LSL)是一个开源工具箱,可用于发送、接收和同步来自各种传感器硬件的神经、生理和行为数据流。功能日益强大、精确和便携的数据化脑部及身体感应硬件设备(如Emotiv脑电(EEG)系统)正在将神经科学带出实验室,带入实时数据的世界。曾经,像脑电(EEG)和脑磁(MEG)这样的脑部测量仅限于研究实验室,而现在,移动设备能让我们在更自然的环境中同时收集来自多个人的多种数据。
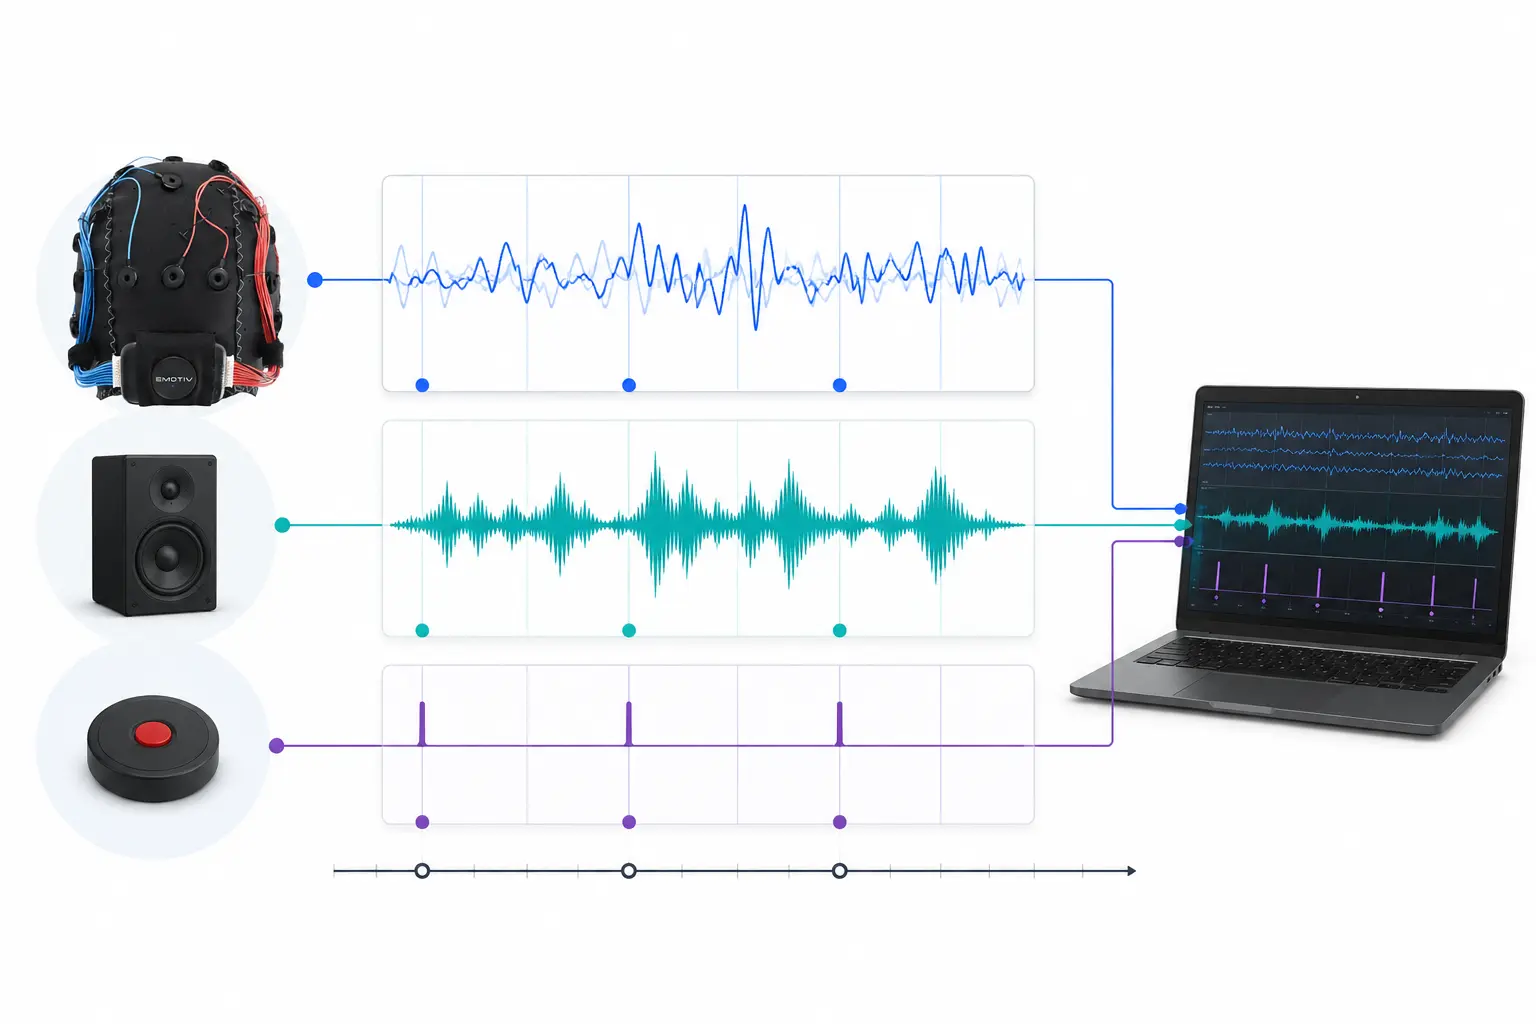
研究人员可能对听同一首音乐的两个人之间的生理同步性感兴趣。LSL可以帮助我们分别收集两台EEG脑电仪的数据,这些数据同时还能与声音播放保持同步。
LSL的其他一些应用示例:
将实验中的事件标记(event markers)添加到正在进行的EEG数据中
为单个受试者时间对齐来自多个来源的数据(例如心率、肌电(EMG)、脑电(EEG))
时间对齐来自多个受试者的数据(例如EEG超扫描研究/Hyperscanning)
1.2 LSL 是如何工作的?
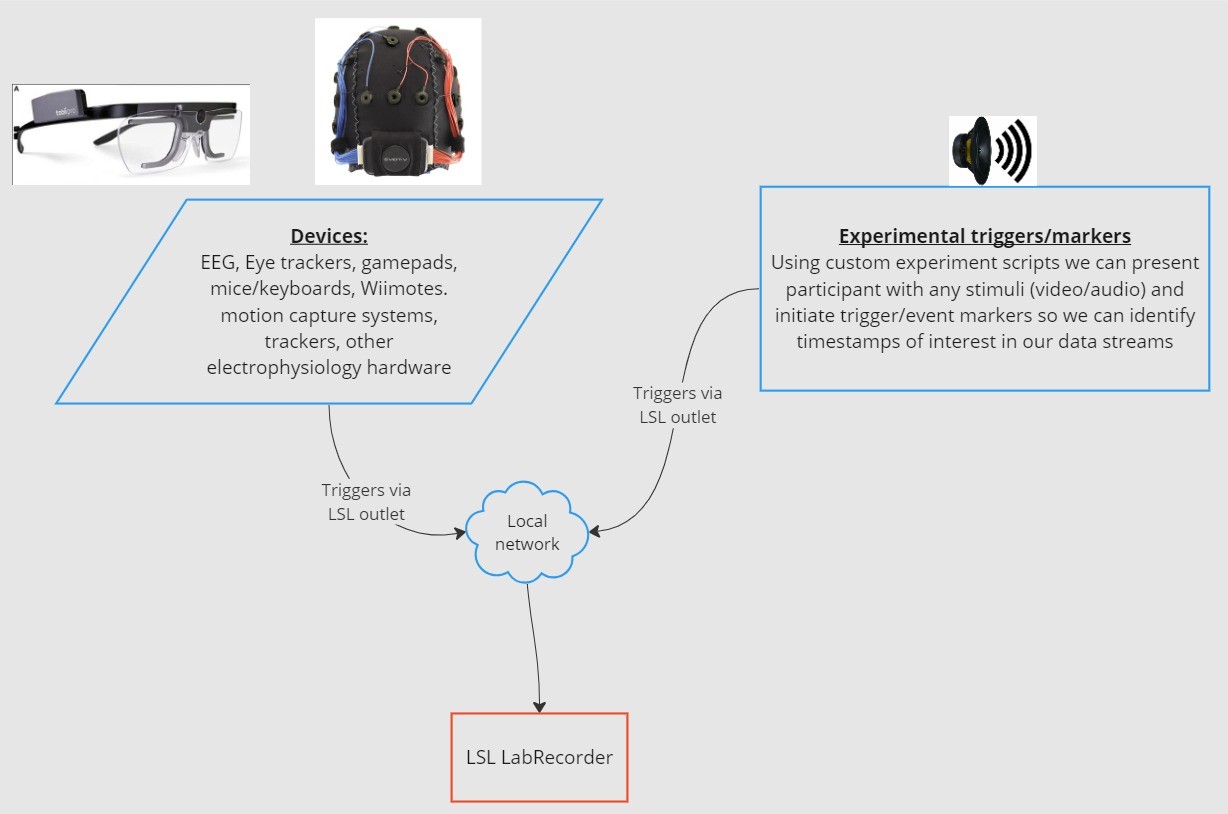
实验室串流层(Lab Streaming Layer)是一种用于在多个设备之间实时交换时间序列数据的协议。LSL 可以使用 Python、MATLAB、C++、Java 等编程语言的开源库来实现。
其核心功能围绕 LSL 数据流展开:
1. 采集设备/软件收集数据并创建数据流 - 生理数据可以从EEG记录设备、眼动仪、动作捕捉系统、心率监测器等流式传输到 LSL,包括元数据(采样率、数据类型、通道信息等) - 来自实验的事件标记(例如使用 PsychoPy)也可以作为数据流使用 LSL 发送
2. 数据流被发布到网络中 - 这就是使用 LSL 发送数据的方式;数据流被“广播”到网络中 - 已发布的流在网络上可用,并可被同一网络上的其他支持 LSL 的设备发现 - LSL 根据通用时钟(遵循网络时间协议 NTP)为每个数据块或样本分配一个时间戳。 - 数据流将通过“出口(outlet)”逐个样本(或逐个数据块)地推送
3. 收集设备“订阅”数据流 - 这就是使用 LSL 接收数据的方式 - 同一网络上的收集设备通过“进口(inlet)”接收发布的视频和数据流。 - 每个 inlet 仅接收来自一个 outlet 的数据流样本和元数据
4. 保存数据 - 订阅数据流后,您可以将其保存为您喜欢的编程语言中的变量,或使用 LSL 提供的软件 LabRecorder 将其保存为标准格式(例如 .xdf)。
2.0 教程概述
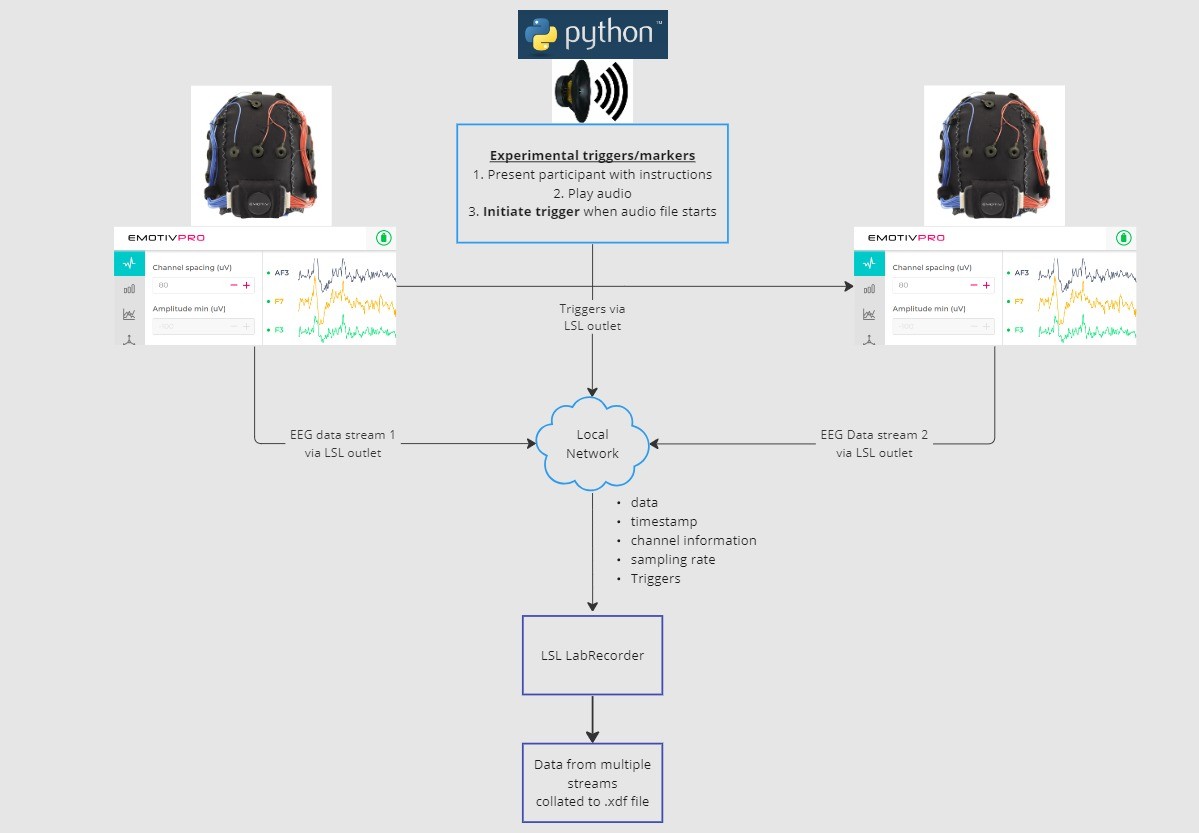
在本教程中,我们将以一个实验设置示例为例,指导您在 Python 中使用 LSL 实现该设置所需的步骤和代码。我们将使用 Python 播放一段声音,同时收集两名佩戴 Emotiv 头戴式设备的受试者的 EEG 数据。我们将使用两台分别运行 EmotivPRO 的电脑来收集 EEG 数据,并通过独立的 LSL 出口(outlet)广播每个数据流。我们将使用一个 Python 库来播放音频文件,并在每次文件开始播放时同步发送一个触发器(trigger)。
步骤:
1. 使用 EmotivPRO 通过包含 EEG 数据(和/或运动、接触质量、信号质量等)的 LSL 出口(outlet)传输数据。 2. 使用 Python 脚本播放音频,同时通过另一个 LSL 发送触发标记。使用 LabRecorder 通过 LSL 进口(inlet)捕获并保存所有这三个数据流。
2.1 步骤 1 - 设置与安装
您将需要受支持的数据采集设备来收集数据
• 所有 Emotiv 的脑电设备都通过 EmotivPRO 软件连接到 LSL在您的设备上安装 EmotivPRO。您需要拥有有效的 EmotivPRO 许可证才能使用 LSL。
使用以下命令安装 Python LSL 库:
pip install pylsl下载 LabRecorder 软件。这是一个简单且免费的应用程序,可以通过命令行运行
或使用独立下载运行对于我们的实验:安装使用 Python 播放音频所需的包
pip install sounddevice soundfile
2.2 步骤 3 - 从 EmotivPRO 通过 LSL 流发送数据
在应用程序的右上角找到“...”,导航到“Settings”(设置)
找到“Lab Streaming Layer”部分和“Outlet”子部分
选择您想要广播的所有数据类型
选择数据格式(32位浮点数或64位双精度浮点数)
选择是逐个样本发送数据还是按样本块发送数据
点击“Start”(开始)以广播 LSL 数据流
2.3 步骤 4 - 使用 Python 脚本播放音频并发送触发器
复制以下代码块并将其粘贴到 Python 文件中并保存到您的计算机。
找到您想要播放的音频文件(最好是 .wav 文件),修改脚本,将
变量audio_filepath改为您计算机上音频文件的文件路径打开命令提示符与命令行交互,并导航到存储
Python 文件的文件夹输入:
python3 filename.py
• 根据您的 Python 安装情况,您可以使用python代替python3
注意:将/path/to/audio.wav替换为您要在实验期间播放的音频文件的位置。
""" LSL Example: Play audio and send a trigger marker <p>This script creates an LSL marker stream, waits for the user to<br>press ENTER, then plays an audio file and sends a marker that<br>can be synchronized with EEG data collected through LabRecorder.<br>"""</p> <p>import sounddevice as sd<br>import soundfile as sf<br>from pylsl import StreamInfo, StreamOutlet</p> <p>def wait_for_keypress():<br>print("Press ENTER to start audio playback and send an LSL marker.")<br>while True:<br>if input() == "":<br>break</p> <p>def play_audio_and_send_marker(audio_file, outlet):<br>data, fs = sf.read(audio_file)</p> <pre><code>print("Playing audio and sending LSL marker...") marker_val = [1] outlet.push_sample(marker_val) sd.play(data, fs) sd.wait() print("Audio playback finished.") </code></pre> <p>if <strong>name</strong> == "<strong>main</strong>":</p> <pre><code>info = StreamInfo( name="AudioMarkers", type="Markers", channel_count=1, nominal_srate=0, channel_format="int32", source_id="uniqueMarkerID12345" ) outlet = StreamOutlet(info) while True: wait_for_keypress() audio_filepath = "/path/to/audio.wav" play_audio_and_send_marker( audio_filepath, outlet )</code></pre><h2 dir="auto">2.4 STEP 5 - Use LabRecorder to view and save all LSL streams</h2><ol dir="auto"><li data-preset-tag="p"><p>Open LabRecorder</p></li><li data-preset-tag="p"><p>Press <code>Update</code>. The available LSL streams should be visible in the stream list<br>• You should be able to see streams from both EmotivPROs (usually called “Emotiv-<br>DataStream”) and the marker stream (called “AudioMarkers”)</p></li><li data-preset-tag="p"><p>Click <code>Browse</code> to select a location to store data (and set other parameters)</p></li><li data-preset-tag="p"><p>Select all streams and press <code>Record</code> to start recording</p></li></ol><h2 dir="auto">3.0 Working with the data</h2><p dir="auto">LabRecorder outputs an XDF file (Extensible Data Format) that contains data from all the streams. XDF files are structured into, streams, each with a different header that describes what it contains (device name, data type, sampling rate, channels, and more). You can use the below codeblock to open your XDF file and display some basic information.</p><p dir="auto"><strong>Note: Replace </strong><code><strong>/path/to/your/file.xdf</strong></code><strong> with the filepath for your LabRecorder XDF output file.</strong></p><pre data-language="JSX"><code>import pyxdf </code></pre> <p>import mne<br>import matplotlib.pyplot as plt<br>import numpy as np</p> <h1>Give the path to your LSL output file here.</h1> <p>data_path = "/path/to/your/file.xdf"</p> <h1>Load the XDF file.</h1> <p>streams, fileheader = pyxdf.load_xdf(data_path)</p> <p>print("XDF File Header:", fileheader)<br>print("Number of streams found:", len(streams))</p> <p>for i, stream in enumerate(streams):<br>print("\nStream", i + 1)<br>print("Stream Name:", stream["info"]["name"][0])<br>print("Stream Type:", stream["info"]["type"][0])<br>print("Number of Channels:", stream["info"]["channel_count"][0])</p> <pre><code>sfreq = float(stream["info"]["nominal_srate"][0]) print("Sampling Rate:", sfreq) print("Number of Samples:", len(stream["time_series"])) print("First 5 data points:", stream["time_series"][:5]) channel_names = [ chan["label"][0] for chan in stream["info"]["desc"][0]["channels"][0]["channel"] ] print("Channel Names:", channel_names) channel_types = "eeg"</code></pre><h3 dir="auto"><br></h3><h2 dir="auto">4.0 Additional Resources</h2><h4 dir="auto">Official Documentation</h4><ol dir="auto"><li data-preset-tag="p"><p>Check out the <a href="1. Check out the online documentation, including the official README file on GitHub 2. Additional resources: • Code to run LSL using Emotiv’s devices, with example scripts • Useful LSL demo on YouTube • SCCN LSL GitHub repository for all associated libraries • LSL GitHub repository for a collection a submodules and apps 3. HyPyP analysis pipeline for Hyperscanning studies" target="_blank">online documentation</a>, including the <a href="https://github.com/sccn/labstreaminglayer/" target="_blank">official README file on GitHub</a></p></li><li data-preset-tag="p"><p>Additional resources:<br>• <a href="https://github.com/Emotiv/labstreaminglayer" target="_blank">Code</a> to run LSL using Emotiv’s devices, with example scripts<br>• Useful <a href="https://www.youtube.com/watch?v=Y1at7yrcFW0&list=PLVnr33MP5RMRhGwY36zHHDOmAaYTB138D" target="_blank">LSL demo on YouTube</a><br>• <a href="https://github.com/sccn/labstreaminglayer" target="_blank">SCCN LSL GitHub repository</a> for all associated libraries<br>• <a href="https://github.com/labstreaminglayer" target="_blank">LSL GitHub repository</a> for a collection a submodules and apps</p></li><li data-preset-tag="p"><p><a href="https://academic.oup.com/scan/article/16/1-2/72/5919711?login=false" target="_blank">HyPyP analysis pipeline</a> for Hyperscanning studies</p></li></ol> </code></pre
""" LSL Example: Play audio and send a trigger marker <p>This script creates an LSL marker stream, waits for the user to<br>press ENTER, then plays an audio file and sends a marker that<br>can be synchronized with EEG data collected through LabRecorder.<br>"""</p> <p>import sounddevice as sd<br>import soundfile as sf<br>from pylsl import StreamInfo, StreamOutlet</p> <p>def wait_for_keypress():<br>print("Press ENTER to start audio playback and send an LSL marker.")<br>while True:<br>if input() == "":<br>break</p> <p>def play_audio_and_send_marker(audio_file, outlet):<br>data, fs = sf.read(audio_file)</p> <pre><code>print("Playing audio and sending LSL marker...") marker_val = [1] outlet.push_sample(marker_val) sd.play(data, fs) sd.wait() print("Audio playback finished.") </code></pre> <p>if <strong>name</strong> == "<strong>main</strong>":</p> <pre><code>info = StreamInfo( name="AudioMarkers", type="Markers", channel_count=1, nominal_srate=0, channel_format="int32", source_id="uniqueMarkerID12345" ) outlet = StreamOutlet(info) while True: wait_for_keypress() audio_filepath = "/path/to/audio.wav" play_audio_and_send_marker( audio_filepath, outlet )</code></pre><h2 dir="auto">2.4 STEP 5 - Use LabRecorder to view and save all LSL streams</h2><ol dir="auto"><li data-preset-tag="p"><p>Open LabRecorder</p></li><li data-preset-tag="p"><p>Press <code>Update</code>. The available LSL streams should be visible in the stream list<br>• You should be able to see streams from both EmotivPROs (usually called “Emotiv-<br>DataStream”) and the marker stream (called “AudioMarkers”)</p></li><li data-preset-tag="p"><p>Click <code>Browse</code> to select a location to store data (and set other parameters)</p></li><li data-preset-tag="p"><p>Select all streams and press <code>Record</code> to start recording</p></li></ol><h2 dir="auto">3.0 Working with the data</h2><p dir="auto">LabRecorder outputs an XDF file (Extensible Data Format) that contains data from all the streams. XDF files are structured into, streams, each with a different header that describes what it contains (device name, data type, sampling rate, channels, and more). You can use the below codeblock to open your XDF file and display some basic information.</p><p dir="auto"><strong>Note: Replace </strong><code><strong>/path/to/your/file.xdf</strong></code><strong> with the filepath for your LabRecorder XDF output file.</strong></p><pre data-language="JSX"><code>import pyxdf </code></pre> <p>import mne<br>import matplotlib.pyplot as plt<br>import numpy as np</p> <h1>Give the path to your LSL output file here.</h1> <p>data_path = "/path/to/your/file.xdf"</p> <h1>Load the XDF file.</h1> <p>streams, fileheader = pyxdf.load_xdf(data_path)</p> <p>print("XDF File Header:", fileheader)<br>print("Number of streams found:", len(streams))</p> <p>for i, stream in enumerate(streams):<br>print("\nStream", i + 1)<br>print("Stream Name:", stream["info"]["name"][0])<br>print("Stream Type:", stream["info"]["type"][0])<br>print("Number of Channels:", stream["info"]["channel_count"][0])</p> <pre><code>sfreq = float(stream["info"]["nominal_srate"][0]) print("Sampling Rate:", sfreq) print("Number of Samples:", len(stream["time_series"])) print("First 5 data points:", stream["time_series"][:5]) channel_names = [ chan["label"][0] for chan in stream["info"]["desc"][0]["channels"][0]["channel"] ] print("Channel Names:", channel_names) channel_types = "eeg"</code></pre><h3 dir="auto"><br></h3><h2 dir="auto">4.0 Additional Resources</h2><h4 dir="auto">Official Documentation</h4><ol dir="auto"><li data-preset-tag="p"><p>Check out the <a href="1. Check out the online documentation, including the official README file on GitHub 2. Additional resources: • Code to run LSL using Emotiv’s devices, with example scripts • Useful LSL demo on YouTube • SCCN LSL GitHub repository for all associated libraries • LSL GitHub repository for a collection a submodules and apps 3. HyPyP analysis pipeline for Hyperscanning studies" target="_blank">online documentation</a>, including the <a href="https://github.com/sccn/labstreaminglayer/" target="_blank">official README file on GitHub</a></p></li><li data-preset-tag="p"><p>Additional resources:<br>• <a href="https://github.com/Emotiv/labstreaminglayer" target="_blank">Code</a> to run LSL using Emotiv’s devices, with example scripts<br>• Useful <a href="https://www.youtube.com/watch?v=Y1at7yrcFW0&list=PLVnr33MP5RMRhGwY36zHHDOmAaYTB138D" target="_blank">LSL demo on YouTube</a><br>• <a href="https://github.com/sccn/labstreaminglayer" target="_blank">SCCN LSL GitHub repository</a> for all associated libraries<br>• <a href="https://github.com/labstreaminglayer" target="_blank">LSL GitHub repository</a> for a collection a submodules and apps</p></li><li data-preset-tag="p"><p><a href="https://academic.oup.com/scan/article/16/1-2/72/5919711?login=false" target="_blank">HyPyP analysis pipeline</a> for Hyperscanning studies</p></li></ol> </code></pre
""" LSL Example: Play audio and send a trigger marker <p>This script creates an LSL marker stream, waits for the user to<br>press ENTER, then plays an audio file and sends a marker that<br>can be synchronized with EEG data collected through LabRecorder.<br>"""</p> <p>import sounddevice as sd<br>import soundfile as sf<br>from pylsl import StreamInfo, StreamOutlet</p> <p>def wait_for_keypress():<br>print("Press ENTER to start audio playback and send an LSL marker.")<br>while True:<br>if input() == "":<br>break</p> <p>def play_audio_and_send_marker(audio_file, outlet):<br>data, fs = sf.read(audio_file)</p> <pre><code>print("Playing audio and sending LSL marker...") marker_val = [1] outlet.push_sample(marker_val) sd.play(data, fs) sd.wait() print("Audio playback finished.") </code></pre> <p>if <strong>name</strong> == "<strong>main</strong>":</p> <pre><code>info = StreamInfo( name="AudioMarkers", type="Markers", channel_count=1, nominal_srate=0, channel_format="int32", source_id="uniqueMarkerID12345" ) outlet = StreamOutlet(info) while True: wait_for_keypress() audio_filepath = "/path/to/audio.wav" play_audio_and_send_marker( audio_filepath, outlet )</code></pre><h2 dir="auto">2.4 STEP 5 - Use LabRecorder to view and save all LSL streams</h2><ol dir="auto"><li data-preset-tag="p"><p>Open LabRecorder</p></li><li data-preset-tag="p"><p>Press <code>Update</code>. The available LSL streams should be visible in the stream list<br>• You should be able to see streams from both EmotivPROs (usually called “Emotiv-<br>DataStream”) and the marker stream (called “AudioMarkers”)</p></li><li data-preset-tag="p"><p>Click <code>Browse</code> to select a location to store data (and set other parameters)</p></li><li data-preset-tag="p"><p>Select all streams and press <code>Record</code> to start recording</p></li></ol><h2 dir="auto">3.0 Working with the data</h2><p dir="auto">LabRecorder outputs an XDF file (Extensible Data Format) that contains data from all the streams. XDF files are structured into, streams, each with a different header that describes what it contains (device name, data type, sampling rate, channels, and more). You can use the below codeblock to open your XDF file and display some basic information.</p><p dir="auto"><strong>Note: Replace </strong><code><strong>/path/to/your/file.xdf</strong></code><strong> with the filepath for your LabRecorder XDF output file.</strong></p><pre data-language="JSX"><code>import pyxdf </code></pre> <p>import mne<br>import matplotlib.pyplot as plt<br>import numpy as np</p> <h1>Give the path to your LSL output file here.</h1> <p>data_path = "/path/to/your/file.xdf"</p> <h1>Load the XDF file.</h1> <p>streams, fileheader = pyxdf.load_xdf(data_path)</p> <p>print("XDF File Header:", fileheader)<br>print("Number of streams found:", len(streams))</p> <p>for i, stream in enumerate(streams):<br>print("\nStream", i + 1)<br>print("Stream Name:", stream["info"]["name"][0])<br>print("Stream Type:", stream["info"]["type"][0])<br>print("Number of Channels:", stream["info"]["channel_count"][0])</p> <pre><code>sfreq = float(stream["info"]["nominal_srate"][0]) print("Sampling Rate:", sfreq) print("Number of Samples:", len(stream["time_series"])) print("First 5 data points:", stream["time_series"][:5]) channel_names = [ chan["label"][0] for chan in stream["info"]["desc"][0]["channels"][0]["channel"] ] print("Channel Names:", channel_names) channel_types = "eeg"</code></pre><h3 dir="auto"><br></h3><h2 dir="auto">4.0 Additional Resources</h2><h4 dir="auto">Official Documentation</h4><ol dir="auto"><li data-preset-tag="p"><p>Check out the <a href="1. Check out the online documentation, including the official README file on GitHub 2. Additional resources: • Code to run LSL using Emotiv’s devices, with example scripts • Useful LSL demo on YouTube • SCCN LSL GitHub repository for all associated libraries • LSL GitHub repository for a collection a submodules and apps 3. HyPyP analysis pipeline for Hyperscanning studies" target="_blank">online documentation</a>, including the <a href="https://github.com/sccn/labstreaminglayer/" target="_blank">official README file on GitHub</a></p></li><li data-preset-tag="p"><p>Additional resources:<br>• <a href="https://github.com/Emotiv/labstreaminglayer" target="_blank">Code</a> to run LSL using Emotiv’s devices, with example scripts<br>• Useful <a href="https://www.youtube.com/watch?v=Y1at7yrcFW0&list=PLVnr33MP5RMRhGwY36zHHDOmAaYTB138D" target="_blank">LSL demo on YouTube</a><br>• <a href="https://github.com/sccn/labstreaminglayer" target="_blank">SCCN LSL GitHub repository</a> for all associated libraries<br>• <a href="https://github.com/labstreaminglayer" target="_blank">LSL GitHub repository</a> for a collection a submodules and apps</p></li><li data-preset-tag="p"><p><a href="https://academic.oup.com/scan/article/16/1-2/72/5919711?login=false" target="_blank">HyPyP analysis pipeline</a> for Hyperscanning studies</p></li></ol> </code></pre
欢迎!在本教程中,我们将学习如何使用Python中的实验室串流层(LSL)来收集并同步来自多个设备的Emotiv脑电(EEG)数据。这需要具备Python编程语言的基础实用知识。
您将学到什么
什么是实验室串流层(LSL)以及为什么研究人员使用它
如何从多个Emotiv脑电(EEG)设备收集同步数据
如何导入并检查收集的数据
1.1 什么是 LSL?它有什么用途?
实验室串流层(LSL)是一个开源工具箱,可用于发送、接收和同步来自各种传感器硬件的神经、生理和行为数据流。功能日益强大、精确和便携的数据化脑部及身体感应硬件设备(如Emotiv脑电(EEG)系统)正在将神经科学带出实验室,带入实时数据的世界。曾经,像脑电(EEG)和脑磁(MEG)这样的脑部测量仅限于研究实验室,而现在,移动设备能让我们在更自然的环境中同时收集来自多个人的多种数据。
研究人员可能对听同一首音乐的两个人之间的生理同步性感兴趣。LSL可以帮助我们分别收集两台EEG脑电仪的数据,这些数据同时还能与声音播放保持同步。
LSL的其他一些应用示例:
将实验中的事件标记(event markers)添加到正在进行的EEG数据中
为单个受试者时间对齐来自多个来源的数据(例如心率、肌电(EMG)、脑电(EEG))
时间对齐来自多个受试者的数据(例如EEG超扫描研究/Hyperscanning)
1.2 LSL 是如何工作的?
实验室串流层(Lab Streaming Layer)是一种用于在多个设备之间实时交换时间序列数据的协议。LSL 可以使用 Python、MATLAB、C++、Java 等编程语言的开源库来实现。
其核心功能围绕 LSL 数据流展开:
1. 采集设备/软件收集数据并创建数据流 - 生理数据可以从EEG记录设备、眼动仪、动作捕捉系统、心率监测器等流式传输到 LSL,包括元数据(采样率、数据类型、通道信息等) - 来自实验的事件标记(例如使用 PsychoPy)也可以作为数据流使用 LSL 发送
2. 数据流被发布到网络中 - 这就是使用 LSL 发送数据的方式;数据流被“广播”到网络中 - 已发布的流在网络上可用,并可被同一网络上的其他支持 LSL 的设备发现 - LSL 根据通用时钟(遵循网络时间协议 NTP)为每个数据块或样本分配一个时间戳。 - 数据流将通过“出口(outlet)”逐个样本(或逐个数据块)地推送
3. 收集设备“订阅”数据流 - 这就是使用 LSL 接收数据的方式 - 同一网络上的收集设备通过“进口(inlet)”接收发布的视频和数据流。 - 每个 inlet 仅接收来自一个 outlet 的数据流样本和元数据
4. 保存数据 - 订阅数据流后,您可以将其保存为您喜欢的编程语言中的变量,或使用 LSL 提供的软件 LabRecorder 将其保存为标准格式(例如 .xdf)。
2.0 教程概述
在本教程中,我们将以一个实验设置示例为例,指导您在 Python 中使用 LSL 实现该设置所需的步骤和代码。我们将使用 Python 播放一段声音,同时收集两名佩戴 Emotiv 头戴式设备的受试者的 EEG 数据。我们将使用两台分别运行 EmotivPRO 的电脑来收集 EEG 数据,并通过独立的 LSL 出口(outlet)广播每个数据流。我们将使用一个 Python 库来播放音频文件,并在每次文件开始播放时同步发送一个触发器(trigger)。
步骤:
1. 使用 EmotivPRO 通过包含 EEG 数据(和/或运动、接触质量、信号质量等)的 LSL 出口(outlet)传输数据。 2. 使用 Python 脚本播放音频,同时通过另一个 LSL 发送触发标记。使用 LabRecorder 通过 LSL 进口(inlet)捕获并保存所有这三个数据流。
2.1 步骤 1 - 设置与安装
您将需要受支持的数据采集设备来收集数据
• 所有 Emotiv 的脑电设备都通过 EmotivPRO 软件连接到 LSL在您的设备上安装 EmotivPRO。您需要拥有有效的 EmotivPRO 许可证才能使用 LSL。
使用以下命令安装 Python LSL 库:
pip install pylsl下载 LabRecorder 软件。这是一个简单且免费的应用程序,可以通过命令行运行
或使用独立下载运行对于我们的实验:安装使用 Python 播放音频所需的包
pip install sounddevice soundfile
2.2 步骤 3 - 从 EmotivPRO 通过 LSL 流发送数据
在应用程序的右上角找到“...”,导航到“Settings”(设置)
找到“Lab Streaming Layer”部分和“Outlet”子部分
选择您想要广播的所有数据类型
选择数据格式(32位浮点数或64位双精度浮点数)
选择是逐个样本发送数据还是按样本块发送数据
点击“Start”(开始)以广播 LSL 数据流
2.3 步骤 4 - 使用 Python 脚本播放音频并发送触发器
复制以下代码块并将其粘贴到 Python 文件中并保存到您的计算机。
找到您想要播放的音频文件(最好是 .wav 文件),修改脚本,将
变量audio_filepath改为您计算机上音频文件的文件路径打开命令提示符与命令行交互,并导航到存储
Python 文件的文件夹输入:
python3 filename.py
• 根据您的 Python 安装情况,您可以使用python代替python3
注意:将/path/to/audio.wav替换为您要在实验期间播放的音频文件的位置。
""" LSL Example: Play audio and send a trigger marker <p>This script creates an LSL marker stream, waits for the user to<br>press ENTER, then plays an audio file and sends a marker that<br>can be synchronized with EEG data collected through LabRecorder.<br>"""</p> <p>import sounddevice as sd<br>import soundfile as sf<br>from pylsl import StreamInfo, StreamOutlet</p> <p>def wait_for_keypress():<br>print("Press ENTER to start audio playback and send an LSL marker.")<br>while True:<br>if input() == "":<br>break</p> <p>def play_audio_and_send_marker(audio_file, outlet):<br>data, fs = sf.read(audio_file)</p> <pre><code>print("Playing audio and sending LSL marker...") marker_val = [1] outlet.push_sample(marker_val) sd.play(data, fs) sd.wait() print("Audio playback finished.") </code></pre> <p>if <strong>name</strong> == "<strong>main</strong>":</p> <pre><code>info = StreamInfo( name="AudioMarkers", type="Markers", channel_count=1, nominal_srate=0, channel_format="int32", source_id="uniqueMarkerID12345" ) outlet = StreamOutlet(info) while True: wait_for_keypress() audio_filepath = "/path/to/audio.wav" play_audio_and_send_marker( audio_filepath, outlet )</code></pre><h2 dir="auto">2.4 STEP 5 - Use LabRecorder to view and save all LSL streams</h2><ol dir="auto"><li data-preset-tag="p"><p>Open LabRecorder</p></li><li data-preset-tag="p"><p>Press <code>Update</code>. The available LSL streams should be visible in the stream list<br>• You should be able to see streams from both EmotivPROs (usually called “Emotiv-<br>DataStream”) and the marker stream (called “AudioMarkers”)</p></li><li data-preset-tag="p"><p>Click <code>Browse</code> to select a location to store data (and set other parameters)</p></li><li data-preset-tag="p"><p>Select all streams and press <code>Record</code> to start recording</p></li></ol><h2 dir="auto">3.0 Working with the data</h2><p dir="auto">LabRecorder outputs an XDF file (Extensible Data Format) that contains data from all the streams. XDF files are structured into, streams, each with a different header that describes what it contains (device name, data type, sampling rate, channels, and more). You can use the below codeblock to open your XDF file and display some basic information.</p><p dir="auto"><strong>Note: Replace </strong><code><strong>/path/to/your/file.xdf</strong></code><strong> with the filepath for your LabRecorder XDF output file.</strong></p><pre data-language="JSX"><code>import pyxdf </code></pre> <p>import mne<br>import matplotlib.pyplot as plt<br>import numpy as np</p> <h1>Give the path to your LSL output file here.</h1> <p>data_path = "/path/to/your/file.xdf"</p> <h1>Load the XDF file.</h1> <p>streams, fileheader = pyxdf.load_xdf(data_path)</p> <p>print("XDF File Header:", fileheader)<br>print("Number of streams found:", len(streams))</p> <p>for i, stream in enumerate(streams):<br>print("\nStream", i + 1)<br>print("Stream Name:", stream["info"]["name"][0])<br>print("Stream Type:", stream["info"]["type"][0])<br>print("Number of Channels:", stream["info"]["channel_count"][0])</p> <pre><code>sfreq = float(stream["info"]["nominal_srate"][0]) print("Sampling Rate:", sfreq) print("Number of Samples:", len(stream["time_series"])) print("First 5 data points:", stream["time_series"][:5]) channel_names = [ chan["label"][0] for chan in stream["info"]["desc"][0]["channels"][0]["channel"] ] print("Channel Names:", channel_names) channel_types = "eeg"</code></pre><h3 dir="auto"><br></h3><h2 dir="auto">4.0 Additional Resources</h2><h4 dir="auto">Official Documentation</h4><ol dir="auto"><li data-preset-tag="p"><p>Check out the <a href="1. Check out the online documentation, including the official README file on GitHub 2. Additional resources: • Code to run LSL using Emotiv’s devices, with example scripts • Useful LSL demo on YouTube • SCCN LSL GitHub repository for all associated libraries • LSL GitHub repository for a collection a submodules and apps 3. HyPyP analysis pipeline for Hyperscanning studies" target="_blank">online documentation</a>, including the <a href="https://github.com/sccn/labstreaminglayer/" target="_blank">official README file on GitHub</a></p></li><li data-preset-tag="p"><p>Additional resources:<br>• <a href="https://github.com/Emotiv/labstreaminglayer" target="_blank">Code</a> to run LSL using Emotiv’s devices, with example scripts<br>• Useful <a href="https://www.youtube.com/watch?v=Y1at7yrcFW0&list=PLVnr33MP5RMRhGwY36zHHDOmAaYTB138D" target="_blank">LSL demo on YouTube</a><br>• <a href="https://github.com/sccn/labstreaminglayer" target="_blank">SCCN LSL GitHub repository</a> for all associated libraries<br>• <a href="https://github.com/labstreaminglayer" target="_blank">LSL GitHub repository</a> for a collection a submodules and apps</p></li><li data-preset-tag="p"><p><a href="https://academic.oup.com/scan/article/16/1-2/72/5919711?login=false" target="_blank">HyPyP analysis pipeline</a> for Hyperscanning studies</p></li></ol> </code></pre
欢迎!在本教程中,我们将学习如何使用Python中的实验室串流层(LSL)来收集并同步来自多个设备的Emotiv脑电(EEG)数据。这需要具备Python编程语言的基础实用知识。
您将学到什么
什么是实验室串流层(LSL)以及为什么研究人员使用它
如何从多个Emotiv脑电(EEG)设备收集同步数据
如何导入并检查收集的数据
1.1 什么是 LSL?它有什么用途?
实验室串流层(LSL)是一个开源工具箱,可用于发送、接收和同步来自各种传感器硬件的神经、生理和行为数据流。功能日益强大、精确和便携的数据化脑部及身体感应硬件设备(如Emotiv脑电(EEG)系统)正在将神经科学带出实验室,带入实时数据的世界。曾经,像脑电(EEG)和脑磁(MEG)这样的脑部测量仅限于研究实验室,而现在,移动设备能让我们在更自然的环境中同时收集来自多个人的多种数据。
研究人员可能对听同一首音乐的两个人之间的生理同步性感兴趣。LSL可以帮助我们分别收集两台EEG脑电仪的数据,这些数据同时还能与声音播放保持同步。
LSL的其他一些应用示例:
将实验中的事件标记(event markers)添加到正在进行的EEG数据中
为单个受试者时间对齐来自多个来源的数据(例如心率、肌电(EMG)、脑电(EEG))
时间对齐来自多个受试者的数据(例如EEG超扫描研究/Hyperscanning)
1.2 LSL 是如何工作的?
实验室串流层(Lab Streaming Layer)是一种用于在多个设备之间实时交换时间序列数据的协议。LSL 可以使用 Python、MATLAB、C++、Java 等编程语言的开源库来实现。
其核心功能围绕 LSL 数据流展开:
1. 采集设备/软件收集数据并创建数据流 - 生理数据可以从EEG记录设备、眼动仪、动作捕捉系统、心率监测器等流式传输到 LSL,包括元数据(采样率、数据类型、通道信息等) - 来自实验的事件标记(例如使用 PsychoPy)也可以作为数据流使用 LSL 发送
2. 数据流被发布到网络中 - 这就是使用 LSL 发送数据的方式;数据流被“广播”到网络中 - 已发布的流在网络上可用,并可被同一网络上的其他支持 LSL 的设备发现 - LSL 根据通用时钟(遵循网络时间协议 NTP)为每个数据块或样本分配一个时间戳。 - 数据流将通过“出口(outlet)”逐个样本(或逐个数据块)地推送
3. 收集设备“订阅”数据流 - 这就是使用 LSL 接收数据的方式 - 同一网络上的收集设备通过“进口(inlet)”接收发布的视频和数据流。 - 每个 inlet 仅接收来自一个 outlet 的数据流样本和元数据
4. 保存数据 - 订阅数据流后,您可以将其保存为您喜欢的编程语言中的变量,或使用 LSL 提供的软件 LabRecorder 将其保存为标准格式(例如 .xdf)。
2.0 教程概述
在本教程中,我们将以一个实验设置示例为例,指导您在 Python 中使用 LSL 实现该设置所需的步骤和代码。我们将使用 Python 播放一段声音,同时收集两名佩戴 Emotiv 头戴式设备的受试者的 EEG 数据。我们将使用两台分别运行 EmotivPRO 的电脑来收集 EEG 数据,并通过独立的 LSL 出口(outlet)广播每个数据流。我们将使用一个 Python 库来播放音频文件,并在每次文件开始播放时同步发送一个触发器(trigger)。
步骤:
1. 使用 EmotivPRO 通过包含 EEG 数据(和/或运动、接触质量、信号质量等)的 LSL 出口(outlet)传输数据。 2. 使用 Python 脚本播放音频,同时通过另一个 LSL 发送触发标记。使用 LabRecorder 通过 LSL 进口(inlet)捕获并保存所有这三个数据流。
2.1 步骤 1 - 设置与安装
您将需要受支持的数据采集设备来收集数据
• 所有 Emotiv 的脑电设备都通过 EmotivPRO 软件连接到 LSL在您的设备上安装 EmotivPRO。您需要拥有有效的 EmotivPRO 许可证才能使用 LSL。
使用以下命令安装 Python LSL 库:
pip install pylsl下载 LabRecorder 软件。这是一个简单且免费的应用程序,可以通过命令行运行
或使用独立下载运行对于我们的实验:安装使用 Python 播放音频所需的包
pip install sounddevice soundfile
2.2 步骤 3 - 从 EmotivPRO 通过 LSL 流发送数据
在应用程序的右上角找到“...”,导航到“Settings”(设置)
找到“Lab Streaming Layer”部分和“Outlet”子部分
选择您想要广播的所有数据类型
选择数据格式(32位浮点数或64位双精度浮点数)
选择是逐个样本发送数据还是按样本块发送数据
点击“Start”(开始)以广播 LSL 数据流
2.3 步骤 4 - 使用 Python 脚本播放音频并发送触发器
复制以下代码块并将其粘贴到 Python 文件中并保存到您的计算机。
找到您想要播放的音频文件(最好是 .wav 文件),修改脚本,将
变量audio_filepath改为您计算机上音频文件的文件路径打开命令提示符与命令行交互,并导航到存储
Python 文件的文件夹输入:
python3 filename.py
• 根据您的 Python 安装情况,您可以使用python代替python3
注意:将/path/to/audio.wav替换为您要在实验期间播放的音频文件的位置。
""" LSL Example: Play audio and send a trigger marker <p>This script creates an LSL marker stream, waits for the user to<br>press ENTER, then plays an audio file and sends a marker that<br>can be synchronized with EEG data collected through LabRecorder.<br>"""</p> <p>import sounddevice as sd<br>import soundfile as sf<br>from pylsl import StreamInfo, StreamOutlet</p> <p>def wait_for_keypress():<br>print("Press ENTER to start audio playback and send an LSL marker.")<br>while True:<br>if input() == "":<br>break</p> <p>def play_audio_and_send_marker(audio_file, outlet):<br>data, fs = sf.read(audio_file)</p> <pre><code>print("Playing audio and sending LSL marker...") marker_val = [1] outlet.push_sample(marker_val) sd.play(data, fs) sd.wait() print("Audio playback finished.") </code></pre> <p>if <strong>name</strong> == "<strong>main</strong>":</p> <pre><code>info = StreamInfo( name="AudioMarkers", type="Markers", channel_count=1, nominal_srate=0, channel_format="int32", source_id="uniqueMarkerID12345" ) outlet = StreamOutlet(info) while True: wait_for_keypress() audio_filepath = "/path/to/audio.wav" play_audio_and_send_marker( audio_filepath, outlet )</code></pre><h2 dir="auto">2.4 STEP 5 - Use LabRecorder to view and save all LSL streams</h2><ol dir="auto"><li data-preset-tag="p"><p>Open LabRecorder</p></li><li data-preset-tag="p"><p>Press <code>Update</code>. The available LSL streams should be visible in the stream list<br>• You should be able to see streams from both EmotivPROs (usually called “Emotiv-<br>DataStream”) and the marker stream (called “AudioMarkers”)</p></li><li data-preset-tag="p"><p>Click <code>Browse</code> to select a location to store data (and set other parameters)</p></li><li data-preset-tag="p"><p>Select all streams and press <code>Record</code> to start recording</p></li></ol><h2 dir="auto">3.0 Working with the data</h2><p dir="auto">LabRecorder outputs an XDF file (Extensible Data Format) that contains data from all the streams. XDF files are structured into, streams, each with a different header that describes what it contains (device name, data type, sampling rate, channels, and more). You can use the below codeblock to open your XDF file and display some basic information.</p><p dir="auto"><strong>Note: Replace </strong><code><strong>/path/to/your/file.xdf</strong></code><strong> with the filepath for your LabRecorder XDF output file.</strong></p><pre data-language="JSX"><code>import pyxdf </code></pre> <p>import mne<br>import matplotlib.pyplot as plt<br>import numpy as np</p> <h1>Give the path to your LSL output file here.</h1> <p>data_path = "/path/to/your/file.xdf"</p> <h1>Load the XDF file.</h1> <p>streams, fileheader = pyxdf.load_xdf(data_path)</p> <p>print("XDF File Header:", fileheader)<br>print("Number of streams found:", len(streams))</p> <p>for i, stream in enumerate(streams):<br>print("\nStream", i + 1)<br>print("Stream Name:", stream["info"]["name"][0])<br>print("Stream Type:", stream["info"]["type"][0])<br>print("Number of Channels:", stream["info"]["channel_count"][0])</p> <pre><code>sfreq = float(stream["info"]["nominal_srate"][0]) print("Sampling Rate:", sfreq) print("Number of Samples:", len(stream["time_series"])) print("First 5 data points:", stream["time_series"][:5]) channel_names = [ chan["label"][0] for chan in stream["info"]["desc"][0]["channels"][0]["channel"] ] print("Channel Names:", channel_names) channel_types = "eeg"</code></pre><h3 dir="auto"><br></h3><h2 dir="auto">4.0 Additional Resources</h2><h4 dir="auto">Official Documentation</h4><ol dir="auto"><li data-preset-tag="p"><p>Check out the <a href="1. Check out the online documentation, including the official README file on GitHub 2. Additional resources: • Code to run LSL using Emotiv’s devices, with example scripts • Useful LSL demo on YouTube • SCCN LSL GitHub repository for all associated libraries • LSL GitHub repository for a collection a submodules and apps 3. HyPyP analysis pipeline for Hyperscanning studies" target="_blank">online documentation</a>, including the <a href="https://github.com/sccn/labstreaminglayer/" target="_blank">official README file on GitHub</a></p></li><li data-preset-tag="p"><p>Additional resources:<br>• <a href="https://github.com/Emotiv/labstreaminglayer" target="_blank">Code</a> to run LSL using Emotiv’s devices, with example scripts<br>• Useful <a href="https://www.youtube.com/watch?v=Y1at7yrcFW0&list=PLVnr33MP5RMRhGwY36zHHDOmAaYTB138D" target="_blank">LSL demo on YouTube</a><br>• <a href="https://github.com/sccn/labstreaminglayer" target="_blank">SCCN LSL GitHub repository</a> for all associated libraries<br>• <a href="https://github.com/labstreaminglayer" target="_blank">LSL GitHub repository</a> for a collection a submodules and apps</p></li><li data-preset-tag="p"><p><a href="https://academic.oup.com/scan/article/16/1-2/72/5919711?login=false" target="_blank">HyPyP analysis pipeline</a> for Hyperscanning studies</p></li></ol> </code></pre
继续阅读