다중 데이터 스트림 동기화를 위한 Lab Streaming Layer (LSL)
로시니 란데니야(Roshini Randeniya) 박사와 루카스 클라이네(Lucas Kleine)
업데이트됨
2024. 5. 17.
다중 데이터 스트림 동기화를 위한 Lab Streaming Layer (LSL)
로시니 란데니야(Roshini Randeniya) 박사와 루카스 클라이네(Lucas Kleine)
업데이트됨
2024. 5. 17.
다중 데이터 스트림 동기화를 위한 Lab Streaming Layer (LSL)
로시니 란데니야(Roshini Randeniya) 박사와 루카스 클라이네(Lucas Kleine)
업데이트됨
2024. 5. 17.
환영합니다! 이 튜토리얼에서는 Python에서 Lab Streaming Layer (LSL)를 사용하여 여러 기기에서 Emotiv EEG 데이터를 수집하고 동기화하는 방법을 배웁니다. 이를 위해서는 Python 프로그래밍 언어에 대한 기본적인 실무 지식이 필요합니다.
배울 내용
Lab Streaming Layer (LSL)가 무엇이며 연구자들이 이를 사용하는 이유
여러 Emotiv EEG 장치에서 동기화된 데이터를 수집하는 방법
수집된 데이터를 가져오고 검사하는 방법
1.1 LSL이란 무엇이며 어디에 유용한가요?
교생 스트리밍 레이어(LSL)는 다양한 센서 하드웨어로부터 신경, 생리 및 행동 데이터 스트림을 전송, 수신 및 동기화하는 데 사용할 수 있는 오픈 소스 툴박스입니다. 갈수록 기능이 뛰어나고 정밀하며 모바일화된 뇌 및 신체 감지 하드웨어 장치(기기)(Emotiv EEG 시스템 등)는 뇌과학을 연구실 밖으로 끌어내어 실시간 데이터의 세계로 안내하고 있습니다. 한때 뇌 측정(EEG 및 MEG 등)이 연구실 내에만 국한되었다면, 이제 모바일 장치 덕분에 더 자연스러운 환경에서 여러 사람으로부터 동시에 다양한 데이터를 수집할 수 있게 되었습니다.
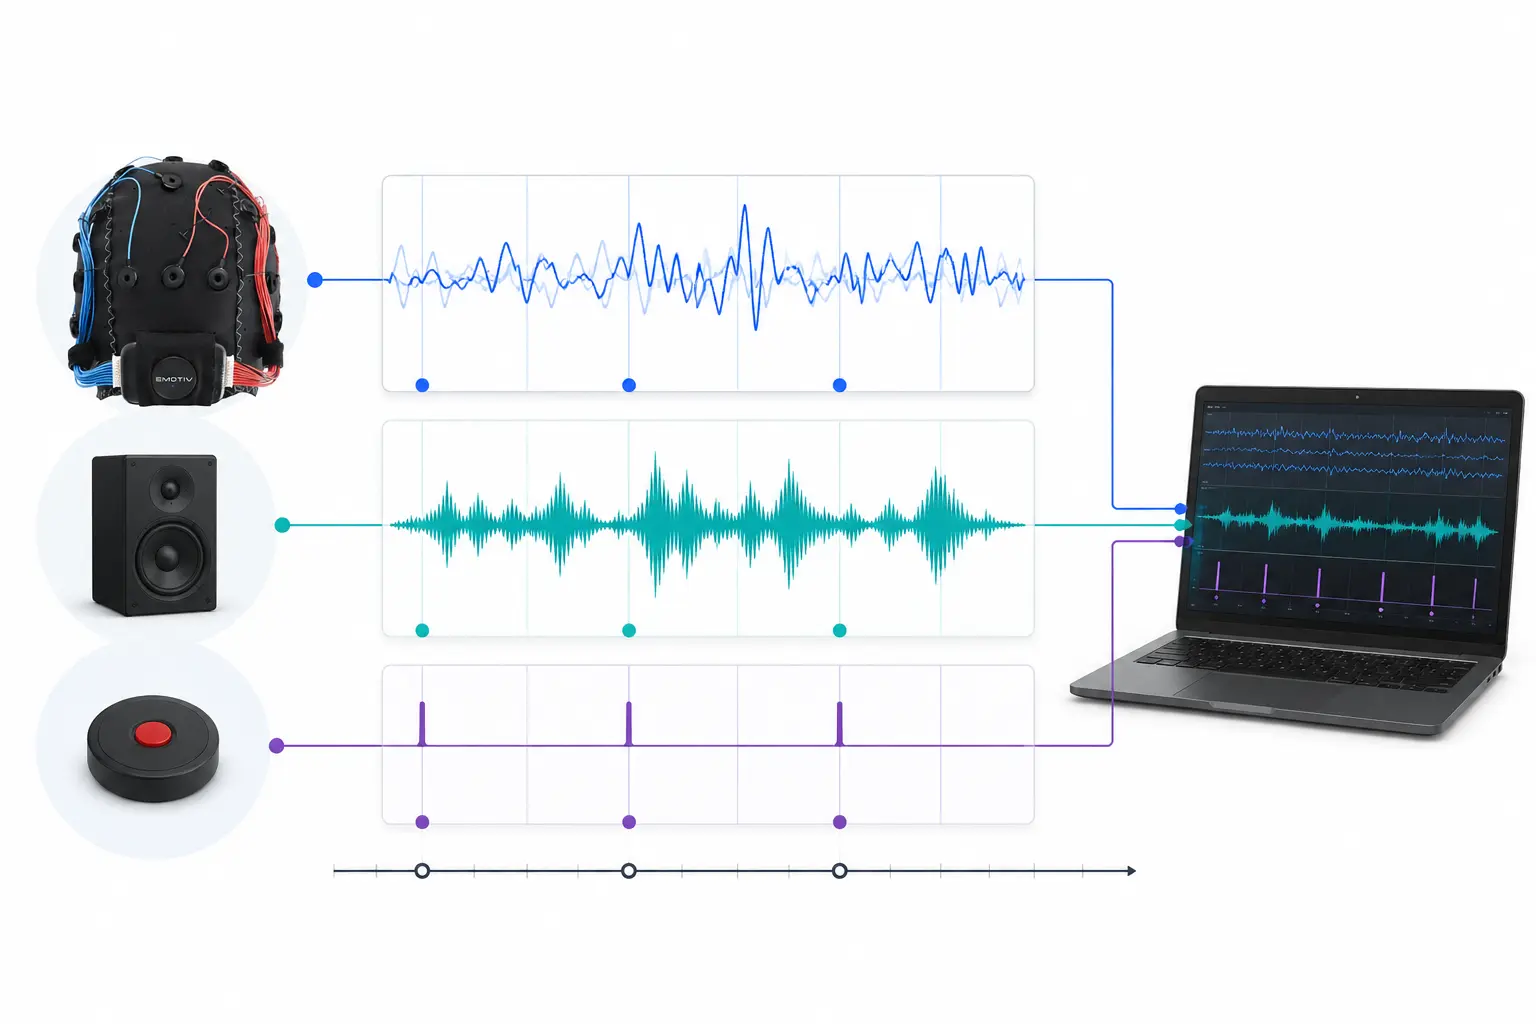
연구자는 동일한 음악을 듣는 두 사람 간의 생리적 동기화에 관심을 가질 수 있습니다. LSL은 두 개의 EEG 헤드셋에서 각각 데이터를 수집하는 동시에, 소리 재생과도 데이터를 동기화하는 데 도움을 줄 수 있습니다.
LSL의 기타 사용 사례 예시:
실험의 이벤트 마커를 진행 중인 EEG 데이터에 추가
한 명의 참가자를 위해 여러 소스(예: 심박수, EMG, EEG)에서 수집한 데이터의 시간 정렬
여러 참가자의 데이터 시간 정렬(예: EEG 하이퍼스캐닝 연구)
1.2 LSL은 어떻게 작동하나요?
Lab Streaming Layer는 여러 기기 간에 시계열 데이터를 실시간으로 교환하기 위한 프로토콜입니다. LSL은 Python, MATLAB, C++, Java 등과 같은 프로그래밍 언어용 오픈 소스 라이브러리를 사용하여 구현할 수 있습니다.
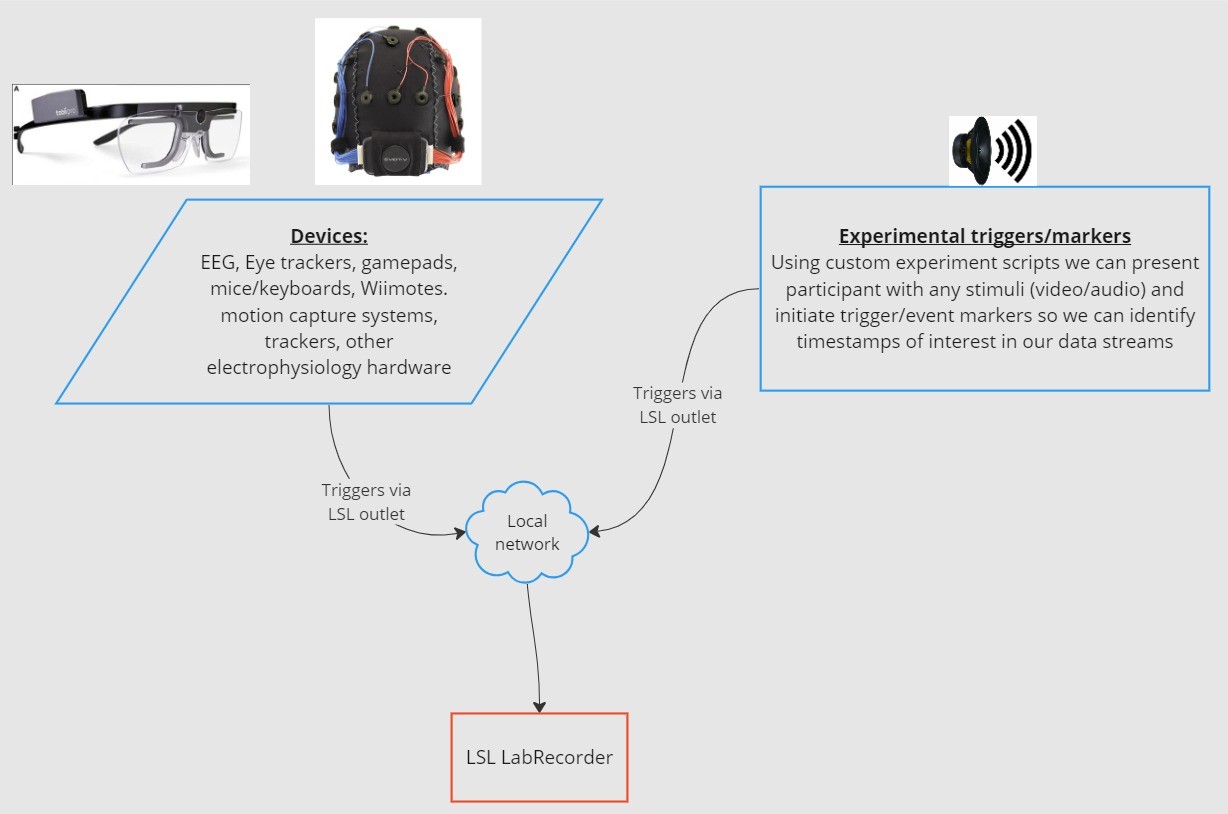
핵심 기능은 LSL 데이터 스트림을 중심으로 작동합니다:
1. 수집 장치/소프트웨어가 데이터를 수집하고 데이터 스트림을 생성합니다 - EEG 기록 장치, 아이 트래커, 모션 캡처 시스템, 심박수 모니터 등에서 메타데이터(샘플링 속도, 데이터 유형, 채널 정보 등)를 포함한 생리적 데이터를 LSL로 스트리밍할 수 있습니다. - 실험(예: PsychoPy 사용)의 이벤트 마커도 LSL을 사용하여 데이터 스트림으로 전송할 수 있습니다.
2. 데이터 스트림이 네트워크에 게시(publish)됩니다 - 이것이 LSL을 사용하여 데이터를 전송하는 방식입니다. 데이터 스트림이 네트워크로 "브로드캐스트"됩니다. - 게시된 스트림은 네트워크에서 사용 가능하며, 동일한 네트워크 상의 다른 LSL 지원 기기에서 검색할 수 있습니다. - LSL은 공통 클록(네트워크 시간 프로토콜 준수)을 기반으로 각 데이터 청크 또는 샘플에 타임스탬프를 할당합니다. - 스트림은 "아울렛(outlet)"을 통해 샘플 단위(또는 청크 단위)로 푸시됩니다.
3. 수집 장치들이 데이터 스트림을 "구독(subscribe)"합니다 - 이것이 LSL을 통해 데이터를 수신하는 방식입니다. - 동일한 네트워크 상의 수집 장치들은 "인렛(inlet)"을 통해 게시된 데이터 스트림을 받습니다. - 각 인렛은 단 하나의 아울렛으로부터만 스트림 샘플과 메타데이터를 수신합니다.
4. 데이터 저장 - 데이터 스트림을 구독하면 선호하는 프로토콜 언어에서 변수로 저장하거나, LSL에서 제공하는 LabRecorder 소프트웨어를 사용하여 .xdf와 같은 표준 형식으로 저장할 수 있습니다.
2.0 튜토리얼 개요
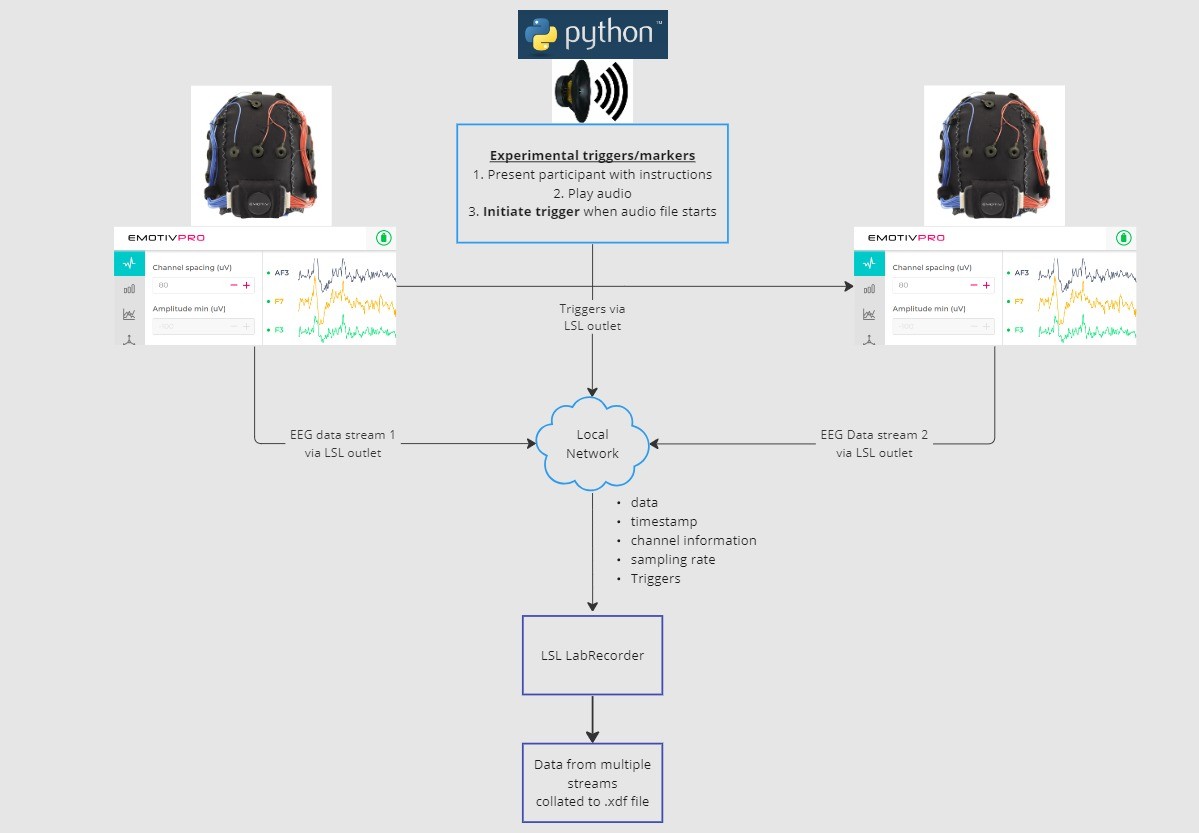
본 튜토리얼에서는 예시 실험 설정을 통해 Python에서 LSL을 사용하여 이를 구현하는 데 필요한 단계와 코드를 안내합니다. Emotiv 헤드셋을 착용한 두 사람으로부터 EEG 데이터를 수집하는 동안 Python으로 소리를 재생하는 방식을 사용합니다. 각각 EmotivPRO를 실행하는 두 대의 컴퓨터를 사용하여 EEG 데이터를 수집하고, 각 스트림을 별도의 LSL 아울렛을 통해 브로드캐스트합니다. Python 라이브러리를 사용하여 오디오 파일을 재생하고, 파일이 시작될 때마다 동시에 트리거를 전송합니다.
단계:
1. EmotivPRO를 사용하여 EEG 데이터(및/또는 모션, 접촉 품질, 신호 품질 등)를 포함하는 LSL 아울렛을 통해 데이터를 스트리밍합니다. 2. Python 스크립트를 사용하여 오디오 트랙을 재생하고, 동시에 다른 LSL을 통해 트리거를 전송합니다. LabRecorder를 사용하여 LSL 인렛을 통해 세 개의 데이터 스트림을 모두 캡처하고 저장합니다.
2.1 1단계 - 설정 및 설치
데이터 수집을 위해 지원되는 데이터 수집 장치가 필요합니다
• Emotiv의 모든 브레인웨어 장치는 EmotivPRO 소프트웨어를 통해 LSL에 연결됩니다.장치에 EmotivPRO를 설치합니다. LSL을 사용하려면 유효한 EmotivPRO 라이선스가 필요합니다.
다음 명령어로 Python LSL 라이브러리를 설치합니다:
pip install pylslLabRecorder 소프트웨어를 다운로드합니다. 이 소프트웨어는 명령줄에서 또는 독립형 다운로드를 통해 실행할 수 있는 간단한 무료 앱입니다.
실험을 위해: Python을 사용하여 오디오를 재생하는 데 필요한 패키지를 설치합니다.
pip install sounddevice soundfile
2.2 3단계 - EmotivPRO에서 LSL 스트림을 통해 데이터 전송
앱 우측 상단의 “...”를 찾아 설정(Settings)으로 이동합니다.
‘Lab Streaming Layer’ 섹션과 ‘Outlet’ 하위 섹션을 찾습니다.
브로드캐스트하려는 모든 데이터 유형을 선택합니다.
데이터 형식(32비트 float 또는 64비트 double)을 선택합니다.
데이터를 샘플 단위로 보낼지 또는 샘플 청크 단위로 보낼지 선택합니다.
‘Start’를 클릭하여 LSL 데이터 스트림 브로드캐스트를 시작합니다.
2.3 4단계 - Python 스크립트를 사용하여 오디오 재생 및 트리거 전송
다음 코드 블록을 복사하여 Python 파일에 붙여넣고 컴퓨터에 저장합니다.
재생하려는 오디오 파일(가급적 .wav 파일)을 찾고, 스크립트에서
audio_filepath변수를 컴퓨터에 있는 오디오 파일 경로로 변경합니다.명령 프롬프트를 열어 명령줄과 상호 작용하고, Python 파일이 저장된 폴더로 이동합니다.
python3 filename.py를 입력합니다.
• 설치된 Python 버전에 따라python3대신python을 사용할 수 있습니다.
참고:/path/to/audio.wav부분을 실험 중에 재생할 오디오 파일의 위치로 바꾸십시오.
""" LSL Example: Play audio and send a trigger marker <p>This script creates an LSL marker stream, waits for the user to<br>press ENTER, then plays an audio file and sends a marker that<br>can be synchronized with EEG data collected through LabRecorder.<br>"""</p> <p>import sounddevice as sd<br>import soundfile as sf<br>from pylsl import StreamInfo, StreamOutlet</p> <p>def wait_for_keypress():<br>print("Press ENTER to start audio playback and send an LSL marker.")<br>while True:<br>if input() == "":<br>break</p> <p>def play_audio_and_send_marker(audio_file, outlet):<br>data, fs = sf.read(audio_file)</p> <pre><code>print("Playing audio and sending LSL marker...") marker_val = [1] outlet.push_sample(marker_val) sd.play(data, fs) sd.wait() print("Audio playback finished.") </code></pre> <p>if <strong>name</strong> == "<strong>main</strong>":</p> <pre><code>info = StreamInfo( name="AudioMarkers", type="Markers", channel_count=1, nominal_srate=0, channel_format="int32", source_id="uniqueMarkerID12345" ) outlet = StreamOutlet(info) while True: wait_for_keypress() audio_filepath = "/path/to/audio.wav" play_audio_and_send_marker( audio_filepath, outlet )</code></pre><h2 dir="auto">2.4 STEP 5 - Use LabRecorder to view and save all LSL streams</h2><ol dir="auto"><li data-preset-tag="p"><p>Open LabRecorder</p></li><li data-preset-tag="p"><p>Press <code>Update</code>. The available LSL streams should be visible in the stream list<br>• You should be able to see streams from both EmotivPROs (usually called “Emotiv-<br>DataStream”) and the marker stream (called “AudioMarkers”)</p></li><li data-preset-tag="p"><p>Click <code>Browse</code> to select a location to store data (and set other parameters)</p></li><li data-preset-tag="p"><p>Select all streams and press <code>Record</code> to start recording</p></li></ol><h2 dir="auto">3.0 Working with the data</h2><p dir="auto">LabRecorder outputs an XDF file (Extensible Data Format) that contains data from all the streams. XDF files are structured into, streams, each with a different header that describes what it contains (device name, data type, sampling rate, channels, and more). You can use the below codeblock to open your XDF file and display some basic information.</p><p dir="auto"><strong>Note: Replace </strong><code><strong>/path/to/your/file.xdf</strong></code><strong> with the filepath for your LabRecorder XDF output file.</strong></p><pre data-language="JSX"><code>import pyxdf </code></pre> <p>import mne<br>import matplotlib.pyplot as plt<br>import numpy as np</p> <h1>Give the path to your LSL output file here.</h1> <p>data_path = "/path/to/your/file.xdf"</p> <h1>Load the XDF file.</h1> <p>streams, fileheader = pyxdf.load_xdf(data_path)</p> <p>print("XDF File Header:", fileheader)<br>print("Number of streams found:", len(streams))</p> <p>for i, stream in enumerate(streams):<br>print("\nStream", i + 1)<br>print("Stream Name:", stream["info"]["name"][0])<br>print("Stream Type:", stream["info"]["type"][0])<br>print("Number of Channels:", stream["info"]["channel_count"][0])</p> <pre><code>sfreq = float(stream["info"]["nominal_srate"][0]) print("Sampling Rate:", sfreq) print("Number of Samples:", len(stream["time_series"])) print("First 5 data points:", stream["time_series"][:5]) channel_names = [ chan["label"][0] for chan in stream["info"]["desc"][0]["channels"][0]["channel"] ] print("Channel Names:", channel_names) channel_types = "eeg"</code></pre><h3 dir="auto"><br></h3><h2 dir="auto">4.0 Additional Resources</h2><h4 dir="auto">Official Documentation</h4><ol dir="auto"><li data-preset-tag="p"><p>Check out the <a href="1. Check out the online documentation, including the official README file on GitHub 2. Additional resources: • Code to run LSL using Emotiv’s devices, with example scripts • Useful LSL demo on YouTube • SCCN LSL GitHub repository for all associated libraries • LSL GitHub repository for a collection a submodules and apps 3. HyPyP analysis pipeline for Hyperscanning studies" target="_blank">online documentation</a>, including the <a href="https://github.com/sccn/labstreaminglayer/" target="_blank">official README file on GitHub</a></p></li><li data-preset-tag="p"><p>Additional resources:<br>• <a href="https://github.com/Emotiv/labstreaminglayer" target="_blank">Code</a> to run LSL using Emotiv’s devices, with example scripts<br>• Useful <a href="https://www.youtube.com/watch?v=Y1at7yrcFW0&list=PLVnr33MP5RMRhGwY36zHHDOmAaYTB138D" target="_blank">LSL demo on YouTube</a><br>• <a href="https://github.com/sccn/labstreaminglayer" target="_blank">SCCN LSL GitHub repository</a> for all associated libraries<br>• <a href="https://github.com/labstreaminglayer" target="_blank">LSL GitHub repository</a> for a collection a submodules and apps</p></li><li data-preset-tag="p"><p><a href="https://academic.oup.com/scan/article/16/1-2/72/5919711?login=false" target="_blank">HyPyP analysis pipeline</a> for Hyperscanning studies</p></li></ol> </code></pre
""" LSL Example: Play audio and send a trigger marker <p>This script creates an LSL marker stream, waits for the user to<br>press ENTER, then plays an audio file and sends a marker that<br>can be synchronized with EEG data collected through LabRecorder.<br>"""</p> <p>import sounddevice as sd<br>import soundfile as sf<br>from pylsl import StreamInfo, StreamOutlet</p> <p>def wait_for_keypress():<br>print("Press ENTER to start audio playback and send an LSL marker.")<br>while True:<br>if input() == "":<br>break</p> <p>def play_audio_and_send_marker(audio_file, outlet):<br>data, fs = sf.read(audio_file)</p> <pre><code>print("Playing audio and sending LSL marker...") marker_val = [1] outlet.push_sample(marker_val) sd.play(data, fs) sd.wait() print("Audio playback finished.") </code></pre> <p>if <strong>name</strong> == "<strong>main</strong>":</p> <pre><code>info = StreamInfo( name="AudioMarkers", type="Markers", channel_count=1, nominal_srate=0, channel_format="int32", source_id="uniqueMarkerID12345" ) outlet = StreamOutlet(info) while True: wait_for_keypress() audio_filepath = "/path/to/audio.wav" play_audio_and_send_marker( audio_filepath, outlet )</code></pre><h2 dir="auto">2.4 STEP 5 - Use LabRecorder to view and save all LSL streams</h2><ol dir="auto"><li data-preset-tag="p"><p>Open LabRecorder</p></li><li data-preset-tag="p"><p>Press <code>Update</code>. The available LSL streams should be visible in the stream list<br>• You should be able to see streams from both EmotivPROs (usually called “Emotiv-<br>DataStream”) and the marker stream (called “AudioMarkers”)</p></li><li data-preset-tag="p"><p>Click <code>Browse</code> to select a location to store data (and set other parameters)</p></li><li data-preset-tag="p"><p>Select all streams and press <code>Record</code> to start recording</p></li></ol><h2 dir="auto">3.0 Working with the data</h2><p dir="auto">LabRecorder outputs an XDF file (Extensible Data Format) that contains data from all the streams. XDF files are structured into, streams, each with a different header that describes what it contains (device name, data type, sampling rate, channels, and more). You can use the below codeblock to open your XDF file and display some basic information.</p><p dir="auto"><strong>Note: Replace </strong><code><strong>/path/to/your/file.xdf</strong></code><strong> with the filepath for your LabRecorder XDF output file.</strong></p><pre data-language="JSX"><code>import pyxdf </code></pre> <p>import mne<br>import matplotlib.pyplot as plt<br>import numpy as np</p> <h1>Give the path to your LSL output file here.</h1> <p>data_path = "/path/to/your/file.xdf"</p> <h1>Load the XDF file.</h1> <p>streams, fileheader = pyxdf.load_xdf(data_path)</p> <p>print("XDF File Header:", fileheader)<br>print("Number of streams found:", len(streams))</p> <p>for i, stream in enumerate(streams):<br>print("\nStream", i + 1)<br>print("Stream Name:", stream["info"]["name"][0])<br>print("Stream Type:", stream["info"]["type"][0])<br>print("Number of Channels:", stream["info"]["channel_count"][0])</p> <pre><code>sfreq = float(stream["info"]["nominal_srate"][0]) print("Sampling Rate:", sfreq) print("Number of Samples:", len(stream["time_series"])) print("First 5 data points:", stream["time_series"][:5]) channel_names = [ chan["label"][0] for chan in stream["info"]["desc"][0]["channels"][0]["channel"] ] print("Channel Names:", channel_names) channel_types = "eeg"</code></pre><h3 dir="auto"><br></h3><h2 dir="auto">4.0 Additional Resources</h2><h4 dir="auto">Official Documentation</h4><ol dir="auto"><li data-preset-tag="p"><p>Check out the <a href="1. Check out the online documentation, including the official README file on GitHub 2. Additional resources: • Code to run LSL using Emotiv’s devices, with example scripts • Useful LSL demo on YouTube • SCCN LSL GitHub repository for all associated libraries • LSL GitHub repository for a collection a submodules and apps 3. HyPyP analysis pipeline for Hyperscanning studies" target="_blank">online documentation</a>, including the <a href="https://github.com/sccn/labstreaminglayer/" target="_blank">official README file on GitHub</a></p></li><li data-preset-tag="p"><p>Additional resources:<br>• <a href="https://github.com/Emotiv/labstreaminglayer" target="_blank">Code</a> to run LSL using Emotiv’s devices, with example scripts<br>• Useful <a href="https://www.youtube.com/watch?v=Y1at7yrcFW0&list=PLVnr33MP5RMRhGwY36zHHDOmAaYTB138D" target="_blank">LSL demo on YouTube</a><br>• <a href="https://github.com/sccn/labstreaminglayer" target="_blank">SCCN LSL GitHub repository</a> for all associated libraries<br>• <a href="https://github.com/labstreaminglayer" target="_blank">LSL GitHub repository</a> for a collection a submodules and apps</p></li><li data-preset-tag="p"><p><a href="https://academic.oup.com/scan/article/16/1-2/72/5919711?login=false" target="_blank">HyPyP analysis pipeline</a> for Hyperscanning studies</p></li></ol> </code></pre
""" LSL Example: Play audio and send a trigger marker <p>This script creates an LSL marker stream, waits for the user to<br>press ENTER, then plays an audio file and sends a marker that<br>can be synchronized with EEG data collected through LabRecorder.<br>"""</p> <p>import sounddevice as sd<br>import soundfile as sf<br>from pylsl import StreamInfo, StreamOutlet</p> <p>def wait_for_keypress():<br>print("Press ENTER to start audio playback and send an LSL marker.")<br>while True:<br>if input() == "":<br>break</p> <p>def play_audio_and_send_marker(audio_file, outlet):<br>data, fs = sf.read(audio_file)</p> <pre><code>print("Playing audio and sending LSL marker...") marker_val = [1] outlet.push_sample(marker_val) sd.play(data, fs) sd.wait() print("Audio playback finished.") </code></pre> <p>if <strong>name</strong> == "<strong>main</strong>":</p> <pre><code>info = StreamInfo( name="AudioMarkers", type="Markers", channel_count=1, nominal_srate=0, channel_format="int32", source_id="uniqueMarkerID12345" ) outlet = StreamOutlet(info) while True: wait_for_keypress() audio_filepath = "/path/to/audio.wav" play_audio_and_send_marker( audio_filepath, outlet )</code></pre><h2 dir="auto">2.4 STEP 5 - Use LabRecorder to view and save all LSL streams</h2><ol dir="auto"><li data-preset-tag="p"><p>Open LabRecorder</p></li><li data-preset-tag="p"><p>Press <code>Update</code>. The available LSL streams should be visible in the stream list<br>• You should be able to see streams from both EmotivPROs (usually called “Emotiv-<br>DataStream”) and the marker stream (called “AudioMarkers”)</p></li><li data-preset-tag="p"><p>Click <code>Browse</code> to select a location to store data (and set other parameters)</p></li><li data-preset-tag="p"><p>Select all streams and press <code>Record</code> to start recording</p></li></ol><h2 dir="auto">3.0 Working with the data</h2><p dir="auto">LabRecorder outputs an XDF file (Extensible Data Format) that contains data from all the streams. XDF files are structured into, streams, each with a different header that describes what it contains (device name, data type, sampling rate, channels, and more). You can use the below codeblock to open your XDF file and display some basic information.</p><p dir="auto"><strong>Note: Replace </strong><code><strong>/path/to/your/file.xdf</strong></code><strong> with the filepath for your LabRecorder XDF output file.</strong></p><pre data-language="JSX"><code>import pyxdf </code></pre> <p>import mne<br>import matplotlib.pyplot as plt<br>import numpy as np</p> <h1>Give the path to your LSL output file here.</h1> <p>data_path = "/path/to/your/file.xdf"</p> <h1>Load the XDF file.</h1> <p>streams, fileheader = pyxdf.load_xdf(data_path)</p> <p>print("XDF File Header:", fileheader)<br>print("Number of streams found:", len(streams))</p> <p>for i, stream in enumerate(streams):<br>print("\nStream", i + 1)<br>print("Stream Name:", stream["info"]["name"][0])<br>print("Stream Type:", stream["info"]["type"][0])<br>print("Number of Channels:", stream["info"]["channel_count"][0])</p> <pre><code>sfreq = float(stream["info"]["nominal_srate"][0]) print("Sampling Rate:", sfreq) print("Number of Samples:", len(stream["time_series"])) print("First 5 data points:", stream["time_series"][:5]) channel_names = [ chan["label"][0] for chan in stream["info"]["desc"][0]["channels"][0]["channel"] ] print("Channel Names:", channel_names) channel_types = "eeg"</code></pre><h3 dir="auto"><br></h3><h2 dir="auto">4.0 Additional Resources</h2><h4 dir="auto">Official Documentation</h4><ol dir="auto"><li data-preset-tag="p"><p>Check out the <a href="1. Check out the online documentation, including the official README file on GitHub 2. Additional resources: • Code to run LSL using Emotiv’s devices, with example scripts • Useful LSL demo on YouTube • SCCN LSL GitHub repository for all associated libraries • LSL GitHub repository for a collection a submodules and apps 3. HyPyP analysis pipeline for Hyperscanning studies" target="_blank">online documentation</a>, including the <a href="https://github.com/sccn/labstreaminglayer/" target="_blank">official README file on GitHub</a></p></li><li data-preset-tag="p"><p>Additional resources:<br>• <a href="https://github.com/Emotiv/labstreaminglayer" target="_blank">Code</a> to run LSL using Emotiv’s devices, with example scripts<br>• Useful <a href="https://www.youtube.com/watch?v=Y1at7yrcFW0&list=PLVnr33MP5RMRhGwY36zHHDOmAaYTB138D" target="_blank">LSL demo on YouTube</a><br>• <a href="https://github.com/sccn/labstreaminglayer" target="_blank">SCCN LSL GitHub repository</a> for all associated libraries<br>• <a href="https://github.com/labstreaminglayer" target="_blank">LSL GitHub repository</a> for a collection a submodules and apps</p></li><li data-preset-tag="p"><p><a href="https://academic.oup.com/scan/article/16/1-2/72/5919711?login=false" target="_blank">HyPyP analysis pipeline</a> for Hyperscanning studies</p></li></ol> </code></pre
환영합니다! 이 튜토리얼에서는 Python에서 Lab Streaming Layer (LSL)를 사용하여 여러 기기에서 Emotiv EEG 데이터를 수집하고 동기화하는 방법을 배웁니다. 이를 위해서는 Python 프로그래밍 언어에 대한 기본적인 실무 지식이 필요합니다.
배울 내용
Lab Streaming Layer (LSL)가 무엇이며 연구자들이 이를 사용하는 이유
여러 Emotiv EEG 장치에서 동기화된 데이터를 수집하는 방법
수집된 데이터를 가져오고 검사하는 방법
1.1 LSL이란 무엇이며 어디에 유용한가요?
교생 스트리밍 레이어(LSL)는 다양한 센서 하드웨어로부터 신경, 생리 및 행동 데이터 스트림을 전송, 수신 및 동기화하는 데 사용할 수 있는 오픈 소스 툴박스입니다. 갈수록 기능이 뛰어나고 정밀하며 모바일화된 뇌 및 신체 감지 하드웨어 장치(기기)(Emotiv EEG 시스템 등)는 뇌과학을 연구실 밖으로 끌어내어 실시간 데이터의 세계로 안내하고 있습니다. 한때 뇌 측정(EEG 및 MEG 등)이 연구실 내에만 국한되었다면, 이제 모바일 장치 덕분에 더 자연스러운 환경에서 여러 사람으로부터 동시에 다양한 데이터를 수집할 수 있게 되었습니다.
연구자는 동일한 음악을 듣는 두 사람 간의 생리적 동기화에 관심을 가질 수 있습니다. LSL은 두 개의 EEG 헤드셋에서 각각 데이터를 수집하는 동시에, 소리 재생과도 데이터를 동기화하는 데 도움을 줄 수 있습니다.
LSL의 기타 사용 사례 예시:
실험의 이벤트 마커를 진행 중인 EEG 데이터에 추가
한 명의 참가자를 위해 여러 소스(예: 심박수, EMG, EEG)에서 수집한 데이터의 시간 정렬
여러 참가자의 데이터 시간 정렬(예: EEG 하이퍼스캐닝 연구)
1.2 LSL은 어떻게 작동하나요?
Lab Streaming Layer는 여러 기기 간에 시계열 데이터를 실시간으로 교환하기 위한 프로토콜입니다. LSL은 Python, MATLAB, C++, Java 등과 같은 프로그래밍 언어용 오픈 소스 라이브러리를 사용하여 구현할 수 있습니다.
핵심 기능은 LSL 데이터 스트림을 중심으로 작동합니다:
1. 수집 장치/소프트웨어가 데이터를 수집하고 데이터 스트림을 생성합니다 - EEG 기록 장치, 아이 트래커, 모션 캡처 시스템, 심박수 모니터 등에서 메타데이터(샘플링 속도, 데이터 유형, 채널 정보 등)를 포함한 생리적 데이터를 LSL로 스트리밍할 수 있습니다. - 실험(예: PsychoPy 사용)의 이벤트 마커도 LSL을 사용하여 데이터 스트림으로 전송할 수 있습니다.
2. 데이터 스트림이 네트워크에 게시(publish)됩니다 - 이것이 LSL을 사용하여 데이터를 전송하는 방식입니다. 데이터 스트림이 네트워크로 "브로드캐스트"됩니다. - 게시된 스트림은 네트워크에서 사용 가능하며, 동일한 네트워크 상의 다른 LSL 지원 기기에서 검색할 수 있습니다. - LSL은 공통 클록(네트워크 시간 프로토콜 준수)을 기반으로 각 데이터 청크 또는 샘플에 타임스탬프를 할당합니다. - 스트림은 "아울렛(outlet)"을 통해 샘플 단위(또는 청크 단위)로 푸시됩니다.
3. 수집 장치들이 데이터 스트림을 "구독(subscribe)"합니다 - 이것이 LSL을 통해 데이터를 수신하는 방식입니다. - 동일한 네트워크 상의 수집 장치들은 "인렛(inlet)"을 통해 게시된 데이터 스트림을 받습니다. - 각 인렛은 단 하나의 아울렛으로부터만 스트림 샘플과 메타데이터를 수신합니다.
4. 데이터 저장 - 데이터 스트림을 구독하면 선호하는 프로토콜 언어에서 변수로 저장하거나, LSL에서 제공하는 LabRecorder 소프트웨어를 사용하여 .xdf와 같은 표준 형식으로 저장할 수 있습니다.
2.0 튜토리얼 개요
본 튜토리얼에서는 예시 실험 설정을 통해 Python에서 LSL을 사용하여 이를 구현하는 데 필요한 단계와 코드를 안내합니다. Emotiv 헤드셋을 착용한 두 사람으로부터 EEG 데이터를 수집하는 동안 Python으로 소리를 재생하는 방식을 사용합니다. 각각 EmotivPRO를 실행하는 두 대의 컴퓨터를 사용하여 EEG 데이터를 수집하고, 각 스트림을 별도의 LSL 아울렛을 통해 브로드캐스트합니다. Python 라이브러리를 사용하여 오디오 파일을 재생하고, 파일이 시작될 때마다 동시에 트리거를 전송합니다.
단계:
1. EmotivPRO를 사용하여 EEG 데이터(및/또는 모션, 접촉 품질, 신호 품질 등)를 포함하는 LSL 아울렛을 통해 데이터를 스트리밍합니다. 2. Python 스크립트를 사용하여 오디오 트랙을 재생하고, 동시에 다른 LSL을 통해 트리거를 전송합니다. LabRecorder를 사용하여 LSL 인렛을 통해 세 개의 데이터 스트림을 모두 캡처하고 저장합니다.
2.1 1단계 - 설정 및 설치
데이터 수집을 위해 지원되는 데이터 수집 장치가 필요합니다
• Emotiv의 모든 브레인웨어 장치는 EmotivPRO 소프트웨어를 통해 LSL에 연결됩니다.장치에 EmotivPRO를 설치합니다. LSL을 사용하려면 유효한 EmotivPRO 라이선스가 필요합니다.
다음 명령어로 Python LSL 라이브러리를 설치합니다:
pip install pylslLabRecorder 소프트웨어를 다운로드합니다. 이 소프트웨어는 명령줄에서 또는 독립형 다운로드를 통해 실행할 수 있는 간단한 무료 앱입니다.
실험을 위해: Python을 사용하여 오디오를 재생하는 데 필요한 패키지를 설치합니다.
pip install sounddevice soundfile
2.2 3단계 - EmotivPRO에서 LSL 스트림을 통해 데이터 전송
앱 우측 상단의 “...”를 찾아 설정(Settings)으로 이동합니다.
‘Lab Streaming Layer’ 섹션과 ‘Outlet’ 하위 섹션을 찾습니다.
브로드캐스트하려는 모든 데이터 유형을 선택합니다.
데이터 형식(32비트 float 또는 64비트 double)을 선택합니다.
데이터를 샘플 단위로 보낼지 또는 샘플 청크 단위로 보낼지 선택합니다.
‘Start’를 클릭하여 LSL 데이터 스트림 브로드캐스트를 시작합니다.
2.3 4단계 - Python 스크립트를 사용하여 오디오 재생 및 트리거 전송
다음 코드 블록을 복사하여 Python 파일에 붙여넣고 컴퓨터에 저장합니다.
재생하려는 오디오 파일(가급적 .wav 파일)을 찾고, 스크립트에서
audio_filepath변수를 컴퓨터에 있는 오디오 파일 경로로 변경합니다.명령 프롬프트를 열어 명령줄과 상호 작용하고, Python 파일이 저장된 폴더로 이동합니다.
python3 filename.py를 입력합니다.
• 설치된 Python 버전에 따라python3대신python을 사용할 수 있습니다.
참고:/path/to/audio.wav부분을 실험 중에 재생할 오디오 파일의 위치로 바꾸십시오.
""" LSL Example: Play audio and send a trigger marker <p>This script creates an LSL marker stream, waits for the user to<br>press ENTER, then plays an audio file and sends a marker that<br>can be synchronized with EEG data collected through LabRecorder.<br>"""</p> <p>import sounddevice as sd<br>import soundfile as sf<br>from pylsl import StreamInfo, StreamOutlet</p> <p>def wait_for_keypress():<br>print("Press ENTER to start audio playback and send an LSL marker.")<br>while True:<br>if input() == "":<br>break</p> <p>def play_audio_and_send_marker(audio_file, outlet):<br>data, fs = sf.read(audio_file)</p> <pre><code>print("Playing audio and sending LSL marker...") marker_val = [1] outlet.push_sample(marker_val) sd.play(data, fs) sd.wait() print("Audio playback finished.") </code></pre> <p>if <strong>name</strong> == "<strong>main</strong>":</p> <pre><code>info = StreamInfo( name="AudioMarkers", type="Markers", channel_count=1, nominal_srate=0, channel_format="int32", source_id="uniqueMarkerID12345" ) outlet = StreamOutlet(info) while True: wait_for_keypress() audio_filepath = "/path/to/audio.wav" play_audio_and_send_marker( audio_filepath, outlet )</code></pre><h2 dir="auto">2.4 STEP 5 - Use LabRecorder to view and save all LSL streams</h2><ol dir="auto"><li data-preset-tag="p"><p>Open LabRecorder</p></li><li data-preset-tag="p"><p>Press <code>Update</code>. The available LSL streams should be visible in the stream list<br>• You should be able to see streams from both EmotivPROs (usually called “Emotiv-<br>DataStream”) and the marker stream (called “AudioMarkers”)</p></li><li data-preset-tag="p"><p>Click <code>Browse</code> to select a location to store data (and set other parameters)</p></li><li data-preset-tag="p"><p>Select all streams and press <code>Record</code> to start recording</p></li></ol><h2 dir="auto">3.0 Working with the data</h2><p dir="auto">LabRecorder outputs an XDF file (Extensible Data Format) that contains data from all the streams. XDF files are structured into, streams, each with a different header that describes what it contains (device name, data type, sampling rate, channels, and more). You can use the below codeblock to open your XDF file and display some basic information.</p><p dir="auto"><strong>Note: Replace </strong><code><strong>/path/to/your/file.xdf</strong></code><strong> with the filepath for your LabRecorder XDF output file.</strong></p><pre data-language="JSX"><code>import pyxdf </code></pre> <p>import mne<br>import matplotlib.pyplot as plt<br>import numpy as np</p> <h1>Give the path to your LSL output file here.</h1> <p>data_path = "/path/to/your/file.xdf"</p> <h1>Load the XDF file.</h1> <p>streams, fileheader = pyxdf.load_xdf(data_path)</p> <p>print("XDF File Header:", fileheader)<br>print("Number of streams found:", len(streams))</p> <p>for i, stream in enumerate(streams):<br>print("\nStream", i + 1)<br>print("Stream Name:", stream["info"]["name"][0])<br>print("Stream Type:", stream["info"]["type"][0])<br>print("Number of Channels:", stream["info"]["channel_count"][0])</p> <pre><code>sfreq = float(stream["info"]["nominal_srate"][0]) print("Sampling Rate:", sfreq) print("Number of Samples:", len(stream["time_series"])) print("First 5 data points:", stream["time_series"][:5]) channel_names = [ chan["label"][0] for chan in stream["info"]["desc"][0]["channels"][0]["channel"] ] print("Channel Names:", channel_names) channel_types = "eeg"</code></pre><h3 dir="auto"><br></h3><h2 dir="auto">4.0 Additional Resources</h2><h4 dir="auto">Official Documentation</h4><ol dir="auto"><li data-preset-tag="p"><p>Check out the <a href="1. Check out the online documentation, including the official README file on GitHub 2. Additional resources: • Code to run LSL using Emotiv’s devices, with example scripts • Useful LSL demo on YouTube • SCCN LSL GitHub repository for all associated libraries • LSL GitHub repository for a collection a submodules and apps 3. HyPyP analysis pipeline for Hyperscanning studies" target="_blank">online documentation</a>, including the <a href="https://github.com/sccn/labstreaminglayer/" target="_blank">official README file on GitHub</a></p></li><li data-preset-tag="p"><p>Additional resources:<br>• <a href="https://github.com/Emotiv/labstreaminglayer" target="_blank">Code</a> to run LSL using Emotiv’s devices, with example scripts<br>• Useful <a href="https://www.youtube.com/watch?v=Y1at7yrcFW0&list=PLVnr33MP5RMRhGwY36zHHDOmAaYTB138D" target="_blank">LSL demo on YouTube</a><br>• <a href="https://github.com/sccn/labstreaminglayer" target="_blank">SCCN LSL GitHub repository</a> for all associated libraries<br>• <a href="https://github.com/labstreaminglayer" target="_blank">LSL GitHub repository</a> for a collection a submodules and apps</p></li><li data-preset-tag="p"><p><a href="https://academic.oup.com/scan/article/16/1-2/72/5919711?login=false" target="_blank">HyPyP analysis pipeline</a> for Hyperscanning studies</p></li></ol> </code></pre
환영합니다! 이 튜토리얼에서는 Python에서 Lab Streaming Layer (LSL)를 사용하여 여러 기기에서 Emotiv EEG 데이터를 수집하고 동기화하는 방법을 배웁니다. 이를 위해서는 Python 프로그래밍 언어에 대한 기본적인 실무 지식이 필요합니다.
배울 내용
Lab Streaming Layer (LSL)가 무엇이며 연구자들이 이를 사용하는 이유
여러 Emotiv EEG 장치에서 동기화된 데이터를 수집하는 방법
수집된 데이터를 가져오고 검사하는 방법
1.1 LSL이란 무엇이며 어디에 유용한가요?
교생 스트리밍 레이어(LSL)는 다양한 센서 하드웨어로부터 신경, 생리 및 행동 데이터 스트림을 전송, 수신 및 동기화하는 데 사용할 수 있는 오픈 소스 툴박스입니다. 갈수록 기능이 뛰어나고 정밀하며 모바일화된 뇌 및 신체 감지 하드웨어 장치(기기)(Emotiv EEG 시스템 등)는 뇌과학을 연구실 밖으로 끌어내어 실시간 데이터의 세계로 안내하고 있습니다. 한때 뇌 측정(EEG 및 MEG 등)이 연구실 내에만 국한되었다면, 이제 모바일 장치 덕분에 더 자연스러운 환경에서 여러 사람으로부터 동시에 다양한 데이터를 수집할 수 있게 되었습니다.
연구자는 동일한 음악을 듣는 두 사람 간의 생리적 동기화에 관심을 가질 수 있습니다. LSL은 두 개의 EEG 헤드셋에서 각각 데이터를 수집하는 동시에, 소리 재생과도 데이터를 동기화하는 데 도움을 줄 수 있습니다.
LSL의 기타 사용 사례 예시:
실험의 이벤트 마커를 진행 중인 EEG 데이터에 추가
한 명의 참가자를 위해 여러 소스(예: 심박수, EMG, EEG)에서 수집한 데이터의 시간 정렬
여러 참가자의 데이터 시간 정렬(예: EEG 하이퍼스캐닝 연구)
1.2 LSL은 어떻게 작동하나요?
Lab Streaming Layer는 여러 기기 간에 시계열 데이터를 실시간으로 교환하기 위한 프로토콜입니다. LSL은 Python, MATLAB, C++, Java 등과 같은 프로그래밍 언어용 오픈 소스 라이브러리를 사용하여 구현할 수 있습니다.
핵심 기능은 LSL 데이터 스트림을 중심으로 작동합니다:
1. 수집 장치/소프트웨어가 데이터를 수집하고 데이터 스트림을 생성합니다 - EEG 기록 장치, 아이 트래커, 모션 캡처 시스템, 심박수 모니터 등에서 메타데이터(샘플링 속도, 데이터 유형, 채널 정보 등)를 포함한 생리적 데이터를 LSL로 스트리밍할 수 있습니다. - 실험(예: PsychoPy 사용)의 이벤트 마커도 LSL을 사용하여 데이터 스트림으로 전송할 수 있습니다.
2. 데이터 스트림이 네트워크에 게시(publish)됩니다 - 이것이 LSL을 사용하여 데이터를 전송하는 방식입니다. 데이터 스트림이 네트워크로 "브로드캐스트"됩니다. - 게시된 스트림은 네트워크에서 사용 가능하며, 동일한 네트워크 상의 다른 LSL 지원 기기에서 검색할 수 있습니다. - LSL은 공통 클록(네트워크 시간 프로토콜 준수)을 기반으로 각 데이터 청크 또는 샘플에 타임스탬프를 할당합니다. - 스트림은 "아울렛(outlet)"을 통해 샘플 단위(또는 청크 단위)로 푸시됩니다.
3. 수집 장치들이 데이터 스트림을 "구독(subscribe)"합니다 - 이것이 LSL을 통해 데이터를 수신하는 방식입니다. - 동일한 네트워크 상의 수집 장치들은 "인렛(inlet)"을 통해 게시된 데이터 스트림을 받습니다. - 각 인렛은 단 하나의 아울렛으로부터만 스트림 샘플과 메타데이터를 수신합니다.
4. 데이터 저장 - 데이터 스트림을 구독하면 선호하는 프로토콜 언어에서 변수로 저장하거나, LSL에서 제공하는 LabRecorder 소프트웨어를 사용하여 .xdf와 같은 표준 형식으로 저장할 수 있습니다.
2.0 튜토리얼 개요
본 튜토리얼에서는 예시 실험 설정을 통해 Python에서 LSL을 사용하여 이를 구현하는 데 필요한 단계와 코드를 안내합니다. Emotiv 헤드셋을 착용한 두 사람으로부터 EEG 데이터를 수집하는 동안 Python으로 소리를 재생하는 방식을 사용합니다. 각각 EmotivPRO를 실행하는 두 대의 컴퓨터를 사용하여 EEG 데이터를 수집하고, 각 스트림을 별도의 LSL 아울렛을 통해 브로드캐스트합니다. Python 라이브러리를 사용하여 오디오 파일을 재생하고, 파일이 시작될 때마다 동시에 트리거를 전송합니다.
단계:
1. EmotivPRO를 사용하여 EEG 데이터(및/또는 모션, 접촉 품질, 신호 품질 등)를 포함하는 LSL 아울렛을 통해 데이터를 스트리밍합니다. 2. Python 스크립트를 사용하여 오디오 트랙을 재생하고, 동시에 다른 LSL을 통해 트리거를 전송합니다. LabRecorder를 사용하여 LSL 인렛을 통해 세 개의 데이터 스트림을 모두 캡처하고 저장합니다.
2.1 1단계 - 설정 및 설치
데이터 수집을 위해 지원되는 데이터 수집 장치가 필요합니다
• Emotiv의 모든 브레인웨어 장치는 EmotivPRO 소프트웨어를 통해 LSL에 연결됩니다.장치에 EmotivPRO를 설치합니다. LSL을 사용하려면 유효한 EmotivPRO 라이선스가 필요합니다.
다음 명령어로 Python LSL 라이브러리를 설치합니다:
pip install pylslLabRecorder 소프트웨어를 다운로드합니다. 이 소프트웨어는 명령줄에서 또는 독립형 다운로드를 통해 실행할 수 있는 간단한 무료 앱입니다.
실험을 위해: Python을 사용하여 오디오를 재생하는 데 필요한 패키지를 설치합니다.
pip install sounddevice soundfile
2.2 3단계 - EmotivPRO에서 LSL 스트림을 통해 데이터 전송
앱 우측 상단의 “...”를 찾아 설정(Settings)으로 이동합니다.
‘Lab Streaming Layer’ 섹션과 ‘Outlet’ 하위 섹션을 찾습니다.
브로드캐스트하려는 모든 데이터 유형을 선택합니다.
데이터 형식(32비트 float 또는 64비트 double)을 선택합니다.
데이터를 샘플 단위로 보낼지 또는 샘플 청크 단위로 보낼지 선택합니다.
‘Start’를 클릭하여 LSL 데이터 스트림 브로드캐스트를 시작합니다.
2.3 4단계 - Python 스크립트를 사용하여 오디오 재생 및 트리거 전송
다음 코드 블록을 복사하여 Python 파일에 붙여넣고 컴퓨터에 저장합니다.
재생하려는 오디오 파일(가급적 .wav 파일)을 찾고, 스크립트에서
audio_filepath변수를 컴퓨터에 있는 오디오 파일 경로로 변경합니다.명령 프롬프트를 열어 명령줄과 상호 작용하고, Python 파일이 저장된 폴더로 이동합니다.
python3 filename.py를 입력합니다.
• 설치된 Python 버전에 따라python3대신python을 사용할 수 있습니다.
참고:/path/to/audio.wav부분을 실험 중에 재생할 오디오 파일의 위치로 바꾸십시오.
""" LSL Example: Play audio and send a trigger marker <p>This script creates an LSL marker stream, waits for the user to<br>press ENTER, then plays an audio file and sends a marker that<br>can be synchronized with EEG data collected through LabRecorder.<br>"""</p> <p>import sounddevice as sd<br>import soundfile as sf<br>from pylsl import StreamInfo, StreamOutlet</p> <p>def wait_for_keypress():<br>print("Press ENTER to start audio playback and send an LSL marker.")<br>while True:<br>if input() == "":<br>break</p> <p>def play_audio_and_send_marker(audio_file, outlet):<br>data, fs = sf.read(audio_file)</p> <pre><code>print("Playing audio and sending LSL marker...") marker_val = [1] outlet.push_sample(marker_val) sd.play(data, fs) sd.wait() print("Audio playback finished.") </code></pre> <p>if <strong>name</strong> == "<strong>main</strong>":</p> <pre><code>info = StreamInfo( name="AudioMarkers", type="Markers", channel_count=1, nominal_srate=0, channel_format="int32", source_id="uniqueMarkerID12345" ) outlet = StreamOutlet(info) while True: wait_for_keypress() audio_filepath = "/path/to/audio.wav" play_audio_and_send_marker( audio_filepath, outlet )</code></pre><h2 dir="auto">2.4 STEP 5 - Use LabRecorder to view and save all LSL streams</h2><ol dir="auto"><li data-preset-tag="p"><p>Open LabRecorder</p></li><li data-preset-tag="p"><p>Press <code>Update</code>. The available LSL streams should be visible in the stream list<br>• You should be able to see streams from both EmotivPROs (usually called “Emotiv-<br>DataStream”) and the marker stream (called “AudioMarkers”)</p></li><li data-preset-tag="p"><p>Click <code>Browse</code> to select a location to store data (and set other parameters)</p></li><li data-preset-tag="p"><p>Select all streams and press <code>Record</code> to start recording</p></li></ol><h2 dir="auto">3.0 Working with the data</h2><p dir="auto">LabRecorder outputs an XDF file (Extensible Data Format) that contains data from all the streams. XDF files are structured into, streams, each with a different header that describes what it contains (device name, data type, sampling rate, channels, and more). You can use the below codeblock to open your XDF file and display some basic information.</p><p dir="auto"><strong>Note: Replace </strong><code><strong>/path/to/your/file.xdf</strong></code><strong> with the filepath for your LabRecorder XDF output file.</strong></p><pre data-language="JSX"><code>import pyxdf </code></pre> <p>import mne<br>import matplotlib.pyplot as plt<br>import numpy as np</p> <h1>Give the path to your LSL output file here.</h1> <p>data_path = "/path/to/your/file.xdf"</p> <h1>Load the XDF file.</h1> <p>streams, fileheader = pyxdf.load_xdf(data_path)</p> <p>print("XDF File Header:", fileheader)<br>print("Number of streams found:", len(streams))</p> <p>for i, stream in enumerate(streams):<br>print("\nStream", i + 1)<br>print("Stream Name:", stream["info"]["name"][0])<br>print("Stream Type:", stream["info"]["type"][0])<br>print("Number of Channels:", stream["info"]["channel_count"][0])</p> <pre><code>sfreq = float(stream["info"]["nominal_srate"][0]) print("Sampling Rate:", sfreq) print("Number of Samples:", len(stream["time_series"])) print("First 5 data points:", stream["time_series"][:5]) channel_names = [ chan["label"][0] for chan in stream["info"]["desc"][0]["channels"][0]["channel"] ] print("Channel Names:", channel_names) channel_types = "eeg"</code></pre><h3 dir="auto"><br></h3><h2 dir="auto">4.0 Additional Resources</h2><h4 dir="auto">Official Documentation</h4><ol dir="auto"><li data-preset-tag="p"><p>Check out the <a href="1. Check out the online documentation, including the official README file on GitHub 2. Additional resources: • Code to run LSL using Emotiv’s devices, with example scripts • Useful LSL demo on YouTube • SCCN LSL GitHub repository for all associated libraries • LSL GitHub repository for a collection a submodules and apps 3. HyPyP analysis pipeline for Hyperscanning studies" target="_blank">online documentation</a>, including the <a href="https://github.com/sccn/labstreaminglayer/" target="_blank">official README file on GitHub</a></p></li><li data-preset-tag="p"><p>Additional resources:<br>• <a href="https://github.com/Emotiv/labstreaminglayer" target="_blank">Code</a> to run LSL using Emotiv’s devices, with example scripts<br>• Useful <a href="https://www.youtube.com/watch?v=Y1at7yrcFW0&list=PLVnr33MP5RMRhGwY36zHHDOmAaYTB138D" target="_blank">LSL demo on YouTube</a><br>• <a href="https://github.com/sccn/labstreaminglayer" target="_blank">SCCN LSL GitHub repository</a> for all associated libraries<br>• <a href="https://github.com/labstreaminglayer" target="_blank">LSL GitHub repository</a> for a collection a submodules and apps</p></li><li data-preset-tag="p"><p><a href="https://academic.oup.com/scan/article/16/1-2/72/5919711?login=false" target="_blank">HyPyP analysis pipeline</a> for Hyperscanning studies</p></li></ol> </code></pre
계속 읽기