Lab Streaming Layer (LSL) לסנכרון מספר זרמי נתונים
ד"ר רושיני רנדניה ולוקאס קליין
עודכן ב
17 במאי 2024
Lab Streaming Layer (LSL) לסנכרון מספר זרמי נתונים
ד"ר רושיני רנדניה ולוקאס קליין
עודכן ב
17 במאי 2024
Lab Streaming Layer (LSL) לסנכרון מספר זרמי נתונים
ד"ר רושיני רנדניה ולוקאס קליין
עודכן ב
17 במאי 2024
ברוכים הבאים! במדריך זה נלמד כיצד להשתמש ב-Lab Streaming Layer (LSL) בפייתון כדי לאסוף ולסנכרן נתוני EEG של Emotiv ממספר מכשירים. פעולה זו תדרוש ידע בסיסי מעשי בשפת התכנות פייתון.
מה תלמדו
מה זה Lab Streaming Layer (LSL) ומדוע חוקרים משתמשים בו
כיצד לאסוף נתונים מסונכרנים ממספר מכשירי EEG של Emotiv
כיצד לייבא ולבחון נתונים שנאספו
1.1 מהו LSL ולמה הוא טוב?
Lab streaming layer (LSL) היא ערכת כלים בקוד פתוח שבה ניתן להשתמש כדי לשלוח, לקבל ולסנכרן זרמי נתונים עצביים, פיזיולוגיים והתנהגותיים מחומרי חומרה מגוונים של חיישנים. מכשירי חומרת חישת מוח וגוף בעלי יכולת דיוק וניידות הולכים וגדלים (כמו מערכות EEG של Emotiv) מביאים את מדעי המוח אל מחוץ למעבדה אל עולם הנתונים בזמן אמת. במקום שבו מדידות מוח כמו EEG ו-MEG היו מוגבלות פעם למעבדות מחקר, מכשירים ניידים מאפשרים לנו לאסוף מספר נתונים בסביבות טבעיות יותר, וממספר אנשים בבת אחת.
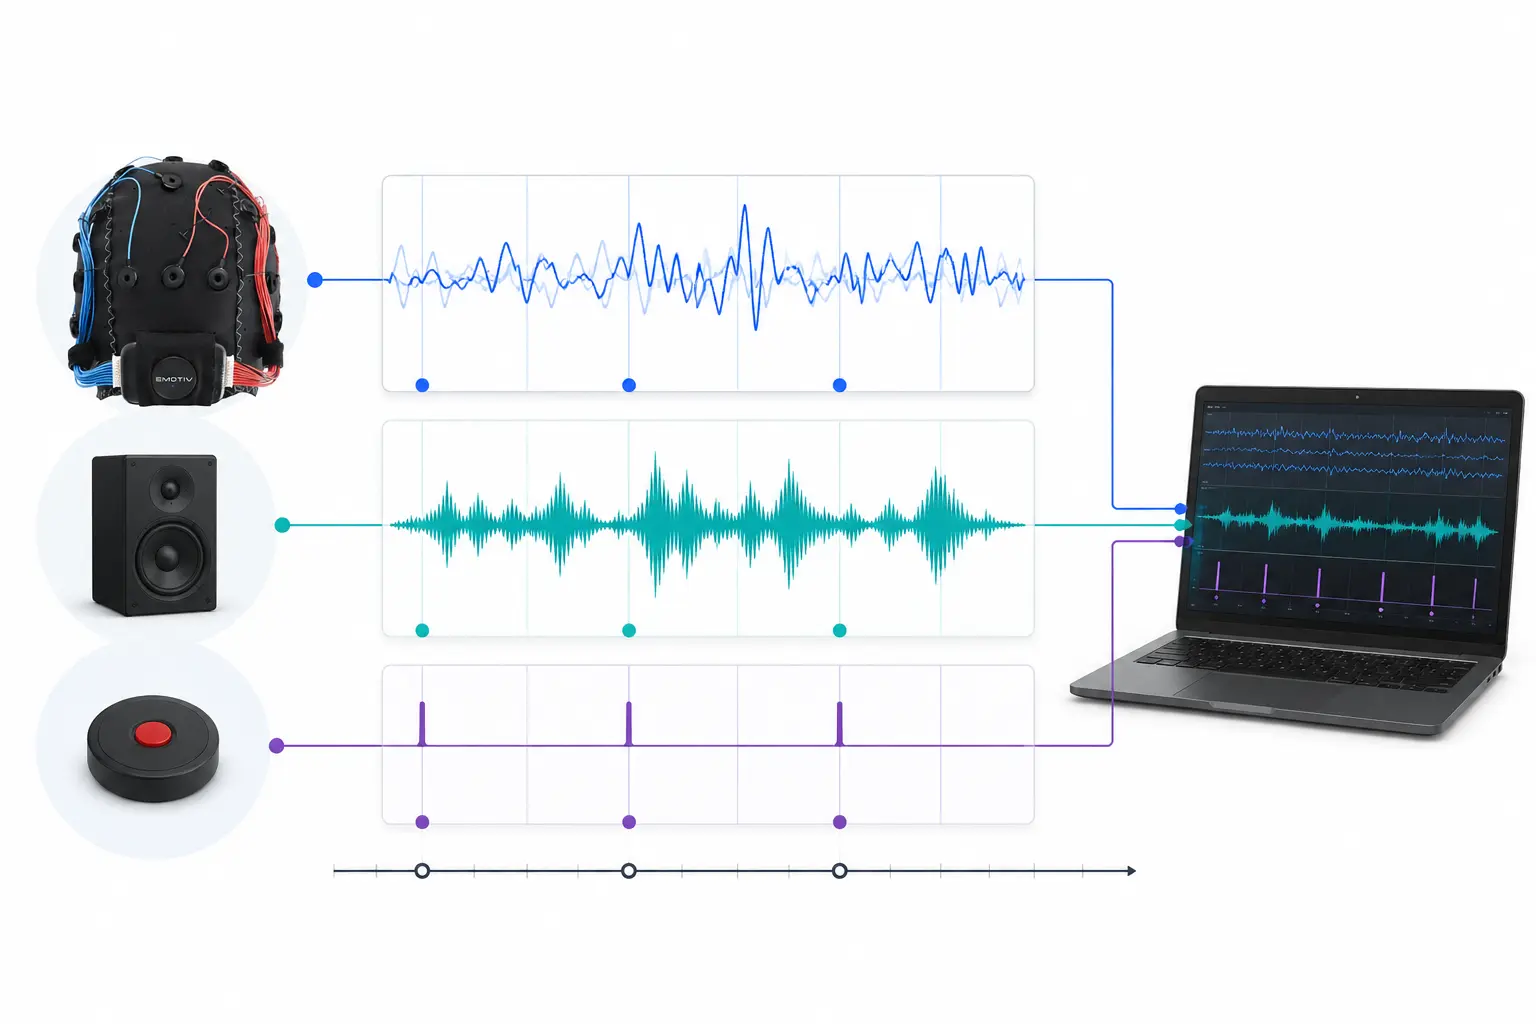
חוקר עשוי להתעניין בסינכרון פיזיולוגי בין שני אנשים המאזינים לאותה מוזיקה. LSL יכול לעזור לנו לאסוף נתונים משתי קסדות EEG בנפרד, אשר מסונכרנים גם להצגת הצליל.
כמה דוגמאות לשימושים אחרים ב-LSL:
הוספת סמני אירועים מניסוי לנתוני EEG מתמשכים
תיאום זמן של נתונים ממקורות מרובים עבור משתתף בודד (למשל דופק, EMG, EEG)
תיאום זמן של נתונים ממספר משתתפים (למשל, מחקרי EEG Hyperscanning)
1.2 כיצד פועל LSL?
Lab Streaming Layer הוא פרוטוקול לחילופין בזמן אמת של נתוני סדרות עיתיות בין מכשירים מרובים. ניתן ליישם את LSL באמצעות ספריות קוד פתוח עבור שפות תכנות כגון Python, MATLAB, C++, Java ואחרות.
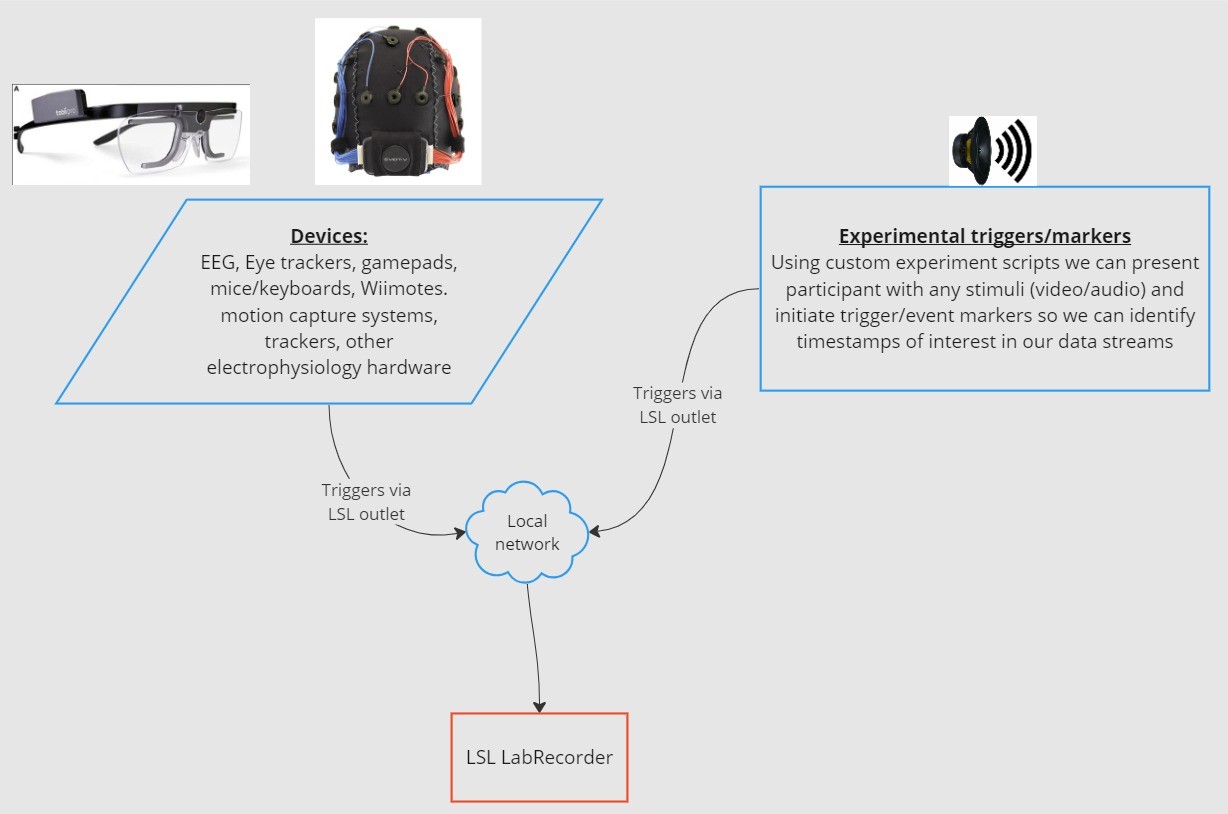
פונקציונליות הליבה סובבת סביב זרמי נתונים של LSL:
1. מכשיר/תוכנת רכישה אוספים נתונים ויוצרים זרם נתונים - ניתן להזרים נתונים פיזיולוגיים ל-LSL ממכשירי הקלטת EEG, עוקבי עיניים, מערכות ללכידת תנועה, מוניטורים של קצב לב וכו', כולל מטא-נתונים (קצב דגימה, סוג נתונים, מידע על ערוצים וכו') - ניתן לשלוח סמני אירועים מניסויים (למשל באמצעות PsychoPy) כזרם נתונים באמצעות LSL
2. זרם הנתונים מפורסם ברשת - כך נשלחים נתונים באמצעות LSL; זרם הנתונים "משודר" לרשת - זרמים שפורסמו זמינים ברשת וניתנים לגילוי על ידי מכשירים תומכי LSL אחרים באותה רשת - LSL מקצה לכל פיסת נתונים או דגימה חותמת זמן המבוססת על שעון משותף (בעקבות פרוטוקול Network Time Protocol). - הזרם נדחף דגימה-אחר-דגימה (או פיסה-אחר-פיסה) דרך "מוצא" (outlet)
3. מכשירי איסוף "נרשמים" לזרמי נתונים - כך מתקבלים נתונים באמצעות LSL - מכשירי איסוף באותה רשת מקבלים זרמי נתונים שפורסמו באמצעות "מבואות" (inlets). - כל מבוא מקבל את דגימות הזרם והמטא-נתונים ממוצא אחד בלבד
4. שמירת נתונים - לאחר ההרשמה לזרם נתונים, תוכל לשמור אותו במשתנה בשפת התכנות המועדפת עליך, או להשתמש בתוכנת LabRecorder המצורפת של LSL כדי לשמור אותו בפורמט סטנדרטי כגון .xdf.
2.0 סקירה כללית של המדריך
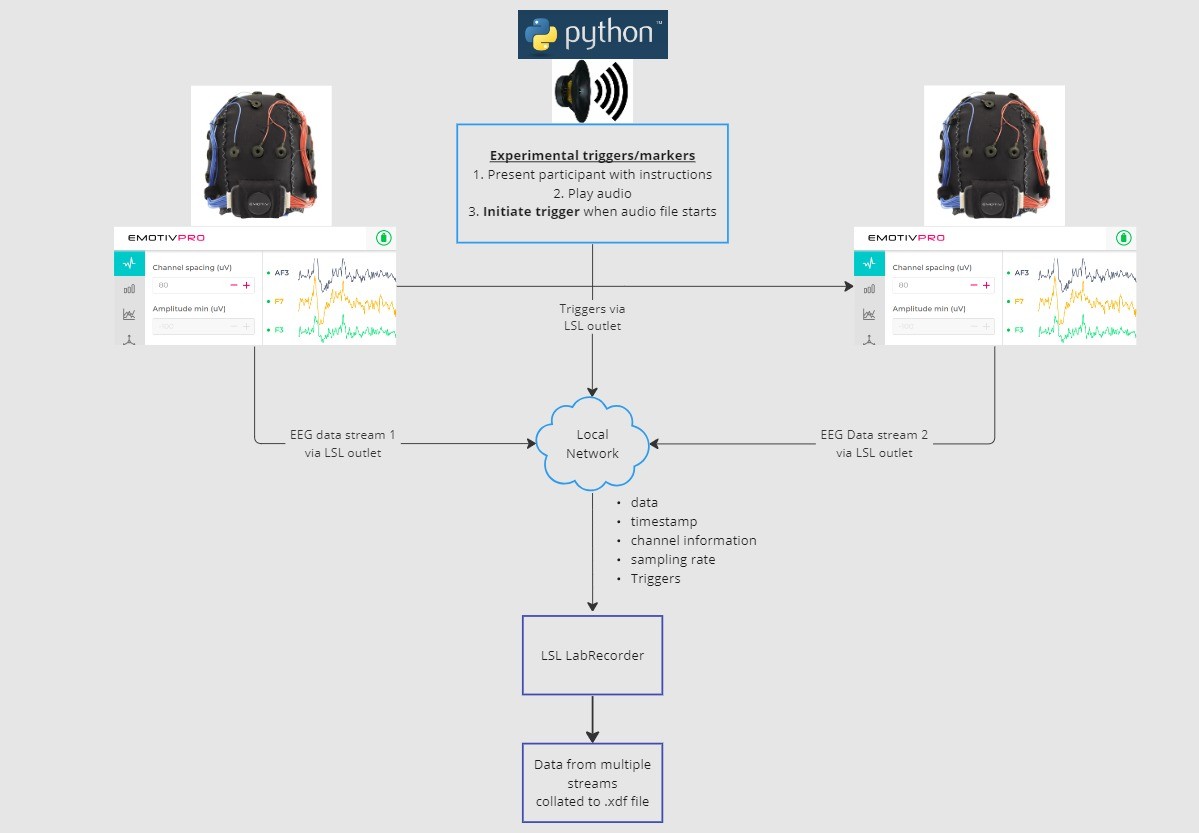
במדריך זה, ניקח דוגמה של מערך ניסיוני וננחה אותך בשלבים ובקוד הדרושים ליישומו באמצעות LSL בפייתון. נשתמש בפייתון כדי להשמיע צליל תוך כדי איסוף נתוני EEG משני אנשים המרכיבים קסדות של Emotiv. נשתמש בשני מחשבים שכל אחד מהם מריץ את EmotivPRO כדי לאסוף את נתוני ה-EEG, ולשדר כל זרם דרך מוצא LSL נפרד. נשתמש בספריית פייתון כדי להשמיע קובץ שמע ובמקביל לשלוח טריגר בכל פעם שהקובץ מתחיל.
שלבים:
1. השתמש ב-EmotivPRO כדי להזרים נתונים דרך מוצאי LSL הכוללים נתוני EEG (ו/או תנועה, איכות מגע, איכות אות וכו') 2. הפעל רצועת שמע באמצעות סקריפט פייתון, ובמקביל שלח טריגר דרך LSL אחר השתמש ב-LabRecorder כדי ללכוד ולשמור את כל שלושת זרמי הנתונים דרך מבוא LSL.
2.1 שלב 1 - הגדרה והתקנה
תצטרך מכשירי איסוף נתונים נתמכים לאיסוף נתונים
• כל מכשירי ה-brainware של Emotiv מתחברים ל-LSL באמצעות תוכנת EmotivPROהתקן את EmotivPRO במכשירים שלך. תצטרך רישיון EmotivPRO תקף כדי להשתמש ב-LSL.
התקן את ספריית ה-LSL לפייתון באמצעות הפקודה הבאה:
pip install pylslהורד את תוכנת LabRecorder. זוהי אפליקציה פשוטה וחינמית שניתן להריץ ממנה
שורת הפקודה או באמצעות הורדה עצמאיתעבור הניסוי שלנו: התקן את החבילות הדרושות להשמעת שמע באמצעות פייתון
pip install sounddevice soundfile
2.2 שלב 3 - שליחת הנתונים מ-EmotivPRO באמצעות זרם LSL
אתר את ה-"..." בפינה הימנית העליונה של האפליקציה, וניווט אל הגדרות (Settings)
מצא את המקטע 'Lab Streaming Layer' ואת תת-המקטע 'Outlet'
בחר את כל סוגי הנתונים שברצונך לשדר
בחר את פורמט הנתונים (32-bit float או 64-bit double)
בחר אם לשלוח נתונים דגימה-אחר-דגימה או בפיסות (chunks) של דגימות
לחץ על 'Start' כדי לשדר זרם נתונים של LSL
2.3 שלב 4 - שימוש בסקריפט פייתון להשמעת שמע ושליחת טריגרים
העתק והדבק את בלוק הקוד הבא לתוך קובץ פייתון ושמור אותו במחשב שלך.
אתר קובץ שמע (רצוי קובץ .wav) שברצונך להשמיע וערוך את הסקריפט על ידי שינוי ה
משתנהaudio_filepathלנתיב קובץ השמע במחשב שלךפתח את שורת הפקודה כדי לקיים אינטראקציה עם ממשק פקודות הטקסט ונווט לתיקייה שבה
קובץ הפייתון שלך מאוחסןהזן:
python3 filename.py
• בהתאם להתקנת הפייתון שלך, ייתכן שתשתמש ב-pythonבמקום ב-python3
הערה: החלף את/path/to/audio.wavבמיקום של קובץ השמע שברצונך להשמיע במהלך הניסוי שלך.
""" LSL Example: Play audio and send a trigger marker <p>This script creates an LSL marker stream, waits for the user to<br>press ENTER, then plays an audio file and sends a marker that<br>can be synchronized with EEG data collected through LabRecorder.<br>"""</p> <p>import sounddevice as sd<br>import soundfile as sf<br>from pylsl import StreamInfo, StreamOutlet</p> <p>def wait_for_keypress():<br>print("Press ENTER to start audio playback and send an LSL marker.")<br>while True:<br>if input() == "":<br>break</p> <p>def play_audio_and_send_marker(audio_file, outlet):<br>data, fs = sf.read(audio_file)</p> <pre><code>print("Playing audio and sending LSL marker...") marker_val = [1] outlet.push_sample(marker_val) sd.play(data, fs) sd.wait() print("Audio playback finished.") </code></pre> <p>if <strong>name</strong> == "<strong>main</strong>":</p> <pre><code>info = StreamInfo( name="AudioMarkers", type="Markers", channel_count=1, nominal_srate=0, channel_format="int32", source_id="uniqueMarkerID12345" ) outlet = StreamOutlet(info) while True: wait_for_keypress() audio_filepath = "/path/to/audio.wav" play_audio_and_send_marker( audio_filepath, outlet )</code></pre><h2 dir="auto">2.4 STEP 5 - Use LabRecorder to view and save all LSL streams</h2><ol dir="auto"><li data-preset-tag="p"><p>Open LabRecorder</p></li><li data-preset-tag="p"><p>Press <code>Update</code>. The available LSL streams should be visible in the stream list<br>• You should be able to see streams from both EmotivPROs (usually called “Emotiv-<br>DataStream”) and the marker stream (called “AudioMarkers”)</p></li><li data-preset-tag="p"><p>Click <code>Browse</code> to select a location to store data (and set other parameters)</p></li><li data-preset-tag="p"><p>Select all streams and press <code>Record</code> to start recording</p></li></ol><h2 dir="auto">3.0 Working with the data</h2><p dir="auto">LabRecorder outputs an XDF file (Extensible Data Format) that contains data from all the streams. XDF files are structured into, streams, each with a different header that describes what it contains (device name, data type, sampling rate, channels, and more). You can use the below codeblock to open your XDF file and display some basic information.</p><p dir="auto"><strong>Note: Replace </strong><code><strong>/path/to/your/file.xdf</strong></code><strong> with the filepath for your LabRecorder XDF output file.</strong></p><pre data-language="JSX"><code>import pyxdf </code></pre> <p>import mne<br>import matplotlib.pyplot as plt<br>import numpy as np</p> <h1>Give the path to your LSL output file here.</h1> <p>data_path = "/path/to/your/file.xdf"</p> <h1>Load the XDF file.</h1> <p>streams, fileheader = pyxdf.load_xdf(data_path)</p> <p>print("XDF File Header:", fileheader)<br>print("Number of streams found:", len(streams))</p> <p>for i, stream in enumerate(streams):<br>print("\nStream", i + 1)<br>print("Stream Name:", stream["info"]["name"][0])<br>print("Stream Type:", stream["info"]["type"][0])<br>print("Number of Channels:", stream["info"]["channel_count"][0])</p> <pre><code>sfreq = float(stream["info"]["nominal_srate"][0]) print("Sampling Rate:", sfreq) print("Number of Samples:", len(stream["time_series"])) print("First 5 data points:", stream["time_series"][:5]) channel_names = [ chan["label"][0] for chan in stream["info"]["desc"][0]["channels"][0]["channel"] ] print("Channel Names:", channel_names) channel_types = "eeg"</code></pre><h3 dir="auto"><br></h3><h2 dir="auto">4.0 Additional Resources</h2><h4 dir="auto">Official Documentation</h4><ol dir="auto"><li data-preset-tag="p"><p>Check out the <a href="1. Check out the online documentation, including the official README file on GitHub 2. Additional resources: • Code to run LSL using Emotiv’s devices, with example scripts • Useful LSL demo on YouTube • SCCN LSL GitHub repository for all associated libraries • LSL GitHub repository for a collection a submodules and apps 3. HyPyP analysis pipeline for Hyperscanning studies" target="_blank">online documentation</a>, including the <a href="https://github.com/sccn/labstreaminglayer/" target="_blank">official README file on GitHub</a></p></li><li data-preset-tag="p"><p>Additional resources:<br>• <a href="https://github.com/Emotiv/labstreaminglayer" target="_blank">Code</a> to run LSL using Emotiv’s devices, with example scripts<br>• Useful <a href="https://www.youtube.com/watch?v=Y1at7yrcFW0&list=PLVnr33MP5RMRhGwY36zHHDOmAaYTB138D" target="_blank">LSL demo on YouTube</a><br>• <a href="https://github.com/sccn/labstreaminglayer" target="_blank">SCCN LSL GitHub repository</a> for all associated libraries<br>• <a href="https://github.com/labstreaminglayer" target="_blank">LSL GitHub repository</a> for a collection a submodules and apps</p></li><li data-preset-tag="p"><p><a href="https://academic.oup.com/scan/article/16/1-2/72/5919711?login=false" target="_blank">HyPyP analysis pipeline</a> for Hyperscanning studies</p></li></ol> </code></pre
""" LSL Example: Play audio and send a trigger marker <p>This script creates an LSL marker stream, waits for the user to<br>press ENTER, then plays an audio file and sends a marker that<br>can be synchronized with EEG data collected through LabRecorder.<br>"""</p> <p>import sounddevice as sd<br>import soundfile as sf<br>from pylsl import StreamInfo, StreamOutlet</p> <p>def wait_for_keypress():<br>print("Press ENTER to start audio playback and send an LSL marker.")<br>while True:<br>if input() == "":<br>break</p> <p>def play_audio_and_send_marker(audio_file, outlet):<br>data, fs = sf.read(audio_file)</p> <pre><code>print("Playing audio and sending LSL marker...") marker_val = [1] outlet.push_sample(marker_val) sd.play(data, fs) sd.wait() print("Audio playback finished.") </code></pre> <p>if <strong>name</strong> == "<strong>main</strong>":</p> <pre><code>info = StreamInfo( name="AudioMarkers", type="Markers", channel_count=1, nominal_srate=0, channel_format="int32", source_id="uniqueMarkerID12345" ) outlet = StreamOutlet(info) while True: wait_for_keypress() audio_filepath = "/path/to/audio.wav" play_audio_and_send_marker( audio_filepath, outlet )</code></pre><h2 dir="auto">2.4 STEP 5 - Use LabRecorder to view and save all LSL streams</h2><ol dir="auto"><li data-preset-tag="p"><p>Open LabRecorder</p></li><li data-preset-tag="p"><p>Press <code>Update</code>. The available LSL streams should be visible in the stream list<br>• You should be able to see streams from both EmotivPROs (usually called “Emotiv-<br>DataStream”) and the marker stream (called “AudioMarkers”)</p></li><li data-preset-tag="p"><p>Click <code>Browse</code> to select a location to store data (and set other parameters)</p></li><li data-preset-tag="p"><p>Select all streams and press <code>Record</code> to start recording</p></li></ol><h2 dir="auto">3.0 Working with the data</h2><p dir="auto">LabRecorder outputs an XDF file (Extensible Data Format) that contains data from all the streams. XDF files are structured into, streams, each with a different header that describes what it contains (device name, data type, sampling rate, channels, and more). You can use the below codeblock to open your XDF file and display some basic information.</p><p dir="auto"><strong>Note: Replace </strong><code><strong>/path/to/your/file.xdf</strong></code><strong> with the filepath for your LabRecorder XDF output file.</strong></p><pre data-language="JSX"><code>import pyxdf </code></pre> <p>import mne<br>import matplotlib.pyplot as plt<br>import numpy as np</p> <h1>Give the path to your LSL output file here.</h1> <p>data_path = "/path/to/your/file.xdf"</p> <h1>Load the XDF file.</h1> <p>streams, fileheader = pyxdf.load_xdf(data_path)</p> <p>print("XDF File Header:", fileheader)<br>print("Number of streams found:", len(streams))</p> <p>for i, stream in enumerate(streams):<br>print("\nStream", i + 1)<br>print("Stream Name:", stream["info"]["name"][0])<br>print("Stream Type:", stream["info"]["type"][0])<br>print("Number of Channels:", stream["info"]["channel_count"][0])</p> <pre><code>sfreq = float(stream["info"]["nominal_srate"][0]) print("Sampling Rate:", sfreq) print("Number of Samples:", len(stream["time_series"])) print("First 5 data points:", stream["time_series"][:5]) channel_names = [ chan["label"][0] for chan in stream["info"]["desc"][0]["channels"][0]["channel"] ] print("Channel Names:", channel_names) channel_types = "eeg"</code></pre><h3 dir="auto"><br></h3><h2 dir="auto">4.0 Additional Resources</h2><h4 dir="auto">Official Documentation</h4><ol dir="auto"><li data-preset-tag="p"><p>Check out the <a href="1. Check out the online documentation, including the official README file on GitHub 2. Additional resources: • Code to run LSL using Emotiv’s devices, with example scripts • Useful LSL demo on YouTube • SCCN LSL GitHub repository for all associated libraries • LSL GitHub repository for a collection a submodules and apps 3. HyPyP analysis pipeline for Hyperscanning studies" target="_blank">online documentation</a>, including the <a href="https://github.com/sccn/labstreaminglayer/" target="_blank">official README file on GitHub</a></p></li><li data-preset-tag="p"><p>Additional resources:<br>• <a href="https://github.com/Emotiv/labstreaminglayer" target="_blank">Code</a> to run LSL using Emotiv’s devices, with example scripts<br>• Useful <a href="https://www.youtube.com/watch?v=Y1at7yrcFW0&list=PLVnr33MP5RMRhGwY36zHHDOmAaYTB138D" target="_blank">LSL demo on YouTube</a><br>• <a href="https://github.com/sccn/labstreaminglayer" target="_blank">SCCN LSL GitHub repository</a> for all associated libraries<br>• <a href="https://github.com/labstreaminglayer" target="_blank">LSL GitHub repository</a> for a collection a submodules and apps</p></li><li data-preset-tag="p"><p><a href="https://academic.oup.com/scan/article/16/1-2/72/5919711?login=false" target="_blank">HyPyP analysis pipeline</a> for Hyperscanning studies</p></li></ol> </code></pre
""" LSL Example: Play audio and send a trigger marker <p>This script creates an LSL marker stream, waits for the user to<br>press ENTER, then plays an audio file and sends a marker that<br>can be synchronized with EEG data collected through LabRecorder.<br>"""</p> <p>import sounddevice as sd<br>import soundfile as sf<br>from pylsl import StreamInfo, StreamOutlet</p> <p>def wait_for_keypress():<br>print("Press ENTER to start audio playback and send an LSL marker.")<br>while True:<br>if input() == "":<br>break</p> <p>def play_audio_and_send_marker(audio_file, outlet):<br>data, fs = sf.read(audio_file)</p> <pre><code>print("Playing audio and sending LSL marker...") marker_val = [1] outlet.push_sample(marker_val) sd.play(data, fs) sd.wait() print("Audio playback finished.") </code></pre> <p>if <strong>name</strong> == "<strong>main</strong>":</p> <pre><code>info = StreamInfo( name="AudioMarkers", type="Markers", channel_count=1, nominal_srate=0, channel_format="int32", source_id="uniqueMarkerID12345" ) outlet = StreamOutlet(info) while True: wait_for_keypress() audio_filepath = "/path/to/audio.wav" play_audio_and_send_marker( audio_filepath, outlet )</code></pre><h2 dir="auto">2.4 STEP 5 - Use LabRecorder to view and save all LSL streams</h2><ol dir="auto"><li data-preset-tag="p"><p>Open LabRecorder</p></li><li data-preset-tag="p"><p>Press <code>Update</code>. The available LSL streams should be visible in the stream list<br>• You should be able to see streams from both EmotivPROs (usually called “Emotiv-<br>DataStream”) and the marker stream (called “AudioMarkers”)</p></li><li data-preset-tag="p"><p>Click <code>Browse</code> to select a location to store data (and set other parameters)</p></li><li data-preset-tag="p"><p>Select all streams and press <code>Record</code> to start recording</p></li></ol><h2 dir="auto">3.0 Working with the data</h2><p dir="auto">LabRecorder outputs an XDF file (Extensible Data Format) that contains data from all the streams. XDF files are structured into, streams, each with a different header that describes what it contains (device name, data type, sampling rate, channels, and more). You can use the below codeblock to open your XDF file and display some basic information.</p><p dir="auto"><strong>Note: Replace </strong><code><strong>/path/to/your/file.xdf</strong></code><strong> with the filepath for your LabRecorder XDF output file.</strong></p><pre data-language="JSX"><code>import pyxdf </code></pre> <p>import mne<br>import matplotlib.pyplot as plt<br>import numpy as np</p> <h1>Give the path to your LSL output file here.</h1> <p>data_path = "/path/to/your/file.xdf"</p> <h1>Load the XDF file.</h1> <p>streams, fileheader = pyxdf.load_xdf(data_path)</p> <p>print("XDF File Header:", fileheader)<br>print("Number of streams found:", len(streams))</p> <p>for i, stream in enumerate(streams):<br>print("\nStream", i + 1)<br>print("Stream Name:", stream["info"]["name"][0])<br>print("Stream Type:", stream["info"]["type"][0])<br>print("Number of Channels:", stream["info"]["channel_count"][0])</p> <pre><code>sfreq = float(stream["info"]["nominal_srate"][0]) print("Sampling Rate:", sfreq) print("Number of Samples:", len(stream["time_series"])) print("First 5 data points:", stream["time_series"][:5]) channel_names = [ chan["label"][0] for chan in stream["info"]["desc"][0]["channels"][0]["channel"] ] print("Channel Names:", channel_names) channel_types = "eeg"</code></pre><h3 dir="auto"><br></h3><h2 dir="auto">4.0 Additional Resources</h2><h4 dir="auto">Official Documentation</h4><ol dir="auto"><li data-preset-tag="p"><p>Check out the <a href="1. Check out the online documentation, including the official README file on GitHub 2. Additional resources: • Code to run LSL using Emotiv’s devices, with example scripts • Useful LSL demo on YouTube • SCCN LSL GitHub repository for all associated libraries • LSL GitHub repository for a collection a submodules and apps 3. HyPyP analysis pipeline for Hyperscanning studies" target="_blank">online documentation</a>, including the <a href="https://github.com/sccn/labstreaminglayer/" target="_blank">official README file on GitHub</a></p></li><li data-preset-tag="p"><p>Additional resources:<br>• <a href="https://github.com/Emotiv/labstreaminglayer" target="_blank">Code</a> to run LSL using Emotiv’s devices, with example scripts<br>• Useful <a href="https://www.youtube.com/watch?v=Y1at7yrcFW0&list=PLVnr33MP5RMRhGwY36zHHDOmAaYTB138D" target="_blank">LSL demo on YouTube</a><br>• <a href="https://github.com/sccn/labstreaminglayer" target="_blank">SCCN LSL GitHub repository</a> for all associated libraries<br>• <a href="https://github.com/labstreaminglayer" target="_blank">LSL GitHub repository</a> for a collection a submodules and apps</p></li><li data-preset-tag="p"><p><a href="https://academic.oup.com/scan/article/16/1-2/72/5919711?login=false" target="_blank">HyPyP analysis pipeline</a> for Hyperscanning studies</p></li></ol> </code></pre
ברוכים הבאים! במדריך זה נלמד כיצד להשתמש ב-Lab Streaming Layer (LSL) בפייתון כדי לאסוף ולסנכרן נתוני EEG של Emotiv ממספר מכשירים. פעולה זו תדרוש ידע בסיסי מעשי בשפת התכנות פייתון.
מה תלמדו
מה זה Lab Streaming Layer (LSL) ומדוע חוקרים משתמשים בו
כיצד לאסוף נתונים מסונכרנים ממספר מכשירי EEG של Emotiv
כיצד לייבא ולבחון נתונים שנאספו
1.1 מהו LSL ולמה הוא טוב?
Lab streaming layer (LSL) היא ערכת כלים בקוד פתוח שבה ניתן להשתמש כדי לשלוח, לקבל ולסנכרן זרמי נתונים עצביים, פיזיולוגיים והתנהגותיים מחומרי חומרה מגוונים של חיישנים. מכשירי חומרת חישת מוח וגוף בעלי יכולת דיוק וניידות הולכים וגדלים (כמו מערכות EEG של Emotiv) מביאים את מדעי המוח אל מחוץ למעבדה אל עולם הנתונים בזמן אמת. במקום שבו מדידות מוח כמו EEG ו-MEG היו מוגבלות פעם למעבדות מחקר, מכשירים ניידים מאפשרים לנו לאסוף מספר נתונים בסביבות טבעיות יותר, וממספר אנשים בבת אחת.
חוקר עשוי להתעניין בסינכרון פיזיולוגי בין שני אנשים המאזינים לאותה מוזיקה. LSL יכול לעזור לנו לאסוף נתונים משתי קסדות EEG בנפרד, אשר מסונכרנים גם להצגת הצליל.
כמה דוגמאות לשימושים אחרים ב-LSL:
הוספת סמני אירועים מניסוי לנתוני EEG מתמשכים
תיאום זמן של נתונים ממקורות מרובים עבור משתתף בודד (למשל דופק, EMG, EEG)
תיאום זמן של נתונים ממספר משתתפים (למשל, מחקרי EEG Hyperscanning)
1.2 כיצד פועל LSL?
Lab Streaming Layer הוא פרוטוקול לחילופין בזמן אמת של נתוני סדרות עיתיות בין מכשירים מרובים. ניתן ליישם את LSL באמצעות ספריות קוד פתוח עבור שפות תכנות כגון Python, MATLAB, C++, Java ואחרות.
פונקציונליות הליבה סובבת סביב זרמי נתונים של LSL:
1. מכשיר/תוכנת רכישה אוספים נתונים ויוצרים זרם נתונים - ניתן להזרים נתונים פיזיולוגיים ל-LSL ממכשירי הקלטת EEG, עוקבי עיניים, מערכות ללכידת תנועה, מוניטורים של קצב לב וכו', כולל מטא-נתונים (קצב דגימה, סוג נתונים, מידע על ערוצים וכו') - ניתן לשלוח סמני אירועים מניסויים (למשל באמצעות PsychoPy) כזרם נתונים באמצעות LSL
2. זרם הנתונים מפורסם ברשת - כך נשלחים נתונים באמצעות LSL; זרם הנתונים "משודר" לרשת - זרמים שפורסמו זמינים ברשת וניתנים לגילוי על ידי מכשירים תומכי LSL אחרים באותה רשת - LSL מקצה לכל פיסת נתונים או דגימה חותמת זמן המבוססת על שעון משותף (בעקבות פרוטוקול Network Time Protocol). - הזרם נדחף דגימה-אחר-דגימה (או פיסה-אחר-פיסה) דרך "מוצא" (outlet)
3. מכשירי איסוף "נרשמים" לזרמי נתונים - כך מתקבלים נתונים באמצעות LSL - מכשירי איסוף באותה רשת מקבלים זרמי נתונים שפורסמו באמצעות "מבואות" (inlets). - כל מבוא מקבל את דגימות הזרם והמטא-נתונים ממוצא אחד בלבד
4. שמירת נתונים - לאחר ההרשמה לזרם נתונים, תוכל לשמור אותו במשתנה בשפת התכנות המועדפת עליך, או להשתמש בתוכנת LabRecorder המצורפת של LSL כדי לשמור אותו בפורמט סטנדרטי כגון .xdf.
2.0 סקירה כללית של המדריך
במדריך זה, ניקח דוגמה של מערך ניסיוני וננחה אותך בשלבים ובקוד הדרושים ליישומו באמצעות LSL בפייתון. נשתמש בפייתון כדי להשמיע צליל תוך כדי איסוף נתוני EEG משני אנשים המרכיבים קסדות של Emotiv. נשתמש בשני מחשבים שכל אחד מהם מריץ את EmotivPRO כדי לאסוף את נתוני ה-EEG, ולשדר כל זרם דרך מוצא LSL נפרד. נשתמש בספריית פייתון כדי להשמיע קובץ שמע ובמקביל לשלוח טריגר בכל פעם שהקובץ מתחיל.
שלבים:
1. השתמש ב-EmotivPRO כדי להזרים נתונים דרך מוצאי LSL הכוללים נתוני EEG (ו/או תנועה, איכות מגע, איכות אות וכו') 2. הפעל רצועת שמע באמצעות סקריפט פייתון, ובמקביל שלח טריגר דרך LSL אחר השתמש ב-LabRecorder כדי ללכוד ולשמור את כל שלושת זרמי הנתונים דרך מבוא LSL.
2.1 שלב 1 - הגדרה והתקנה
תצטרך מכשירי איסוף נתונים נתמכים לאיסוף נתונים
• כל מכשירי ה-brainware של Emotiv מתחברים ל-LSL באמצעות תוכנת EmotivPROהתקן את EmotivPRO במכשירים שלך. תצטרך רישיון EmotivPRO תקף כדי להשתמש ב-LSL.
התקן את ספריית ה-LSL לפייתון באמצעות הפקודה הבאה:
pip install pylslהורד את תוכנת LabRecorder. זוהי אפליקציה פשוטה וחינמית שניתן להריץ ממנה
שורת הפקודה או באמצעות הורדה עצמאיתעבור הניסוי שלנו: התקן את החבילות הדרושות להשמעת שמע באמצעות פייתון
pip install sounddevice soundfile
2.2 שלב 3 - שליחת הנתונים מ-EmotivPRO באמצעות זרם LSL
אתר את ה-"..." בפינה הימנית העליונה של האפליקציה, וניווט אל הגדרות (Settings)
מצא את המקטע 'Lab Streaming Layer' ואת תת-המקטע 'Outlet'
בחר את כל סוגי הנתונים שברצונך לשדר
בחר את פורמט הנתונים (32-bit float או 64-bit double)
בחר אם לשלוח נתונים דגימה-אחר-דגימה או בפיסות (chunks) של דגימות
לחץ על 'Start' כדי לשדר זרם נתונים של LSL
2.3 שלב 4 - שימוש בסקריפט פייתון להשמעת שמע ושליחת טריגרים
העתק והדבק את בלוק הקוד הבא לתוך קובץ פייתון ושמור אותו במחשב שלך.
אתר קובץ שמע (רצוי קובץ .wav) שברצונך להשמיע וערוך את הסקריפט על ידי שינוי ה
משתנהaudio_filepathלנתיב קובץ השמע במחשב שלךפתח את שורת הפקודה כדי לקיים אינטראקציה עם ממשק פקודות הטקסט ונווט לתיקייה שבה
קובץ הפייתון שלך מאוחסןהזן:
python3 filename.py
• בהתאם להתקנת הפייתון שלך, ייתכן שתשתמש ב-pythonבמקום ב-python3
הערה: החלף את/path/to/audio.wavבמיקום של קובץ השמע שברצונך להשמיע במהלך הניסוי שלך.
""" LSL Example: Play audio and send a trigger marker <p>This script creates an LSL marker stream, waits for the user to<br>press ENTER, then plays an audio file and sends a marker that<br>can be synchronized with EEG data collected through LabRecorder.<br>"""</p> <p>import sounddevice as sd<br>import soundfile as sf<br>from pylsl import StreamInfo, StreamOutlet</p> <p>def wait_for_keypress():<br>print("Press ENTER to start audio playback and send an LSL marker.")<br>while True:<br>if input() == "":<br>break</p> <p>def play_audio_and_send_marker(audio_file, outlet):<br>data, fs = sf.read(audio_file)</p> <pre><code>print("Playing audio and sending LSL marker...") marker_val = [1] outlet.push_sample(marker_val) sd.play(data, fs) sd.wait() print("Audio playback finished.") </code></pre> <p>if <strong>name</strong> == "<strong>main</strong>":</p> <pre><code>info = StreamInfo( name="AudioMarkers", type="Markers", channel_count=1, nominal_srate=0, channel_format="int32", source_id="uniqueMarkerID12345" ) outlet = StreamOutlet(info) while True: wait_for_keypress() audio_filepath = "/path/to/audio.wav" play_audio_and_send_marker( audio_filepath, outlet )</code></pre><h2 dir="auto">2.4 STEP 5 - Use LabRecorder to view and save all LSL streams</h2><ol dir="auto"><li data-preset-tag="p"><p>Open LabRecorder</p></li><li data-preset-tag="p"><p>Press <code>Update</code>. The available LSL streams should be visible in the stream list<br>• You should be able to see streams from both EmotivPROs (usually called “Emotiv-<br>DataStream”) and the marker stream (called “AudioMarkers”)</p></li><li data-preset-tag="p"><p>Click <code>Browse</code> to select a location to store data (and set other parameters)</p></li><li data-preset-tag="p"><p>Select all streams and press <code>Record</code> to start recording</p></li></ol><h2 dir="auto">3.0 Working with the data</h2><p dir="auto">LabRecorder outputs an XDF file (Extensible Data Format) that contains data from all the streams. XDF files are structured into, streams, each with a different header that describes what it contains (device name, data type, sampling rate, channels, and more). You can use the below codeblock to open your XDF file and display some basic information.</p><p dir="auto"><strong>Note: Replace </strong><code><strong>/path/to/your/file.xdf</strong></code><strong> with the filepath for your LabRecorder XDF output file.</strong></p><pre data-language="JSX"><code>import pyxdf </code></pre> <p>import mne<br>import matplotlib.pyplot as plt<br>import numpy as np</p> <h1>Give the path to your LSL output file here.</h1> <p>data_path = "/path/to/your/file.xdf"</p> <h1>Load the XDF file.</h1> <p>streams, fileheader = pyxdf.load_xdf(data_path)</p> <p>print("XDF File Header:", fileheader)<br>print("Number of streams found:", len(streams))</p> <p>for i, stream in enumerate(streams):<br>print("\nStream", i + 1)<br>print("Stream Name:", stream["info"]["name"][0])<br>print("Stream Type:", stream["info"]["type"][0])<br>print("Number of Channels:", stream["info"]["channel_count"][0])</p> <pre><code>sfreq = float(stream["info"]["nominal_srate"][0]) print("Sampling Rate:", sfreq) print("Number of Samples:", len(stream["time_series"])) print("First 5 data points:", stream["time_series"][:5]) channel_names = [ chan["label"][0] for chan in stream["info"]["desc"][0]["channels"][0]["channel"] ] print("Channel Names:", channel_names) channel_types = "eeg"</code></pre><h3 dir="auto"><br></h3><h2 dir="auto">4.0 Additional Resources</h2><h4 dir="auto">Official Documentation</h4><ol dir="auto"><li data-preset-tag="p"><p>Check out the <a href="1. Check out the online documentation, including the official README file on GitHub 2. Additional resources: • Code to run LSL using Emotiv’s devices, with example scripts • Useful LSL demo on YouTube • SCCN LSL GitHub repository for all associated libraries • LSL GitHub repository for a collection a submodules and apps 3. HyPyP analysis pipeline for Hyperscanning studies" target="_blank">online documentation</a>, including the <a href="https://github.com/sccn/labstreaminglayer/" target="_blank">official README file on GitHub</a></p></li><li data-preset-tag="p"><p>Additional resources:<br>• <a href="https://github.com/Emotiv/labstreaminglayer" target="_blank">Code</a> to run LSL using Emotiv’s devices, with example scripts<br>• Useful <a href="https://www.youtube.com/watch?v=Y1at7yrcFW0&list=PLVnr33MP5RMRhGwY36zHHDOmAaYTB138D" target="_blank">LSL demo on YouTube</a><br>• <a href="https://github.com/sccn/labstreaminglayer" target="_blank">SCCN LSL GitHub repository</a> for all associated libraries<br>• <a href="https://github.com/labstreaminglayer" target="_blank">LSL GitHub repository</a> for a collection a submodules and apps</p></li><li data-preset-tag="p"><p><a href="https://academic.oup.com/scan/article/16/1-2/72/5919711?login=false" target="_blank">HyPyP analysis pipeline</a> for Hyperscanning studies</p></li></ol> </code></pre
ברוכים הבאים! במדריך זה נלמד כיצד להשתמש ב-Lab Streaming Layer (LSL) בפייתון כדי לאסוף ולסנכרן נתוני EEG של Emotiv ממספר מכשירים. פעולה זו תדרוש ידע בסיסי מעשי בשפת התכנות פייתון.
מה תלמדו
מה זה Lab Streaming Layer (LSL) ומדוע חוקרים משתמשים בו
כיצד לאסוף נתונים מסונכרנים ממספר מכשירי EEG של Emotiv
כיצד לייבא ולבחון נתונים שנאספו
1.1 מהו LSL ולמה הוא טוב?
Lab streaming layer (LSL) היא ערכת כלים בקוד פתוח שבה ניתן להשתמש כדי לשלוח, לקבל ולסנכרן זרמי נתונים עצביים, פיזיולוגיים והתנהגותיים מחומרי חומרה מגוונים של חיישנים. מכשירי חומרת חישת מוח וגוף בעלי יכולת דיוק וניידות הולכים וגדלים (כמו מערכות EEG של Emotiv) מביאים את מדעי המוח אל מחוץ למעבדה אל עולם הנתונים בזמן אמת. במקום שבו מדידות מוח כמו EEG ו-MEG היו מוגבלות פעם למעבדות מחקר, מכשירים ניידים מאפשרים לנו לאסוף מספר נתונים בסביבות טבעיות יותר, וממספר אנשים בבת אחת.
חוקר עשוי להתעניין בסינכרון פיזיולוגי בין שני אנשים המאזינים לאותה מוזיקה. LSL יכול לעזור לנו לאסוף נתונים משתי קסדות EEG בנפרד, אשר מסונכרנים גם להצגת הצליל.
כמה דוגמאות לשימושים אחרים ב-LSL:
הוספת סמני אירועים מניסוי לנתוני EEG מתמשכים
תיאום זמן של נתונים ממקורות מרובים עבור משתתף בודד (למשל דופק, EMG, EEG)
תיאום זמן של נתונים ממספר משתתפים (למשל, מחקרי EEG Hyperscanning)
1.2 כיצד פועל LSL?
Lab Streaming Layer הוא פרוטוקול לחילופין בזמן אמת של נתוני סדרות עיתיות בין מכשירים מרובים. ניתן ליישם את LSL באמצעות ספריות קוד פתוח עבור שפות תכנות כגון Python, MATLAB, C++, Java ואחרות.
פונקציונליות הליבה סובבת סביב זרמי נתונים של LSL:
1. מכשיר/תוכנת רכישה אוספים נתונים ויוצרים זרם נתונים - ניתן להזרים נתונים פיזיולוגיים ל-LSL ממכשירי הקלטת EEG, עוקבי עיניים, מערכות ללכידת תנועה, מוניטורים של קצב לב וכו', כולל מטא-נתונים (קצב דגימה, סוג נתונים, מידע על ערוצים וכו') - ניתן לשלוח סמני אירועים מניסויים (למשל באמצעות PsychoPy) כזרם נתונים באמצעות LSL
2. זרם הנתונים מפורסם ברשת - כך נשלחים נתונים באמצעות LSL; זרם הנתונים "משודר" לרשת - זרמים שפורסמו זמינים ברשת וניתנים לגילוי על ידי מכשירים תומכי LSL אחרים באותה רשת - LSL מקצה לכל פיסת נתונים או דגימה חותמת זמן המבוססת על שעון משותף (בעקבות פרוטוקול Network Time Protocol). - הזרם נדחף דגימה-אחר-דגימה (או פיסה-אחר-פיסה) דרך "מוצא" (outlet)
3. מכשירי איסוף "נרשמים" לזרמי נתונים - כך מתקבלים נתונים באמצעות LSL - מכשירי איסוף באותה רשת מקבלים זרמי נתונים שפורסמו באמצעות "מבואות" (inlets). - כל מבוא מקבל את דגימות הזרם והמטא-נתונים ממוצא אחד בלבד
4. שמירת נתונים - לאחר ההרשמה לזרם נתונים, תוכל לשמור אותו במשתנה בשפת התכנות המועדפת עליך, או להשתמש בתוכנת LabRecorder המצורפת של LSL כדי לשמור אותו בפורמט סטנדרטי כגון .xdf.
2.0 סקירה כללית של המדריך
במדריך זה, ניקח דוגמה של מערך ניסיוני וננחה אותך בשלבים ובקוד הדרושים ליישומו באמצעות LSL בפייתון. נשתמש בפייתון כדי להשמיע צליל תוך כדי איסוף נתוני EEG משני אנשים המרכיבים קסדות של Emotiv. נשתמש בשני מחשבים שכל אחד מהם מריץ את EmotivPRO כדי לאסוף את נתוני ה-EEG, ולשדר כל זרם דרך מוצא LSL נפרד. נשתמש בספריית פייתון כדי להשמיע קובץ שמע ובמקביל לשלוח טריגר בכל פעם שהקובץ מתחיל.
שלבים:
1. השתמש ב-EmotivPRO כדי להזרים נתונים דרך מוצאי LSL הכוללים נתוני EEG (ו/או תנועה, איכות מגע, איכות אות וכו') 2. הפעל רצועת שמע באמצעות סקריפט פייתון, ובמקביל שלח טריגר דרך LSL אחר השתמש ב-LabRecorder כדי ללכוד ולשמור את כל שלושת זרמי הנתונים דרך מבוא LSL.
2.1 שלב 1 - הגדרה והתקנה
תצטרך מכשירי איסוף נתונים נתמכים לאיסוף נתונים
• כל מכשירי ה-brainware של Emotiv מתחברים ל-LSL באמצעות תוכנת EmotivPROהתקן את EmotivPRO במכשירים שלך. תצטרך רישיון EmotivPRO תקף כדי להשתמש ב-LSL.
התקן את ספריית ה-LSL לפייתון באמצעות הפקודה הבאה:
pip install pylslהורד את תוכנת LabRecorder. זוהי אפליקציה פשוטה וחינמית שניתן להריץ ממנה
שורת הפקודה או באמצעות הורדה עצמאיתעבור הניסוי שלנו: התקן את החבילות הדרושות להשמעת שמע באמצעות פייתון
pip install sounddevice soundfile
2.2 שלב 3 - שליחת הנתונים מ-EmotivPRO באמצעות זרם LSL
אתר את ה-"..." בפינה הימנית העליונה של האפליקציה, וניווט אל הגדרות (Settings)
מצא את המקטע 'Lab Streaming Layer' ואת תת-המקטע 'Outlet'
בחר את כל סוגי הנתונים שברצונך לשדר
בחר את פורמט הנתונים (32-bit float או 64-bit double)
בחר אם לשלוח נתונים דגימה-אחר-דגימה או בפיסות (chunks) של דגימות
לחץ על 'Start' כדי לשדר זרם נתונים של LSL
2.3 שלב 4 - שימוש בסקריפט פייתון להשמעת שמע ושליחת טריגרים
העתק והדבק את בלוק הקוד הבא לתוך קובץ פייתון ושמור אותו במחשב שלך.
אתר קובץ שמע (רצוי קובץ .wav) שברצונך להשמיע וערוך את הסקריפט על ידי שינוי ה
משתנהaudio_filepathלנתיב קובץ השמע במחשב שלךפתח את שורת הפקודה כדי לקיים אינטראקציה עם ממשק פקודות הטקסט ונווט לתיקייה שבה
קובץ הפייתון שלך מאוחסןהזן:
python3 filename.py
• בהתאם להתקנת הפייתון שלך, ייתכן שתשתמש ב-pythonבמקום ב-python3
הערה: החלף את/path/to/audio.wavבמיקום של קובץ השמע שברצונך להשמיע במהלך הניסוי שלך.
""" LSL Example: Play audio and send a trigger marker <p>This script creates an LSL marker stream, waits for the user to<br>press ENTER, then plays an audio file and sends a marker that<br>can be synchronized with EEG data collected through LabRecorder.<br>"""</p> <p>import sounddevice as sd<br>import soundfile as sf<br>from pylsl import StreamInfo, StreamOutlet</p> <p>def wait_for_keypress():<br>print("Press ENTER to start audio playback and send an LSL marker.")<br>while True:<br>if input() == "":<br>break</p> <p>def play_audio_and_send_marker(audio_file, outlet):<br>data, fs = sf.read(audio_file)</p> <pre><code>print("Playing audio and sending LSL marker...") marker_val = [1] outlet.push_sample(marker_val) sd.play(data, fs) sd.wait() print("Audio playback finished.") </code></pre> <p>if <strong>name</strong> == "<strong>main</strong>":</p> <pre><code>info = StreamInfo( name="AudioMarkers", type="Markers", channel_count=1, nominal_srate=0, channel_format="int32", source_id="uniqueMarkerID12345" ) outlet = StreamOutlet(info) while True: wait_for_keypress() audio_filepath = "/path/to/audio.wav" play_audio_and_send_marker( audio_filepath, outlet )</code></pre><h2 dir="auto">2.4 STEP 5 - Use LabRecorder to view and save all LSL streams</h2><ol dir="auto"><li data-preset-tag="p"><p>Open LabRecorder</p></li><li data-preset-tag="p"><p>Press <code>Update</code>. The available LSL streams should be visible in the stream list<br>• You should be able to see streams from both EmotivPROs (usually called “Emotiv-<br>DataStream”) and the marker stream (called “AudioMarkers”)</p></li><li data-preset-tag="p"><p>Click <code>Browse</code> to select a location to store data (and set other parameters)</p></li><li data-preset-tag="p"><p>Select all streams and press <code>Record</code> to start recording</p></li></ol><h2 dir="auto">3.0 Working with the data</h2><p dir="auto">LabRecorder outputs an XDF file (Extensible Data Format) that contains data from all the streams. XDF files are structured into, streams, each with a different header that describes what it contains (device name, data type, sampling rate, channels, and more). You can use the below codeblock to open your XDF file and display some basic information.</p><p dir="auto"><strong>Note: Replace </strong><code><strong>/path/to/your/file.xdf</strong></code><strong> with the filepath for your LabRecorder XDF output file.</strong></p><pre data-language="JSX"><code>import pyxdf </code></pre> <p>import mne<br>import matplotlib.pyplot as plt<br>import numpy as np</p> <h1>Give the path to your LSL output file here.</h1> <p>data_path = "/path/to/your/file.xdf"</p> <h1>Load the XDF file.</h1> <p>streams, fileheader = pyxdf.load_xdf(data_path)</p> <p>print("XDF File Header:", fileheader)<br>print("Number of streams found:", len(streams))</p> <p>for i, stream in enumerate(streams):<br>print("\nStream", i + 1)<br>print("Stream Name:", stream["info"]["name"][0])<br>print("Stream Type:", stream["info"]["type"][0])<br>print("Number of Channels:", stream["info"]["channel_count"][0])</p> <pre><code>sfreq = float(stream["info"]["nominal_srate"][0]) print("Sampling Rate:", sfreq) print("Number of Samples:", len(stream["time_series"])) print("First 5 data points:", stream["time_series"][:5]) channel_names = [ chan["label"][0] for chan in stream["info"]["desc"][0]["channels"][0]["channel"] ] print("Channel Names:", channel_names) channel_types = "eeg"</code></pre><h3 dir="auto"><br></h3><h2 dir="auto">4.0 Additional Resources</h2><h4 dir="auto">Official Documentation</h4><ol dir="auto"><li data-preset-tag="p"><p>Check out the <a href="1. Check out the online documentation, including the official README file on GitHub 2. Additional resources: • Code to run LSL using Emotiv’s devices, with example scripts • Useful LSL demo on YouTube • SCCN LSL GitHub repository for all associated libraries • LSL GitHub repository for a collection a submodules and apps 3. HyPyP analysis pipeline for Hyperscanning studies" target="_blank">online documentation</a>, including the <a href="https://github.com/sccn/labstreaminglayer/" target="_blank">official README file on GitHub</a></p></li><li data-preset-tag="p"><p>Additional resources:<br>• <a href="https://github.com/Emotiv/labstreaminglayer" target="_blank">Code</a> to run LSL using Emotiv’s devices, with example scripts<br>• Useful <a href="https://www.youtube.com/watch?v=Y1at7yrcFW0&list=PLVnr33MP5RMRhGwY36zHHDOmAaYTB138D" target="_blank">LSL demo on YouTube</a><br>• <a href="https://github.com/sccn/labstreaminglayer" target="_blank">SCCN LSL GitHub repository</a> for all associated libraries<br>• <a href="https://github.com/labstreaminglayer" target="_blank">LSL GitHub repository</a> for a collection a submodules and apps</p></li><li data-preset-tag="p"><p><a href="https://academic.oup.com/scan/article/16/1-2/72/5919711?login=false" target="_blank">HyPyP analysis pipeline</a> for Hyperscanning studies</p></li></ol> </code></pre
המשך לקרוא