用於同步多個數據流的實驗室串流層 (LSL)
Roshini Randeniya 博士和 Lucas Kleine
更新於
2024年5月17日
用於同步多個數據流的實驗室串流層 (LSL)
Roshini Randeniya 博士和 Lucas Kleine
更新於
2024年5月17日
用於同步多個數據流的實驗室串流層 (LSL)
Roshini Randeniya 博士和 Lucas Kleine
更新於
2024年5月17日
歡迎!在本教學中,我們將學習如何使用 Python 中的實驗室串流層 (Lab Streaming Layer, LSL) 來收集並同步來自多個裝置的 Emotiv EEG 數據。這需要具備 Python 程式語言的基本實作知識。
您將學到什麼
什麼是實驗室串流層 (LSL) 及其研究用途
如何從多個 Emotiv EEG 裝置收集同步數據
如何匯入和檢查收集到的數據
1.1 什麼是 LSL?它有什麼用處?
實驗室串流層 (LSL) 是一個開源工具箱,可用於傳送、接收和同步來自各種感測器硬體的神經、生理和行為數據串流。功能日益強大、精確且行動化的腦部與身體感測硬體裝置(如 Emotiv EEG 系統)正在將神經科學從實驗室帶入即時數據的世界。過去 EEG 和 MEG 等腦部測量僅限於研究實驗室,現在行動裝置讓我們能夠在更自然、更生活化的環境中收集多方面的數據,並能同時從多人身上收集數據。
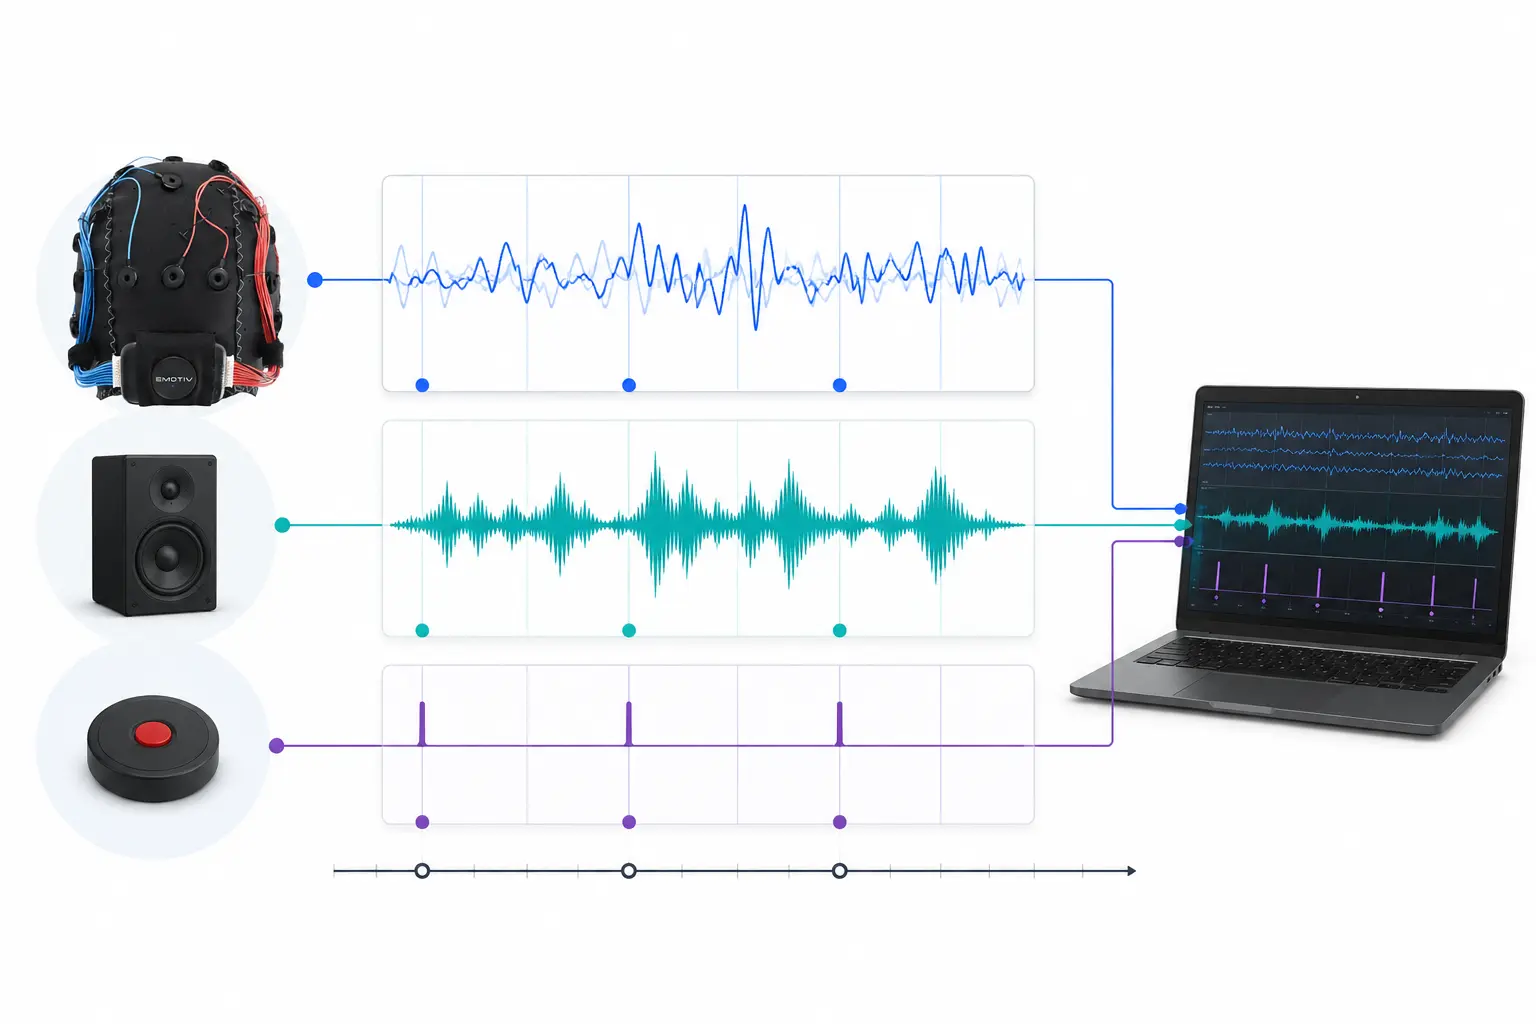
研究人員可能對聽同一首音樂的兩個人之間的生理同步性感興趣。LSL 可以幫助我們分別從兩個 EEG 腦機介面頭戴式裝置收集數據,並使其與聲音的播放保持同步。
LSL 的其他一些使用範例:
將實驗中的事件標記新增至持續進行的 EEG 數據中
針對單一受試者,時間對齊多個來源的數據(例如心率、EMG、EEG)
時間對齊多個受試者的數據(例如 EEG 超掃描研究)
1.2 LSL 是如何運作的?
實驗室串流層是一種用於在多個裝置之間進行即時時間序列數據交換的通訊協定。LSL 可以使用 Python、MATLAB、C++、Java 等程式語言的開源函式庫來實作。
核心功能圍繞在 LSL 數據串流:
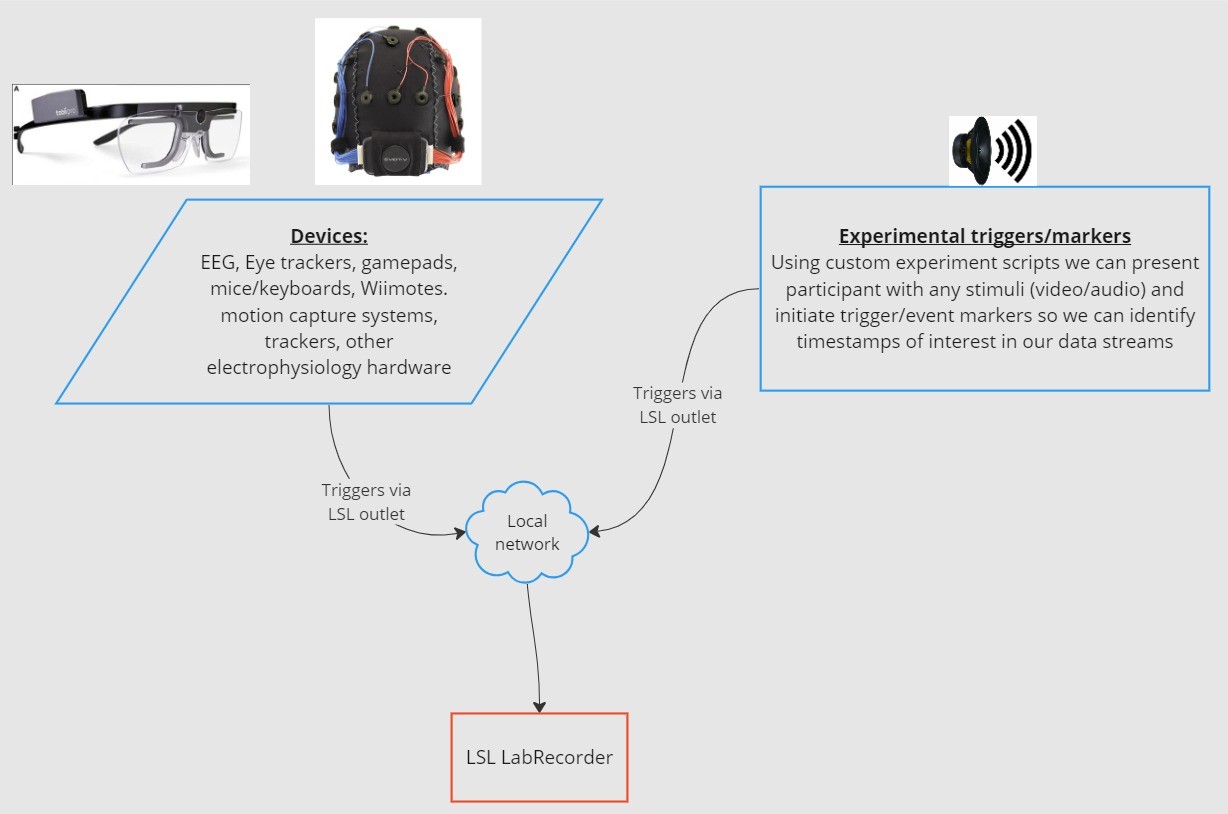
1. 採集裝置/軟體收集數據並建立數據串流 - 生理數據可以從 EEG 記錄裝置、眼動追蹤儀、動作捕捉系統、心率監測器等串流傳輸到 LSL,包括中繼資料(採樣率、數據類型、通道資訊等) - 來自實驗的事件標記(例如使用 PsychoPy)也可以使用 LSL 作為數據串流傳送
2. 數據串流會被發佈到網路 - 這是使用 LSL 傳送數據的方式;數據串流會「廣播」到網路上 - 已發佈的串流可在網路上使用,並可被同一網路上的其他支援 LSL 的裝置偵測到 - LSL 根據共同時鐘(遵循網路時間協定)為每個數據區塊或樣本分配一個時間戳記。 - 串流會透過「出口 (outlet)」逐個樣本(或逐個區塊)推送
3. 收集裝置「訂閱」數據串流 - 這是使用 LSL class 接收數據的方式 - 同一網路上的收集裝置透過「入口 (inlet)」接收已發佈的數據串流。 - 每個入口僅接收來自一個出口的串流樣本和中繼資料
4. 儲存數據 - 訂閱數據串流後,您可以將其儲存到您偏好程式語言中的變數,或者使用 LSL 提供的軟體 LabRecorder 將其儲存為標準格式,例如 .xdf。
2.0 教學總覽
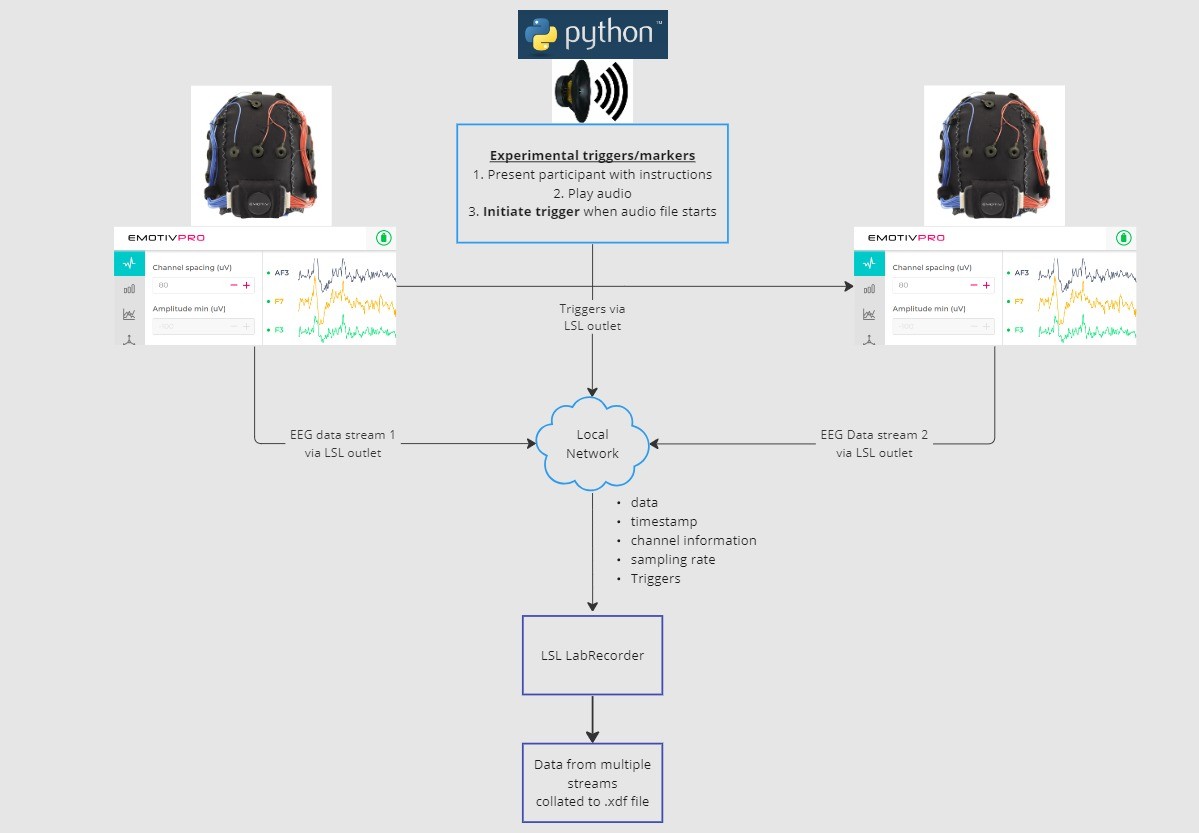
在本教學中,我們將以一個實驗設定為例,指導您在 Python 中使用 LSL 實作它所需的步驟和程式碼。我們將使用 Python 播放聲音,同時從配戴 Emotiv 頭戴式裝置的兩個人身上收集 EEG 數據。我們將使用兩台各自執行 EmotivPRO 的電腦來收集 EEG 數據,並透過獨立的 LSL 出口廣播每個串流。我們將使用 Python 函式庫播放音訊檔案,並在每次檔案開始播放時同時傳送一個觸發器。
步驟:
1. 使用 EmotivPRO 透過 LSL 出口串流傳輸包含 EEG 數據(和/或動作、接觸品質、訊號品質等)的數據。2. 使用 Python 腳本播放音訊軌,並同時透過另一個 LSL 傳送觸發器。使用 LabRecorder 透過 LSL 入口擷取並儲存所有三個數據串流。
2.1 步驟 1 - 設定與安裝
您需要支援的數據採集裝置來收集數據
• 所有 Emotiv 的腦機介面裝置皆可透過 EmotivPRO 軟體連接到 LSL在您的裝置上安裝 EmotivPRO。您需要有效的 EmotivPRO 授權才能使用 LSL。
使用以下命令安裝 Python LSL 函式庫:
pip install pylsl下載 LabRecorder 軟體。這是一個簡單、免費的應用程式,可以從
命令列執行,或使用獨立下載版本針對我們的實驗:安裝使用 Python 播放音訊所需的套件
pip install sounddevice soundfile
2.2 步驟 3 - 透過 LSL 串流從 EmotivPRO 傳送數據
點選應用程式右上角的「...」,然後導覽至「Settings(設定)」
找到「Lab Streaming Layer(實驗室串流層)」區段和「Outlet(出口)」子區段
選擇您想要廣播的所有數據類型
選擇數據格式(32 位元浮點數或 64 位元雙精度浮點數)
選擇是要逐個樣本還是按樣本區別(區塊)傳送數據
按一下「Start(開始)」進而廣播 LSL 數據串流
2.3 步驟 4 - 使用 Python 腳本播放音訊並傳送觸發器
複製以下程式碼區塊並貼到 python 檔案中,然後將其儲存到您的電腦中。
尋找您想要播放的音訊檔案(最好是 .wav 檔案),並透過將變數
audio_filepath變更為
您電腦上音訊檔案的檔案路徑來編輯腳本開啟命令提示字元以便與命令列進行互動,然後導覽至
儲存您 Python 檔案的資料夾輸入:
python3 filename.py
• 根據您安裝的 Python,您可能會使用python而非python3
注意:請將/path/to/audio.wav替換為您想在實驗期間播放的音訊檔案位置。
""" LSL Example: Play audio and send a trigger marker <p>This script creates an LSL marker stream, waits for the user to<br>press ENTER, then plays an audio file and sends a marker that<br>can be synchronized with EEG data collected through LabRecorder.<br>"""</p> <p>import sounddevice as sd<br>import soundfile as sf<br>from pylsl import StreamInfo, StreamOutlet</p> <p>def wait_for_keypress():<br>print("Press ENTER to start audio playback and send an LSL marker.")<br>while True:<br>if input() == "":<br>break</p> <p>def play_audio_and_send_marker(audio_file, outlet):<br>data, fs = sf.read(audio_file)</p> <pre><code>print("Playing audio and sending LSL marker...") marker_val = [1] outlet.push_sample(marker_val) sd.play(data, fs) sd.wait() print("Audio playback finished.") </code></pre> <p>if <strong>name</strong> == "<strong>main</strong>":</p> <pre><code>info = StreamInfo( name="AudioMarkers", type="Markers", channel_count=1, nominal_srate=0, channel_format="int32", source_id="uniqueMarkerID12345" ) outlet = StreamOutlet(info) while True: wait_for_keypress() audio_filepath = "/path/to/audio.wav" play_audio_and_send_marker( audio_filepath, outlet )</code></pre><h2 dir="auto">2.4 STEP 5 - Use LabRecorder to view and save all LSL streams</h2><ol dir="auto"><li data-preset-tag="p"><p>Open LabRecorder</p></li><li data-preset-tag="p"><p>Press <code>Update</code>. The available LSL streams should be visible in the stream list<br>• You should be able to see streams from both EmotivPROs (usually called “Emotiv-<br>DataStream”) and the marker stream (called “AudioMarkers”)</p></li><li data-preset-tag="p"><p>Click <code>Browse</code> to select a location to store data (and set other parameters)</p></li><li data-preset-tag="p"><p>Select all streams and press <code>Record</code> to start recording</p></li></ol><h2 dir="auto">3.0 Working with the data</h2><p dir="auto">LabRecorder outputs an XDF file (Extensible Data Format) that contains data from all the streams. XDF files are structured into, streams, each with a different header that describes what it contains (device name, data type, sampling rate, channels, and more). You can use the below codeblock to open your XDF file and display some basic information.</p><p dir="auto"><strong>Note: Replace </strong><code><strong>/path/to/your/file.xdf</strong></code><strong> with the filepath for your LabRecorder XDF output file.</strong></p><pre data-language="JSX"><code>import pyxdf </code></pre> <p>import mne<br>import matplotlib.pyplot as plt<br>import numpy as np</p> <h1>Give the path to your LSL output file here.</h1> <p>data_path = "/path/to/your/file.xdf"</p> <h1>Load the XDF file.</h1> <p>streams, fileheader = pyxdf.load_xdf(data_path)</p> <p>print("XDF File Header:", fileheader)<br>print("Number of streams found:", len(streams))</p> <p>for i, stream in enumerate(streams):<br>print("\nStream", i + 1)<br>print("Stream Name:", stream["info"]["name"][0])<br>print("Stream Type:", stream["info"]["type"][0])<br>print("Number of Channels:", stream["info"]["channel_count"][0])</p> <pre><code>sfreq = float(stream["info"]["nominal_srate"][0]) print("Sampling Rate:", sfreq) print("Number of Samples:", len(stream["time_series"])) print("First 5 data points:", stream["time_series"][:5]) channel_names = [ chan["label"][0] for chan in stream["info"]["desc"][0]["channels"][0]["channel"] ] print("Channel Names:", channel_names) channel_types = "eeg"</code></pre><h3 dir="auto"><br></h3><h2 dir="auto">4.0 Additional Resources</h2><h4 dir="auto">Official Documentation</h4><ol dir="auto"><li data-preset-tag="p"><p>Check out the <a href="1. Check out the online documentation, including the official README file on GitHub 2. Additional resources: • Code to run LSL using Emotiv’s devices, with example scripts • Useful LSL demo on YouTube • SCCN LSL GitHub repository for all associated libraries • LSL GitHub repository for a collection a submodules and apps 3. HyPyP analysis pipeline for Hyperscanning studies" target="_blank">online documentation</a>, including the <a href="https://github.com/sccn/labstreaminglayer/" target="_blank">official README file on GitHub</a></p></li><li data-preset-tag="p"><p>Additional resources:<br>• <a href="https://github.com/Emotiv/labstreaminglayer" target="_blank">Code</a> to run LSL using Emotiv’s devices, with example scripts<br>• Useful <a href="https://www.youtube.com/watch?v=Y1at7yrcFW0&list=PLVnr33MP5RMRhGwY36zHHDOmAaYTB138D" target="_blank">LSL demo on YouTube</a><br>• <a href="https://github.com/sccn/labstreaminglayer" target="_blank">SCCN LSL GitHub repository</a> for all associated libraries<br>• <a href="https://github.com/labstreaminglayer" target="_blank">LSL GitHub repository</a> for a collection a submodules and apps</p></li><li data-preset-tag="p"><p><a href="https://academic.oup.com/scan/article/16/1-2/72/5919711?login=false" target="_blank">HyPyP analysis pipeline</a> for Hyperscanning studies</p></li></ol> </code></pre
""" LSL Example: Play audio and send a trigger marker <p>This script creates an LSL marker stream, waits for the user to<br>press ENTER, then plays an audio file and sends a marker that<br>can be synchronized with EEG data collected through LabRecorder.<br>"""</p> <p>import sounddevice as sd<br>import soundfile as sf<br>from pylsl import StreamInfo, StreamOutlet</p> <p>def wait_for_keypress():<br>print("Press ENTER to start audio playback and send an LSL marker.")<br>while True:<br>if input() == "":<br>break</p> <p>def play_audio_and_send_marker(audio_file, outlet):<br>data, fs = sf.read(audio_file)</p> <pre><code>print("Playing audio and sending LSL marker...") marker_val = [1] outlet.push_sample(marker_val) sd.play(data, fs) sd.wait() print("Audio playback finished.") </code></pre> <p>if <strong>name</strong> == "<strong>main</strong>":</p> <pre><code>info = StreamInfo( name="AudioMarkers", type="Markers", channel_count=1, nominal_srate=0, channel_format="int32", source_id="uniqueMarkerID12345" ) outlet = StreamOutlet(info) while True: wait_for_keypress() audio_filepath = "/path/to/audio.wav" play_audio_and_send_marker( audio_filepath, outlet )</code></pre><h2 dir="auto">2.4 STEP 5 - Use LabRecorder to view and save all LSL streams</h2><ol dir="auto"><li data-preset-tag="p"><p>Open LabRecorder</p></li><li data-preset-tag="p"><p>Press <code>Update</code>. The available LSL streams should be visible in the stream list<br>• You should be able to see streams from both EmotivPROs (usually called “Emotiv-<br>DataStream”) and the marker stream (called “AudioMarkers”)</p></li><li data-preset-tag="p"><p>Click <code>Browse</code> to select a location to store data (and set other parameters)</p></li><li data-preset-tag="p"><p>Select all streams and press <code>Record</code> to start recording</p></li></ol><h2 dir="auto">3.0 Working with the data</h2><p dir="auto">LabRecorder outputs an XDF file (Extensible Data Format) that contains data from all the streams. XDF files are structured into, streams, each with a different header that describes what it contains (device name, data type, sampling rate, channels, and more). You can use the below codeblock to open your XDF file and display some basic information.</p><p dir="auto"><strong>Note: Replace </strong><code><strong>/path/to/your/file.xdf</strong></code><strong> with the filepath for your LabRecorder XDF output file.</strong></p><pre data-language="JSX"><code>import pyxdf </code></pre> <p>import mne<br>import matplotlib.pyplot as plt<br>import numpy as np</p> <h1>Give the path to your LSL output file here.</h1> <p>data_path = "/path/to/your/file.xdf"</p> <h1>Load the XDF file.</h1> <p>streams, fileheader = pyxdf.load_xdf(data_path)</p> <p>print("XDF File Header:", fileheader)<br>print("Number of streams found:", len(streams))</p> <p>for i, stream in enumerate(streams):<br>print("\nStream", i + 1)<br>print("Stream Name:", stream["info"]["name"][0])<br>print("Stream Type:", stream["info"]["type"][0])<br>print("Number of Channels:", stream["info"]["channel_count"][0])</p> <pre><code>sfreq = float(stream["info"]["nominal_srate"][0]) print("Sampling Rate:", sfreq) print("Number of Samples:", len(stream["time_series"])) print("First 5 data points:", stream["time_series"][:5]) channel_names = [ chan["label"][0] for chan in stream["info"]["desc"][0]["channels"][0]["channel"] ] print("Channel Names:", channel_names) channel_types = "eeg"</code></pre><h3 dir="auto"><br></h3><h2 dir="auto">4.0 Additional Resources</h2><h4 dir="auto">Official Documentation</h4><ol dir="auto"><li data-preset-tag="p"><p>Check out the <a href="1. Check out the online documentation, including the official README file on GitHub 2. Additional resources: • Code to run LSL using Emotiv’s devices, with example scripts • Useful LSL demo on YouTube • SCCN LSL GitHub repository for all associated libraries • LSL GitHub repository for a collection a submodules and apps 3. HyPyP analysis pipeline for Hyperscanning studies" target="_blank">online documentation</a>, including the <a href="https://github.com/sccn/labstreaminglayer/" target="_blank">official README file on GitHub</a></p></li><li data-preset-tag="p"><p>Additional resources:<br>• <a href="https://github.com/Emotiv/labstreaminglayer" target="_blank">Code</a> to run LSL using Emotiv’s devices, with example scripts<br>• Useful <a href="https://www.youtube.com/watch?v=Y1at7yrcFW0&list=PLVnr33MP5RMRhGwY36zHHDOmAaYTB138D" target="_blank">LSL demo on YouTube</a><br>• <a href="https://github.com/sccn/labstreaminglayer" target="_blank">SCCN LSL GitHub repository</a> for all associated libraries<br>• <a href="https://github.com/labstreaminglayer" target="_blank">LSL GitHub repository</a> for a collection a submodules and apps</p></li><li data-preset-tag="p"><p><a href="https://academic.oup.com/scan/article/16/1-2/72/5919711?login=false" target="_blank">HyPyP analysis pipeline</a> for Hyperscanning studies</p></li></ol> </code></pre
""" LSL Example: Play audio and send a trigger marker <p>This script creates an LSL marker stream, waits for the user to<br>press ENTER, then plays an audio file and sends a marker that<br>can be synchronized with EEG data collected through LabRecorder.<br>"""</p> <p>import sounddevice as sd<br>import soundfile as sf<br>from pylsl import StreamInfo, StreamOutlet</p> <p>def wait_for_keypress():<br>print("Press ENTER to start audio playback and send an LSL marker.")<br>while True:<br>if input() == "":<br>break</p> <p>def play_audio_and_send_marker(audio_file, outlet):<br>data, fs = sf.read(audio_file)</p> <pre><code>print("Playing audio and sending LSL marker...") marker_val = [1] outlet.push_sample(marker_val) sd.play(data, fs) sd.wait() print("Audio playback finished.") </code></pre> <p>if <strong>name</strong> == "<strong>main</strong>":</p> <pre><code>info = StreamInfo( name="AudioMarkers", type="Markers", channel_count=1, nominal_srate=0, channel_format="int32", source_id="uniqueMarkerID12345" ) outlet = StreamOutlet(info) while True: wait_for_keypress() audio_filepath = "/path/to/audio.wav" play_audio_and_send_marker( audio_filepath, outlet )</code></pre><h2 dir="auto">2.4 STEP 5 - Use LabRecorder to view and save all LSL streams</h2><ol dir="auto"><li data-preset-tag="p"><p>Open LabRecorder</p></li><li data-preset-tag="p"><p>Press <code>Update</code>. The available LSL streams should be visible in the stream list<br>• You should be able to see streams from both EmotivPROs (usually called “Emotiv-<br>DataStream”) and the marker stream (called “AudioMarkers”)</p></li><li data-preset-tag="p"><p>Click <code>Browse</code> to select a location to store data (and set other parameters)</p></li><li data-preset-tag="p"><p>Select all streams and press <code>Record</code> to start recording</p></li></ol><h2 dir="auto">3.0 Working with the data</h2><p dir="auto">LabRecorder outputs an XDF file (Extensible Data Format) that contains data from all the streams. XDF files are structured into, streams, each with a different header that describes what it contains (device name, data type, sampling rate, channels, and more). You can use the below codeblock to open your XDF file and display some basic information.</p><p dir="auto"><strong>Note: Replace </strong><code><strong>/path/to/your/file.xdf</strong></code><strong> with the filepath for your LabRecorder XDF output file.</strong></p><pre data-language="JSX"><code>import pyxdf </code></pre> <p>import mne<br>import matplotlib.pyplot as plt<br>import numpy as np</p> <h1>Give the path to your LSL output file here.</h1> <p>data_path = "/path/to/your/file.xdf"</p> <h1>Load the XDF file.</h1> <p>streams, fileheader = pyxdf.load_xdf(data_path)</p> <p>print("XDF File Header:", fileheader)<br>print("Number of streams found:", len(streams))</p> <p>for i, stream in enumerate(streams):<br>print("\nStream", i + 1)<br>print("Stream Name:", stream["info"]["name"][0])<br>print("Stream Type:", stream["info"]["type"][0])<br>print("Number of Channels:", stream["info"]["channel_count"][0])</p> <pre><code>sfreq = float(stream["info"]["nominal_srate"][0]) print("Sampling Rate:", sfreq) print("Number of Samples:", len(stream["time_series"])) print("First 5 data points:", stream["time_series"][:5]) channel_names = [ chan["label"][0] for chan in stream["info"]["desc"][0]["channels"][0]["channel"] ] print("Channel Names:", channel_names) channel_types = "eeg"</code></pre><h3 dir="auto"><br></h3><h2 dir="auto">4.0 Additional Resources</h2><h4 dir="auto">Official Documentation</h4><ol dir="auto"><li data-preset-tag="p"><p>Check out the <a href="1. Check out the online documentation, including the official README file on GitHub 2. Additional resources: • Code to run LSL using Emotiv’s devices, with example scripts • Useful LSL demo on YouTube • SCCN LSL GitHub repository for all associated libraries • LSL GitHub repository for a collection a submodules and apps 3. HyPyP analysis pipeline for Hyperscanning studies" target="_blank">online documentation</a>, including the <a href="https://github.com/sccn/labstreaminglayer/" target="_blank">official README file on GitHub</a></p></li><li data-preset-tag="p"><p>Additional resources:<br>• <a href="https://github.com/Emotiv/labstreaminglayer" target="_blank">Code</a> to run LSL using Emotiv’s devices, with example scripts<br>• Useful <a href="https://www.youtube.com/watch?v=Y1at7yrcFW0&list=PLVnr33MP5RMRhGwY36zHHDOmAaYTB138D" target="_blank">LSL demo on YouTube</a><br>• <a href="https://github.com/sccn/labstreaminglayer" target="_blank">SCCN LSL GitHub repository</a> for all associated libraries<br>• <a href="https://github.com/labstreaminglayer" target="_blank">LSL GitHub repository</a> for a collection a submodules and apps</p></li><li data-preset-tag="p"><p><a href="https://academic.oup.com/scan/article/16/1-2/72/5919711?login=false" target="_blank">HyPyP analysis pipeline</a> for Hyperscanning studies</p></li></ol> </code></pre
歡迎!在本教學中,我們將學習如何使用 Python 中的實驗室串流層 (Lab Streaming Layer, LSL) 來收集並同步來自多個裝置的 Emotiv EEG 數據。這需要具備 Python 程式語言的基本實作知識。
您將學到什麼
什麼是實驗室串流層 (LSL) 及其研究用途
如何從多個 Emotiv EEG 裝置收集同步數據
如何匯入和檢查收集到的數據
1.1 什麼是 LSL?它有什麼用處?
實驗室串流層 (LSL) 是一個開源工具箱,可用於傳送、接收和同步來自各種感測器硬體的神經、生理和行為數據串流。功能日益強大、精確且行動化的腦部與身體感測硬體裝置(如 Emotiv EEG 系統)正在將神經科學從實驗室帶入即時數據的世界。過去 EEG 和 MEG 等腦部測量僅限於研究實驗室,現在行動裝置讓我們能夠在更自然、更生活化的環境中收集多方面的數據,並能同時從多人身上收集數據。
研究人員可能對聽同一首音樂的兩個人之間的生理同步性感興趣。LSL 可以幫助我們分別從兩個 EEG 腦機介面頭戴式裝置收集數據,並使其與聲音的播放保持同步。
LSL 的其他一些使用範例:
將實驗中的事件標記新增至持續進行的 EEG 數據中
針對單一受試者,時間對齊多個來源的數據(例如心率、EMG、EEG)
時間對齊多個受試者的數據(例如 EEG 超掃描研究)
1.2 LSL 是如何運作的?
實驗室串流層是一種用於在多個裝置之間進行即時時間序列數據交換的通訊協定。LSL 可以使用 Python、MATLAB、C++、Java 等程式語言的開源函式庫來實作。
核心功能圍繞在 LSL 數據串流:
1. 採集裝置/軟體收集數據並建立數據串流 - 生理數據可以從 EEG 記錄裝置、眼動追蹤儀、動作捕捉系統、心率監測器等串流傳輸到 LSL,包括中繼資料(採樣率、數據類型、通道資訊等) - 來自實驗的事件標記(例如使用 PsychoPy)也可以使用 LSL 作為數據串流傳送
2. 數據串流會被發佈到網路 - 這是使用 LSL 傳送數據的方式;數據串流會「廣播」到網路上 - 已發佈的串流可在網路上使用,並可被同一網路上的其他支援 LSL 的裝置偵測到 - LSL 根據共同時鐘(遵循網路時間協定)為每個數據區塊或樣本分配一個時間戳記。 - 串流會透過「出口 (outlet)」逐個樣本(或逐個區塊)推送
3. 收集裝置「訂閱」數據串流 - 這是使用 LSL class 接收數據的方式 - 同一網路上的收集裝置透過「入口 (inlet)」接收已發佈的數據串流。 - 每個入口僅接收來自一個出口的串流樣本和中繼資料
4. 儲存數據 - 訂閱數據串流後,您可以將其儲存到您偏好程式語言中的變數,或者使用 LSL 提供的軟體 LabRecorder 將其儲存為標準格式,例如 .xdf。
2.0 教學總覽
在本教學中,我們將以一個實驗設定為例,指導您在 Python 中使用 LSL 實作它所需的步驟和程式碼。我們將使用 Python 播放聲音,同時從配戴 Emotiv 頭戴式裝置的兩個人身上收集 EEG 數據。我們將使用兩台各自執行 EmotivPRO 的電腦來收集 EEG 數據,並透過獨立的 LSL 出口廣播每個串流。我們將使用 Python 函式庫播放音訊檔案,並在每次檔案開始播放時同時傳送一個觸發器。
步驟:
1. 使用 EmotivPRO 透過 LSL 出口串流傳輸包含 EEG 數據(和/或動作、接觸品質、訊號品質等)的數據。2. 使用 Python 腳本播放音訊軌,並同時透過另一個 LSL 傳送觸發器。使用 LabRecorder 透過 LSL 入口擷取並儲存所有三個數據串流。
2.1 步驟 1 - 設定與安裝
您需要支援的數據採集裝置來收集數據
• 所有 Emotiv 的腦機介面裝置皆可透過 EmotivPRO 軟體連接到 LSL在您的裝置上安裝 EmotivPRO。您需要有效的 EmotivPRO 授權才能使用 LSL。
使用以下命令安裝 Python LSL 函式庫:
pip install pylsl下載 LabRecorder 軟體。這是一個簡單、免費的應用程式,可以從
命令列執行,或使用獨立下載版本針對我們的實驗:安裝使用 Python 播放音訊所需的套件
pip install sounddevice soundfile
2.2 步驟 3 - 透過 LSL 串流從 EmotivPRO 傳送數據
點選應用程式右上角的「...」,然後導覽至「Settings(設定)」
找到「Lab Streaming Layer(實驗室串流層)」區段和「Outlet(出口)」子區段
選擇您想要廣播的所有數據類型
選擇數據格式(32 位元浮點數或 64 位元雙精度浮點數)
選擇是要逐個樣本還是按樣本區別(區塊)傳送數據
按一下「Start(開始)」進而廣播 LSL 數據串流
2.3 步驟 4 - 使用 Python 腳本播放音訊並傳送觸發器
複製以下程式碼區塊並貼到 python 檔案中,然後將其儲存到您的電腦中。
尋找您想要播放的音訊檔案(最好是 .wav 檔案),並透過將變數
audio_filepath變更為
您電腦上音訊檔案的檔案路徑來編輯腳本開啟命令提示字元以便與命令列進行互動,然後導覽至
儲存您 Python 檔案的資料夾輸入:
python3 filename.py
• 根據您安裝的 Python,您可能會使用python而非python3
注意:請將/path/to/audio.wav替換為您想在實驗期間播放的音訊檔案位置。
""" LSL Example: Play audio and send a trigger marker <p>This script creates an LSL marker stream, waits for the user to<br>press ENTER, then plays an audio file and sends a marker that<br>can be synchronized with EEG data collected through LabRecorder.<br>"""</p> <p>import sounddevice as sd<br>import soundfile as sf<br>from pylsl import StreamInfo, StreamOutlet</p> <p>def wait_for_keypress():<br>print("Press ENTER to start audio playback and send an LSL marker.")<br>while True:<br>if input() == "":<br>break</p> <p>def play_audio_and_send_marker(audio_file, outlet):<br>data, fs = sf.read(audio_file)</p> <pre><code>print("Playing audio and sending LSL marker...") marker_val = [1] outlet.push_sample(marker_val) sd.play(data, fs) sd.wait() print("Audio playback finished.") </code></pre> <p>if <strong>name</strong> == "<strong>main</strong>":</p> <pre><code>info = StreamInfo( name="AudioMarkers", type="Markers", channel_count=1, nominal_srate=0, channel_format="int32", source_id="uniqueMarkerID12345" ) outlet = StreamOutlet(info) while True: wait_for_keypress() audio_filepath = "/path/to/audio.wav" play_audio_and_send_marker( audio_filepath, outlet )</code></pre><h2 dir="auto">2.4 STEP 5 - Use LabRecorder to view and save all LSL streams</h2><ol dir="auto"><li data-preset-tag="p"><p>Open LabRecorder</p></li><li data-preset-tag="p"><p>Press <code>Update</code>. The available LSL streams should be visible in the stream list<br>• You should be able to see streams from both EmotivPROs (usually called “Emotiv-<br>DataStream”) and the marker stream (called “AudioMarkers”)</p></li><li data-preset-tag="p"><p>Click <code>Browse</code> to select a location to store data (and set other parameters)</p></li><li data-preset-tag="p"><p>Select all streams and press <code>Record</code> to start recording</p></li></ol><h2 dir="auto">3.0 Working with the data</h2><p dir="auto">LabRecorder outputs an XDF file (Extensible Data Format) that contains data from all the streams. XDF files are structured into, streams, each with a different header that describes what it contains (device name, data type, sampling rate, channels, and more). You can use the below codeblock to open your XDF file and display some basic information.</p><p dir="auto"><strong>Note: Replace </strong><code><strong>/path/to/your/file.xdf</strong></code><strong> with the filepath for your LabRecorder XDF output file.</strong></p><pre data-language="JSX"><code>import pyxdf </code></pre> <p>import mne<br>import matplotlib.pyplot as plt<br>import numpy as np</p> <h1>Give the path to your LSL output file here.</h1> <p>data_path = "/path/to/your/file.xdf"</p> <h1>Load the XDF file.</h1> <p>streams, fileheader = pyxdf.load_xdf(data_path)</p> <p>print("XDF File Header:", fileheader)<br>print("Number of streams found:", len(streams))</p> <p>for i, stream in enumerate(streams):<br>print("\nStream", i + 1)<br>print("Stream Name:", stream["info"]["name"][0])<br>print("Stream Type:", stream["info"]["type"][0])<br>print("Number of Channels:", stream["info"]["channel_count"][0])</p> <pre><code>sfreq = float(stream["info"]["nominal_srate"][0]) print("Sampling Rate:", sfreq) print("Number of Samples:", len(stream["time_series"])) print("First 5 data points:", stream["time_series"][:5]) channel_names = [ chan["label"][0] for chan in stream["info"]["desc"][0]["channels"][0]["channel"] ] print("Channel Names:", channel_names) channel_types = "eeg"</code></pre><h3 dir="auto"><br></h3><h2 dir="auto">4.0 Additional Resources</h2><h4 dir="auto">Official Documentation</h4><ol dir="auto"><li data-preset-tag="p"><p>Check out the <a href="1. Check out the online documentation, including the official README file on GitHub 2. Additional resources: • Code to run LSL using Emotiv’s devices, with example scripts • Useful LSL demo on YouTube • SCCN LSL GitHub repository for all associated libraries • LSL GitHub repository for a collection a submodules and apps 3. HyPyP analysis pipeline for Hyperscanning studies" target="_blank">online documentation</a>, including the <a href="https://github.com/sccn/labstreaminglayer/" target="_blank">official README file on GitHub</a></p></li><li data-preset-tag="p"><p>Additional resources:<br>• <a href="https://github.com/Emotiv/labstreaminglayer" target="_blank">Code</a> to run LSL using Emotiv’s devices, with example scripts<br>• Useful <a href="https://www.youtube.com/watch?v=Y1at7yrcFW0&list=PLVnr33MP5RMRhGwY36zHHDOmAaYTB138D" target="_blank">LSL demo on YouTube</a><br>• <a href="https://github.com/sccn/labstreaminglayer" target="_blank">SCCN LSL GitHub repository</a> for all associated libraries<br>• <a href="https://github.com/labstreaminglayer" target="_blank">LSL GitHub repository</a> for a collection a submodules and apps</p></li><li data-preset-tag="p"><p><a href="https://academic.oup.com/scan/article/16/1-2/72/5919711?login=false" target="_blank">HyPyP analysis pipeline</a> for Hyperscanning studies</p></li></ol> </code></pre
歡迎!在本教學中,我們將學習如何使用 Python 中的實驗室串流層 (Lab Streaming Layer, LSL) 來收集並同步來自多個裝置的 Emotiv EEG 數據。這需要具備 Python 程式語言的基本實作知識。
您將學到什麼
什麼是實驗室串流層 (LSL) 及其研究用途
如何從多個 Emotiv EEG 裝置收集同步數據
如何匯入和檢查收集到的數據
1.1 什麼是 LSL?它有什麼用處?
實驗室串流層 (LSL) 是一個開源工具箱,可用於傳送、接收和同步來自各種感測器硬體的神經、生理和行為數據串流。功能日益強大、精確且行動化的腦部與身體感測硬體裝置(如 Emotiv EEG 系統)正在將神經科學從實驗室帶入即時數據的世界。過去 EEG 和 MEG 等腦部測量僅限於研究實驗室,現在行動裝置讓我們能夠在更自然、更生活化的環境中收集多方面的數據,並能同時從多人身上收集數據。
研究人員可能對聽同一首音樂的兩個人之間的生理同步性感興趣。LSL 可以幫助我們分別從兩個 EEG 腦機介面頭戴式裝置收集數據,並使其與聲音的播放保持同步。
LSL 的其他一些使用範例:
將實驗中的事件標記新增至持續進行的 EEG 數據中
針對單一受試者,時間對齊多個來源的數據(例如心率、EMG、EEG)
時間對齊多個受試者的數據(例如 EEG 超掃描研究)
1.2 LSL 是如何運作的?
實驗室串流層是一種用於在多個裝置之間進行即時時間序列數據交換的通訊協定。LSL 可以使用 Python、MATLAB、C++、Java 等程式語言的開源函式庫來實作。
核心功能圍繞在 LSL 數據串流:
1. 採集裝置/軟體收集數據並建立數據串流 - 生理數據可以從 EEG 記錄裝置、眼動追蹤儀、動作捕捉系統、心率監測器等串流傳輸到 LSL,包括中繼資料(採樣率、數據類型、通道資訊等) - 來自實驗的事件標記(例如使用 PsychoPy)也可以使用 LSL 作為數據串流傳送
2. 數據串流會被發佈到網路 - 這是使用 LSL 傳送數據的方式;數據串流會「廣播」到網路上 - 已發佈的串流可在網路上使用,並可被同一網路上的其他支援 LSL 的裝置偵測到 - LSL 根據共同時鐘(遵循網路時間協定)為每個數據區塊或樣本分配一個時間戳記。 - 串流會透過「出口 (outlet)」逐個樣本(或逐個區塊)推送
3. 收集裝置「訂閱」數據串流 - 這是使用 LSL class 接收數據的方式 - 同一網路上的收集裝置透過「入口 (inlet)」接收已發佈的數據串流。 - 每個入口僅接收來自一個出口的串流樣本和中繼資料
4. 儲存數據 - 訂閱數據串流後,您可以將其儲存到您偏好程式語言中的變數,或者使用 LSL 提供的軟體 LabRecorder 將其儲存為標準格式,例如 .xdf。
2.0 教學總覽
在本教學中,我們將以一個實驗設定為例,指導您在 Python 中使用 LSL 實作它所需的步驟和程式碼。我們將使用 Python 播放聲音,同時從配戴 Emotiv 頭戴式裝置的兩個人身上收集 EEG 數據。我們將使用兩台各自執行 EmotivPRO 的電腦來收集 EEG 數據,並透過獨立的 LSL 出口廣播每個串流。我們將使用 Python 函式庫播放音訊檔案,並在每次檔案開始播放時同時傳送一個觸發器。
步驟:
1. 使用 EmotivPRO 透過 LSL 出口串流傳輸包含 EEG 數據(和/或動作、接觸品質、訊號品質等)的數據。2. 使用 Python 腳本播放音訊軌,並同時透過另一個 LSL 傳送觸發器。使用 LabRecorder 透過 LSL 入口擷取並儲存所有三個數據串流。
2.1 步驟 1 - 設定與安裝
您需要支援的數據採集裝置來收集數據
• 所有 Emotiv 的腦機介面裝置皆可透過 EmotivPRO 軟體連接到 LSL在您的裝置上安裝 EmotivPRO。您需要有效的 EmotivPRO 授權才能使用 LSL。
使用以下命令安裝 Python LSL 函式庫:
pip install pylsl下載 LabRecorder 軟體。這是一個簡單、免費的應用程式,可以從
命令列執行,或使用獨立下載版本針對我們的實驗:安裝使用 Python 播放音訊所需的套件
pip install sounddevice soundfile
2.2 步驟 3 - 透過 LSL 串流從 EmotivPRO 傳送數據
點選應用程式右上角的「...」,然後導覽至「Settings(設定)」
找到「Lab Streaming Layer(實驗室串流層)」區段和「Outlet(出口)」子區段
選擇您想要廣播的所有數據類型
選擇數據格式(32 位元浮點數或 64 位元雙精度浮點數)
選擇是要逐個樣本還是按樣本區別(區塊)傳送數據
按一下「Start(開始)」進而廣播 LSL 數據串流
2.3 步驟 4 - 使用 Python 腳本播放音訊並傳送觸發器
複製以下程式碼區塊並貼到 python 檔案中,然後將其儲存到您的電腦中。
尋找您想要播放的音訊檔案(最好是 .wav 檔案),並透過將變數
audio_filepath變更為
您電腦上音訊檔案的檔案路徑來編輯腳本開啟命令提示字元以便與命令列進行互動,然後導覽至
儲存您 Python 檔案的資料夾輸入:
python3 filename.py
• 根據您安裝的 Python,您可能會使用python而非python3
注意:請將/path/to/audio.wav替換為您想在實驗期間播放的音訊檔案位置。
""" LSL Example: Play audio and send a trigger marker <p>This script creates an LSL marker stream, waits for the user to<br>press ENTER, then plays an audio file and sends a marker that<br>can be synchronized with EEG data collected through LabRecorder.<br>"""</p> <p>import sounddevice as sd<br>import soundfile as sf<br>from pylsl import StreamInfo, StreamOutlet</p> <p>def wait_for_keypress():<br>print("Press ENTER to start audio playback and send an LSL marker.")<br>while True:<br>if input() == "":<br>break</p> <p>def play_audio_and_send_marker(audio_file, outlet):<br>data, fs = sf.read(audio_file)</p> <pre><code>print("Playing audio and sending LSL marker...") marker_val = [1] outlet.push_sample(marker_val) sd.play(data, fs) sd.wait() print("Audio playback finished.") </code></pre> <p>if <strong>name</strong> == "<strong>main</strong>":</p> <pre><code>info = StreamInfo( name="AudioMarkers", type="Markers", channel_count=1, nominal_srate=0, channel_format="int32", source_id="uniqueMarkerID12345" ) outlet = StreamOutlet(info) while True: wait_for_keypress() audio_filepath = "/path/to/audio.wav" play_audio_and_send_marker( audio_filepath, outlet )</code></pre><h2 dir="auto">2.4 STEP 5 - Use LabRecorder to view and save all LSL streams</h2><ol dir="auto"><li data-preset-tag="p"><p>Open LabRecorder</p></li><li data-preset-tag="p"><p>Press <code>Update</code>. The available LSL streams should be visible in the stream list<br>• You should be able to see streams from both EmotivPROs (usually called “Emotiv-<br>DataStream”) and the marker stream (called “AudioMarkers”)</p></li><li data-preset-tag="p"><p>Click <code>Browse</code> to select a location to store data (and set other parameters)</p></li><li data-preset-tag="p"><p>Select all streams and press <code>Record</code> to start recording</p></li></ol><h2 dir="auto">3.0 Working with the data</h2><p dir="auto">LabRecorder outputs an XDF file (Extensible Data Format) that contains data from all the streams. XDF files are structured into, streams, each with a different header that describes what it contains (device name, data type, sampling rate, channels, and more). You can use the below codeblock to open your XDF file and display some basic information.</p><p dir="auto"><strong>Note: Replace </strong><code><strong>/path/to/your/file.xdf</strong></code><strong> with the filepath for your LabRecorder XDF output file.</strong></p><pre data-language="JSX"><code>import pyxdf </code></pre> <p>import mne<br>import matplotlib.pyplot as plt<br>import numpy as np</p> <h1>Give the path to your LSL output file here.</h1> <p>data_path = "/path/to/your/file.xdf"</p> <h1>Load the XDF file.</h1> <p>streams, fileheader = pyxdf.load_xdf(data_path)</p> <p>print("XDF File Header:", fileheader)<br>print("Number of streams found:", len(streams))</p> <p>for i, stream in enumerate(streams):<br>print("\nStream", i + 1)<br>print("Stream Name:", stream["info"]["name"][0])<br>print("Stream Type:", stream["info"]["type"][0])<br>print("Number of Channels:", stream["info"]["channel_count"][0])</p> <pre><code>sfreq = float(stream["info"]["nominal_srate"][0]) print("Sampling Rate:", sfreq) print("Number of Samples:", len(stream["time_series"])) print("First 5 data points:", stream["time_series"][:5]) channel_names = [ chan["label"][0] for chan in stream["info"]["desc"][0]["channels"][0]["channel"] ] print("Channel Names:", channel_names) channel_types = "eeg"</code></pre><h3 dir="auto"><br></h3><h2 dir="auto">4.0 Additional Resources</h2><h4 dir="auto">Official Documentation</h4><ol dir="auto"><li data-preset-tag="p"><p>Check out the <a href="1. Check out the online documentation, including the official README file on GitHub 2. Additional resources: • Code to run LSL using Emotiv’s devices, with example scripts • Useful LSL demo on YouTube • SCCN LSL GitHub repository for all associated libraries • LSL GitHub repository for a collection a submodules and apps 3. HyPyP analysis pipeline for Hyperscanning studies" target="_blank">online documentation</a>, including the <a href="https://github.com/sccn/labstreaminglayer/" target="_blank">official README file on GitHub</a></p></li><li data-preset-tag="p"><p>Additional resources:<br>• <a href="https://github.com/Emotiv/labstreaminglayer" target="_blank">Code</a> to run LSL using Emotiv’s devices, with example scripts<br>• Useful <a href="https://www.youtube.com/watch?v=Y1at7yrcFW0&list=PLVnr33MP5RMRhGwY36zHHDOmAaYTB138D" target="_blank">LSL demo on YouTube</a><br>• <a href="https://github.com/sccn/labstreaminglayer" target="_blank">SCCN LSL GitHub repository</a> for all associated libraries<br>• <a href="https://github.com/labstreaminglayer" target="_blank">LSL GitHub repository</a> for a collection a submodules and apps</p></li><li data-preset-tag="p"><p><a href="https://academic.oup.com/scan/article/16/1-2/72/5919711?login=false" target="_blank">HyPyP analysis pipeline</a> for Hyperscanning studies</p></li></ol> </code></pre
繼續閱讀