
Lab Streaming Layer (LSL) สำหรับการซิงโครไนซ์สตรีมข้อมูลหลายแหล่ง
ดร. โรชินี รันเดนิยา และลูคัส ไคลน์
อัปเดตเมื่อ
17 พ.ค. 2567
Lab Streaming Layer (LSL) สำหรับการซิงโครไนซ์สตรีมข้อมูลหลายแหล่ง
ดร. โรชินี รันเดนิยา และลูคัส ไคลน์
อัปเดตเมื่อ
17 พ.ค. 2567
Lab Streaming Layer (LSL) สำหรับการซิงโครไนซ์สตรีมข้อมูลหลายแหล่ง
ดร. โรชินี รันเดนิยา และลูคัส ไคลน์
อัปเดตเมื่อ
17 พ.ค. 2567
ยินดีต้อนรับ! ในบทช่วยสอนนี้ เราจะเรียนรู้วิธีการใช้งาน Lab Streaming Layer (LSL) ใน Python เพื่อเก็บรวบรวมและซิงโครไนซ์ข้อมูล EEG จากอุปกรณ์ของ Emotiv หลายเครื่องเข้าด้วยกัน ซึ่งจำเป็นต้องมีความรู้พื้นฐานเกี่ยวกับภาษาโปรแกรม Python
สิ่งที่คุณจะได้เรียนรู้
Lab Streaming Layer (LSL) คืออะไร และทำไมท่านนักวิจัยจึงนำมาใช้งาน
วิธีการจัดเก็บข้อมูลที่ซิงโครไนซ์แล้วจากอุปกรณ์ EEG ของ Emotiv หลายเครื่อง
วิธีการนำเข้าและตรวจสอบข้อมูลที่เก็บรวบรวมมาได้
1.1 LSL คืออะไร และมีประโยชน์อย่างไร?
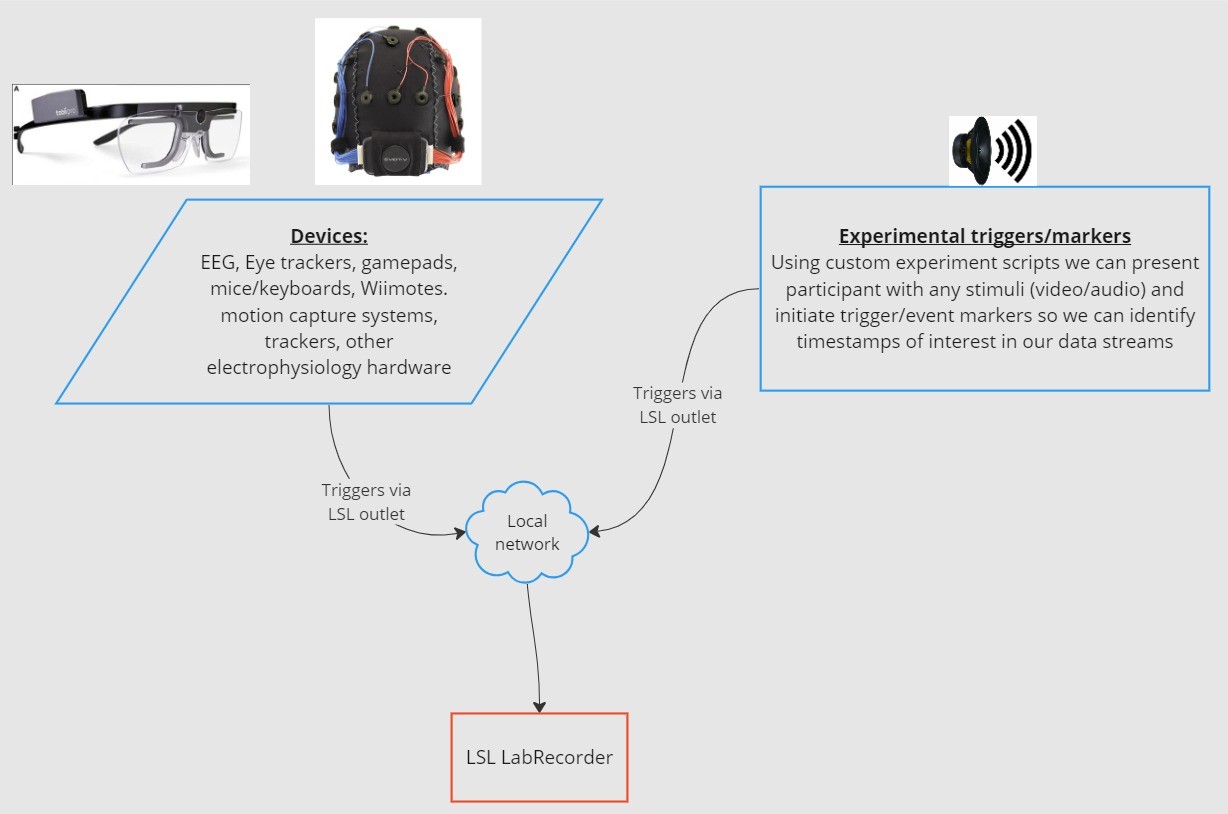
Lab streaming layer (LSL) เป็นชุดเครื่องมือแบบโอเพนซอร์ส (open-source) ที่ใช้สำหรับส่ง รับ และซิงโครไนซ์สตรีมข้อมูลทางประสาท สรีรวิทยา และพฤติกรรมจากอุปกรณ์ฮาร์ดแวร์เซ็นเซอร์ต่าง ๆ อุปกรณ์ฮาร์ดแวร์ตรวจวัดสมองและร่างกายที่มีความแม่นยำสูงและไร้ขีดจำกัดด้านสถานที่ในการเคลื่อนย้าย (เช่น ระบบ EEG ของ Emotiv) กำลังเข้ามาช่วยขับเคลื่อนวงการประสาทวิทยาศาสตร์ให้ออกจากห้องแล็บเข้าสู่โลกของข้อมูลแบบเรียลไทม์ ในยุคก่อนหน้า การวัดสัญญาณสมองอย่าง EEG และ MEG จำกัดอยู่เฉพาะในห้องปฏิบัติการวิจัยเท่านั้น แต่ปัจจุบัน อุปกรณ์เคลื่อนที่ช่วยให้เราสามารถรวบรวมข้อมูลจำนวนมากได้ในสภาพแวดล้อมที่เป็นธรรมชาติมากขึ้น และจากบุคคลหลายคนพร้อมกันในคราวเดียว
ตัวอย่างเช่น นักวิจัยท่านหนึ่งอาจจะสนใจศึกษาความสอดคล้องทางสรีรวิทยา (physiological synchrony) ระหว่างคนสองคนขณะฟังเพลงเดียวกัน LSL จะมาช่วยให้เราสามารถส่งและจัดเก็บข้อมูลจากชุดหูฟัง EEG สองชุดแยกกัน โดยจะประสานเวลาการส่งข้อมูลให้ซิงโครไนซ์ไปพร้อมกับการนําเสนอของเสียงเพลงได้พอดี
ตัวอย่างอื่น ๆ ในการใช้งาน LSL:
ใส่เครื่องหมายเหตุการณ์ (event markers) จากการทดลองลงในข้อมูล EEG ที่กำลังบันทึก
ปรับแนบแกนเวลา (Time-align) ของข้อมูลจากหลาย ๆ แหล่งให้แก่ผู้เข้าร่วมการทดลองคนเดียว (เช่น อัตราการเต้นของหัวใจ, EMG, EEG)
ปรับแนบแกนเวลา (Time-align) ของข้อมูลจากผู้เข้าร่วมทดลองหลายคน (เช่น การศึกษา Hyperscanning ด้วย EEG)
1.2 LSL ทำงานอย่างไร?
Lab Streaming Layer คือระเบียบการ (protocol) สำหรับแลกเปลี่ยนข้อมูลแบบทนทานต่อเวลา (time-series data) แบบเรียลไทม์ระหว่างอุปกรณ์หลายเครื่อง โดยที่ LSL สามารถเขียนและพัฒนาขึ้นมาได้ด้วยไลบรารีโอเพนซอร์สสำหรับภาษาโปรแกรม เช่น Python, MATLAB, C++, Java และอื่น ๆ
ฟังก์ชันหลักจะทำงานอยู่รอบ ๆ สตรีมข้อมูล (data streams) ของ LSL:
1. อุปกรณ์หรือซอฟต์แวร์จัดหาข้อมูล ทำการเก็บรวบรวมข้อมูลและสร้างสตรีมข้อมูลขึ้นมา - ตัวข้อมูลทางสรีรวิทยาสามารถส่งสตรีมไปยัง LSL ได้จากอุปกรณ์บันทึก EEG, เครื่องติดตามการเคลื่อนไหวของดวงตา (eye-trackers), ระบบตรวจจับการเคลื่อนไหว (motion capture), เครื่องวัดอัตราการเต้นของหัวใจ และอื่น ๆ รวมถึงข้อมูลเมทาดาตา (metadata) เช่น อัตราการเก็บตัวอย่างข้อมูล (sampling rate), ประเภทข้อมูล, ข้อมูลช่องสัญญาณ เป็นต้น - เครื่องหมายเหตุการณ์จากการทดลอง (เช่น การใช้ PsychoPy) ก็สามารถถูกส่งเป็นสตรีมข้อมูลโดยใช้ LSL ได้เช่นกัน
2. สตรีมข้อมูลจะถูกเผยแพร่ (published) ไปยังระบบเครือข่าย - นี่คือวิธีการส่งข้อมูลโดยใช้ LSL; สตรีมข้อมูลจะเริ่มการ "บรอดแคสต์" ไปในระบบเครือข่าย - สตรีมข้อมูลที่ถูกเผยแพร่จะเข้าใช้งานได้ในระบบเครือข่ายและค้นหาพบได้โดยอุปกรณ์อื่น ๆ ที่รองรับ LSL ที่อยู่บนเครือข่ายเดียวกัน - LSL จะกำหนดเวลา (timestamp) ให้กับข้อมูลแต่ละส่วนหรือข้อมูลแต่ละตัวอย่างตามนาฬิกาส่วนกลาง (ตามระเบียบการ Network Time Protocol) - สตรีมข้อมูลจะถูกผลักแกนข้อมูลออกทีละตัวอย่าง (หรือทีละกลุ่ม) ผ่านระบบ "ช่องส่งออก (outlet)"
3. อุปกรณ์จัดเก็บข้อมูลทำการ "สมัครรับ (subscribe)" สตรีมข้อมูล - นี่คือวิธีการรับข้อมูลโดยใช้ LSL - อุปกรณ์จัดเก็บข้อมูลบนเครือข่ายเดียวกันจะรับสตรีมข้อมูลเข้ามาผ่านทาง "ช่องนำเข้า (inlets)" - ช่องนำเข้าแต่ละช่องจะรับข้อมูลตัวอย่างสตรีมและข้อมูลเมทาดาตาจากช่องส่งออกเพียงช่องเดียวเท่านั้น
4. บันทึกข้อมูล - เมื่อกดสมัครรับสตรีมข้อมูลแล้ว คุณสามารถบันทึกข้อมูลลงในตัวแปรของภาษาโปรแกรมที่คุณต้องการ หรือเลือกใช้ซอฟต์แวร์ที่ทาง LSL มอบให้อย่าง LabRecorder เพื่อบันทึกข้อมูลลงในรูปแบบไฟล์มาตรฐาน เช่น .xdf
2.0 ภาพรวมของบทช่วยสอน
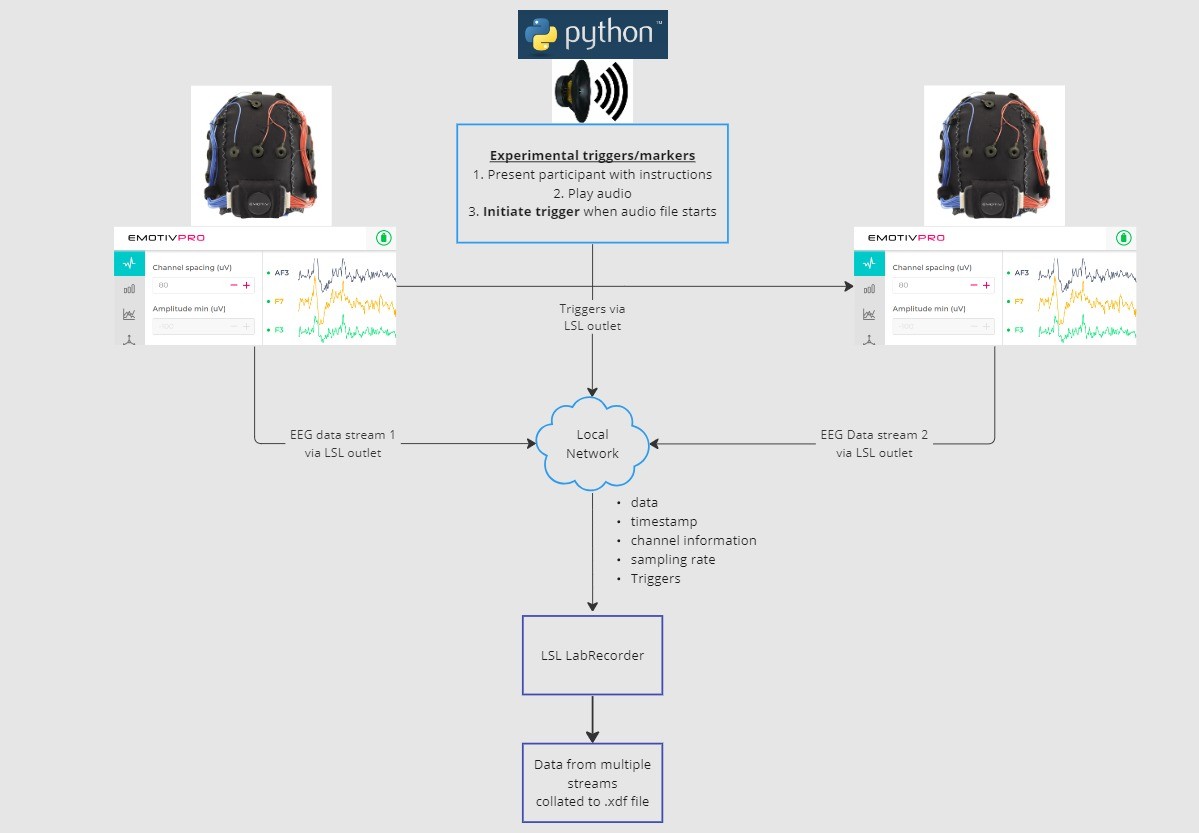
ในบทช่วยสอนนี้ เราจะยกตัวอย่างการจำลองตั้งค่าสถานการณ์การทดลองจริง และนำทางคุณไปพบกับขั้นตอนและชุดโค้ดคำสั่งขั้นพื้นฐานที่จำเป็นในการพัฒนาใช้งานร่วมกับ LSL ใน Python เราจะเขียนคำสั่ง Python เพื่อเล่นไฟล์เสียงไปพร้อม ๆ กับจัดเก็บข้อมูล EEG จากสองบุคคลที่กำลังสวมชุดหูฟัง Emotiv เราจะใช้คอมพิวเตอร์สองเครื่องที่รันระบบ EmotivPRO เพื่อจัดเก็บข้อมูล EEG แล้วทำการส่งบรอดแคสต์แต่ละสตรีมข้อมูลผ่านทางช่องส่งออก LSL แยกต่างหาก และเราจะใช้ไลบรารีของ Python ในการเล่นไฟล์เสียง พร้อมทั้งส่งตัวกระตุ้น (trigger) ไปควบคู่กันทุกครั้งที่ตรวจพบว่าไฟล์เสียงได้เริ่มต้นเล่นขึ้นมาแล้ว
ขั้นตอนต่าง ๆ:
1. ใช้ EmotivPRO สำหรับสตรีมข้อมูลผ่านช่องส่งออก LSL ซึ่งประกอบด้วยข้อมูล EEG (และ/หรือข้อมูลการเคลื่อนไหว, คุณภาพการสัมผัสสัมประสิทธิ์, คุณภาพของสัญญาณ และอื่น ๆ) 2. เล่นเสียงเพลงด้วยสคริปต์ Python และในขณะเดียวกันก็ส่งตัวกระตุ้นผ่านช่อง LSL อีกช่องหนึ่ง และใช้ LabRecorder เพื่อจับและบันทึกสตรีมข้อมูลทั้งสามชุดผ่านช่องนำเข้า LSL
2.1 ขั้นตอนที่ 1 - การติดตั้งและตั้งค่าเริ่มต้น
คุณจำเป็นต้องมี อุปกรณ์รับข้อมูลที่รองรับ สำหรับการเก็บข้อมูล
• อุปกรณ์ทางสมองทั้งหมดของ Emotiv สามารถเชื่อมต่อเข้ากับ LSL ผ่านซอฟต์แวร์ EmotivPROติดตั้งโปรแกรม EmotivPRO บนอุปกรณ์ของคุณ คุณจำเป็นต้องมีสิทธิ์ใบอนุญาตใช้งาน EmotivPRO ที่ถูกต้องเพื่อเรียกใช้งานระบบ LSL
ติดตั้งไลบรารี Python LSL library ด้วยโค้ดคำสั่งต่อไปนี้:
pip install pylslดาวน์โหลดซอฟต์แวร์ LabRecorder โดยตัวระบบจะเป็นแอปพลิเคชันที่ใช้งานได้ง่ายและฟรี โดยรันได้จากหน้า
บรรทัดสั่งการ (command line) หรือผ่านการดาวน์โหลดโปรแกรมแบบสแตนด์อโลนสำหรับการทดลองของเรา: ติดตั้งแพ็กเกจที่จำเป็นสำหรับการเล่นเสียงโดยใช้ Python
pip install sounddevice soundfile
2.2 ขั้นตอนที่ 3 - การส่งข้อมูลจาก EmotivPRO ผ่านทางสตรีม LSL
มองหาเครื่องหมายจุดสามจุด "..." ที่อยู่แถบมุมบนขวาของหน้าต่างแอปพลิเคชัน จากนั้นไปที่เมนู การตั้งค่า (Settings)
มองหาหัวข้อ "Lab Streaming Layer" และหัวข้อย่อย "Outlet"
เลือกชนิดข้อมูล (datatypes) ทั้งหมดที่คุณต้องการจะส่งบรอดแคสต์ข้อมูลออกไป
เลือกรูปแบบของชุดข้อมูล (32-bit float หรือ 64-bit double)
เลือกว่าจะส่งสตรีมข้อมูลออกไปแบบทีละตัวอย่างชิ้น หรือส่งออกไปเป็นกลุ่มก้อนข้อมูล
คลิกเลือกปุ่ม 'Start' เพื่อเริ่มทำการส่งสตรีมข้อมูลผ่าน LSL
2.3 ขั้นตอนที่ 4 - การนำสคริปต์ Python มาเล่นเสียงและส่งตัวกระตุ้น
คัดลอกและวางโค้ดต่อไปนี้ลงในไฟล์ Python และทำการบันทึกจัดเก็บไว้ในคอมพิวเตอร์ของคุณ
เตรียมไฟล์เสียง (แนะนำให้เป็นไฟล์สกุล .wav) ที่ต้องการจะนำมาเล่นและแก้ไขสคริปต์โดยเปลี่ยนค่า
ตัวแปรaudio_filepathให้ชี้ไปยังโฟลเดอร์พิกัดตำแหน่งทางเข้าสู่ไฟล์เสียงในคอมพิวเตอร์ของคุณเปิดหน้าต่าง Command Prompt เพื่อโต้ตอบกับบรรทัดสั่งการ และนำทางเปลี่ยนตำแหน่งไปยังโฟลเดอร์ที่
จัดเก็บไฟล์ Python ของคุณเอาไว้พิมพ์คำสั่ง:
python3 filename.py
• บรรทัดคำสั่งอาจแตกต่างกันตามการติดตั้ง Python ในเครื่องของคุณ คุณอาจต้องเปลี่ยนไปใช้pythonแทนการพิมพ์python3
ข้อควรจำ: กรุณาแทนที่ข้อความ/path/to/audio.wavด้วยพาธจัดเก็บไฟล์เสียงที่คุณต้องการจะเปิดใช้อยู่อิงตามจริงในระหว่างการทดลอง
"""
LSL Example: Play audio and send a trigger marker

This script creates an LSL marker stream, waits for the user to
press ENTER, then plays an audio file and sends a marker that
can be synchronized with EEG data collected through LabRecorder.
"""

import sounddevice as sd
import soundfile as sf
from pylsl import StreamInfo, StreamOutlet


def wait_for_keypress():
    print("Press ENTER to start audio playback and send an LSL marker.")
    while True:
        if input() == "":
            break


def play_audio_and_send_marker(audio_file, outlet):
    data, fs = sf.read(audio_file)

    print("Playing audio and sending LSL marker...")

    marker_val = [1]
    outlet.push_sample(marker_val)

    sd.play(data, fs)
    sd.wait()

    print("Audio playback finished.")


if __name__ == "__main__":

    info = StreamInfo(
        name="AudioMarkers",
        type="Markers",
        channel_count=1,
        nominal_srate=0,
        channel_format="int32",
        source_id="uniqueMarkerID12345"
    )

    outlet = StreamOutlet(info)

    while True:
        wait_for_keypress()

        audio_filepath = "/path/to/audio.wav"

        play_audio_and_send_marker(
            audio_filepath,
            outlet
        )
"""
LSL Example: Play audio and send a trigger marker

This script creates an LSL marker stream, waits for the user to
press ENTER, then plays an audio file and sends a marker that
can be synchronized with EEG data collected through LabRecorder.
"""

import sounddevice as sd
import soundfile as sf
from pylsl import StreamInfo, StreamOutlet


def wait_for_keypress():
    print("Press ENTER to start audio playback and send an LSL marker.")
    while True:
        if input() == "":
            break


def play_audio_and_send_marker(audio_file, outlet):
    data, fs = sf.read(audio_file)

    print("Playing audio and sending LSL marker...")

    marker_val = [1]
    outlet.push_sample(marker_val)

    sd.play(data, fs)
    sd.wait()

    print("Audio playback finished.")


if __name__ == "__main__":

    info = StreamInfo(
        name="AudioMarkers",
        type="Markers",
        channel_count=1,
        nominal_srate=0,
        channel_format="int32",
        source_id="uniqueMarkerID12345"
    )

    outlet = StreamOutlet(info)

    while True:
        wait_for_keypress()

        audio_filepath = "/path/to/audio.wav"

        play_audio_and_send_marker(
            audio_filepath,
            outlet
        )
2.4 ขั้นตอนที่ 5 - การใช้งาน LabRecorder เพื่อรับชมและบันทึกข้อมูลสตรีม LSL ทั้งหมด
เปิดโปรแกรม LabRecorder
คลิกปุ่ม
Updateรายชื่อคลื่นสตรีม LSL ที่พร้อมให้เชื่อมต่อควรสังเกตปรากฏขึ้นในตารางรายชื่อสตรีม
• ตัวอย่างเช่น คุณควรจะมองเห็นชื่อสตรีมที่มาจากอุปกรณ์ EmotivPRO ทั้งคู่ (มักจะตั้งชื่อว่า "Emotiv-DataStream") ลงชื่อร่วมกับสตรีมประเภทเครื่องหมาย (ตั้งชื่อว่า "AudioMarkers")คลิกเลือกปุ่ม
Browseเพื่อเลือกตำแหน่งที่ต้องการใช้จัดเก็บรักษาไฟล์ข้อมูลลงเครื่องคอมพิวเตอร์ (และตั้งค่าย่อยอื่น ๆ)เลือกติ๊กถูกรายการสตรีมทั้งหมด จากนั้นเลือกคลิก
Recordเพื่อเริ่มเปิดใช้งานการบันทึกข้อมูล
3.0 การใช้งานและปรับแต่งข้อมูล
ตัวโปรแกรม LabRecorder จะผลิตไฟล์นามสกุล .XDF (Extensible Data Format) ออกมาเพื่อทำหน้าที่เก็บรวบรวมข้อมูลต่าง ๆ จากทุกคลื่นสตรีม โครงสร้างของไฟล์ .XDF จะแบ่งพิกัดออกตามประเภทช่องสตรีม ซึ่งแต่ละประเภทจะมีส่วนหัวระบุ (Header) ที่แตกต่างกันออกไป เพื่อบรรยายสิ่งที่มีบรรจุอยู่ภายในตัวมัน (ระบุชื่อของอุปกรณ์ตรวจวัด, ประเภทของสุ่มชุดข้อมูล, อัตราเร็วในการสุ่มสัญญาณ, ข้อมูลช่องสัญญาณ เป็นต้น) ท่านผู้ใช้ทดลองสามารถพึ่งพาและหยิบใช้ชุดคำสั่งสำเร็จรูปตามตัวอย่างกล่องโค้ดคำสั่งถัดไปนี้ ในการเปิดและแสดงข้อมูลพื้นฐานที่มีอยู่ภายในไฟล์ .XDF
ข้อควรจำ: กรุณาแทนที่ข้อความ /path/to/your/file.xdf ด้วยพาธจัดเก็บไฟล์ข้อมูลผลลัพธ์ .XDF ของ LabRecorder อิงตามจริงที่มีอยู่ในคอมพิวเตอร์ของคุณ
import pyxdf
import mne
import matplotlib.pyplot as plt
import numpy as np

# Give the path to your LSL output file here.
data_path = "/path/to/your/file.xdf"

# Load the XDF file.
streams, fileheader = pyxdf.load_xdf(data_path)

print("XDF File Header:", fileheader)
print("Number of streams found:", len(streams))

for i, stream in enumerate(streams):
    print("\nStream", i + 1)
    print("Stream Name:", stream["info"]["name"][0])
    print("Stream Type:", stream["info"]["type"][0])
    print("Number of Channels:", stream["info"]["channel_count"][0])

    sfreq = float(stream["info"]["nominal_srate"][0])
    print("Sampling Rate:", sfreq)

    print("Number of Samples:", len(stream["time_series"]))
    print("First 5 data points:", stream["time_series"][:5])

    channel_names = [
        chan["label"][0]
        for chan in stream["info"]["desc"][0]["channels"][0]["channel"]
    ]

    print("Channel Names:", channel_names)

    channel_types = "eeg"
4.0 ทรัพยากรและแหล่งเรียนรู้เพิ่มเติม
เอกสารอย่างเป็นทางการ
ศึกษารายละเอียดเพิ่มเติมได้ที่ เอกสารคู่มือการใช้งานต่าง ๆ เรียนรู้ระบบออนไลน์ของเรา ตลอดจนศึกษาตามหน้า README ของระบบอย่างเป็นทางการบน GitHub
แหล่งเรียนรู้ย่อยของทรัพยากรเพิ่มเติม:
• หน้าสำหรับศึกษารู้จัก ชุดโค้ดคำสั่งสำเร็จรูป ในการสั่งรันพึ่งพาการทำงานชุดระบบ LSL ร่วมกับ อุปกรณ์แวร์เอเบิลของ Emotiv พร้อมมีแบบฉบับไฟล์สคริปต์ตัวอย่างให้รับชม
• รับชมวิดีโอสาธิตที่มีประโยชน์จากช่อง LSL demo บน YouTube
• แหล่งคลังข้อมูลเก็บรักษารหัสต้นฉบับ SCCN LSL GitHub repository สำหรับรวบรวมไลบรารีระบบและหัวข้อย่อยที่เกี่ยวข้องทั้งหมด
• แหล่งคลังข้อมูล LSL GitHub repository สำหรับดูแลดูแลส่วนย่อยและแอปพลิเคชันระบบ LSLหัวข้อการสร้างและวิเคราะห์ข้อมูลท่อส่งผ่าน HyPyP analysis pipeline สำหรับงานศึกษาวิจัย Hyperscanning
ยินดีต้อนรับ! ในบทช่วยสอนนี้ เราจะเรียนรู้วิธีการใช้งาน Lab Streaming Layer (LSL) ใน Python เพื่อเก็บรวบรวมและซิงโครไนซ์ข้อมูล EEG จากอุปกรณ์ของ Emotiv หลายเครื่องเข้าด้วยกัน ซึ่งจำเป็นต้องมีความรู้พื้นฐานเกี่ยวกับภาษาโปรแกรม Python
สิ่งที่คุณจะได้เรียนรู้
Lab Streaming Layer (LSL) คืออะไร และทำไมท่านนักวิจัยจึงนำมาใช้งาน
วิธีการจัดเก็บข้อมูลที่ซิงโครไนซ์แล้วจากอุปกรณ์ EEG ของ Emotiv หลายเครื่อง
วิธีการนำเข้าและตรวจสอบข้อมูลที่เก็บรวบรวมมาได้
1.1 LSL คืออะไร และมีประโยชน์อย่างไร?
Lab streaming layer (LSL) เป็นชุดเครื่องมือแบบโอเพนซอร์ส (open-source) ที่ใช้สำหรับส่ง รับ และซิงโครไนซ์สตรีมข้อมูลทางประสาท สรีรวิทยา และพฤติกรรมจากอุปกรณ์ฮาร์ดแวร์เซ็นเซอร์ต่าง ๆ อุปกรณ์ฮาร์ดแวร์ตรวจวัดสมองและร่างกายที่มีความแม่นยำสูงและไร้ขีดจำกัดด้านสถานที่ในการเคลื่อนย้าย (เช่น ระบบ EEG ของ Emotiv) กำลังเข้ามาช่วยขับเคลื่อนวงการประสาทวิทยาศาสตร์ให้ออกจากห้องแล็บเข้าสู่โลกของข้อมูลแบบเรียลไทม์ ในยุคก่อนหน้า การวัดสัญญาณสมองอย่าง EEG และ MEG จำกัดอยู่เฉพาะในห้องปฏิบัติการวิจัยเท่านั้น แต่ปัจจุบัน อุปกรณ์เคลื่อนที่ช่วยให้เราสามารถรวบรวมข้อมูลจำนวนมากได้ในสภาพแวดล้อมที่เป็นธรรมชาติมากขึ้น และจากบุคคลหลายคนพร้อมกันในคราวเดียว
ตัวอย่างเช่น นักวิจัยท่านหนึ่งอาจจะสนใจศึกษาความสอดคล้องทางสรีรวิทยา (physiological synchrony) ระหว่างคนสองคนขณะฟังเพลงเดียวกัน LSL จะมาช่วยให้เราสามารถส่งและจัดเก็บข้อมูลจากชุดหูฟัง EEG สองชุดแยกกัน โดยจะประสานเวลาการส่งข้อมูลให้ซิงโครไนซ์ไปพร้อมกับการนําเสนอของเสียงเพลงได้พอดี
ตัวอย่างอื่น ๆ ในการใช้งาน LSL:
ใส่เครื่องหมายเหตุการณ์ (event markers) จากการทดลองลงในข้อมูล EEG ที่กำลังบันทึก
ปรับแนบแกนเวลา (Time-align) ของข้อมูลจากหลาย ๆ แหล่งให้แก่ผู้เข้าร่วมการทดลองคนเดียว (เช่น อัตราการเต้นของหัวใจ, EMG, EEG)
ปรับแนบแกนเวลา (Time-align) ของข้อมูลจากผู้เข้าร่วมทดลองหลายคน (เช่น การศึกษา Hyperscanning ด้วย EEG)
1.2 LSL ทำงานอย่างไร?
Lab Streaming Layer คือระเบียบการ (protocol) สำหรับแลกเปลี่ยนข้อมูลแบบทนทานต่อเวลา (time-series data) แบบเรียลไทม์ระหว่างอุปกรณ์หลายเครื่อง โดยที่ LSL สามารถเขียนและพัฒนาขึ้นมาได้ด้วยไลบรารีโอเพนซอร์สสำหรับภาษาโปรแกรม เช่น Python, MATLAB, C++, Java และอื่น ๆ
ฟังก์ชันหลักจะทำงานอยู่รอบ ๆ สตรีมข้อมูล (data streams) ของ LSL:
1. อุปกรณ์หรือซอฟต์แวร์จัดหาข้อมูล ทำการเก็บรวบรวมข้อมูลและสร้างสตรีมข้อมูลขึ้นมา - ตัวข้อมูลทางสรีรวิทยาสามารถส่งสตรีมไปยัง LSL ได้จากอุปกรณ์บันทึก EEG, เครื่องติดตามการเคลื่อนไหวของดวงตา (eye-trackers), ระบบตรวจจับการเคลื่อนไหว (motion capture), เครื่องวัดอัตราการเต้นของหัวใจ และอื่น ๆ รวมถึงข้อมูลเมทาดาตา (metadata) เช่น อัตราการเก็บตัวอย่างข้อมูล (sampling rate), ประเภทข้อมูล, ข้อมูลช่องสัญญาณ เป็นต้น - เครื่องหมายเหตุการณ์จากการทดลอง (เช่น การใช้ PsychoPy) ก็สามารถถูกส่งเป็นสตรีมข้อมูลโดยใช้ LSL ได้เช่นกัน
2. สตรีมข้อมูลจะถูกเผยแพร่ (published) ไปยังระบบเครือข่าย - นี่คือวิธีการส่งข้อมูลโดยใช้ LSL; สตรีมข้อมูลจะเริ่มการ "บรอดแคสต์" ไปในระบบเครือข่าย - สตรีมข้อมูลที่ถูกเผยแพร่จะเข้าใช้งานได้ในระบบเครือข่ายและค้นหาพบได้โดยอุปกรณ์อื่น ๆ ที่รองรับ LSL ที่อยู่บนเครือข่ายเดียวกัน - LSL จะกำหนดเวลา (timestamp) ให้กับข้อมูลแต่ละส่วนหรือข้อมูลแต่ละตัวอย่างตามนาฬิกาส่วนกลาง (ตามระเบียบการ Network Time Protocol) - สตรีมข้อมูลจะถูกผลักแกนข้อมูลออกทีละตัวอย่าง (หรือทีละกลุ่ม) ผ่านระบบ "ช่องส่งออก (outlet)"
3. อุปกรณ์จัดเก็บข้อมูลทำการ "สมัครรับ (subscribe)" สตรีมข้อมูล - นี่คือวิธีการรับข้อมูลโดยใช้ LSL - อุปกรณ์จัดเก็บข้อมูลบนเครือข่ายเดียวกันจะรับสตรีมข้อมูลเข้ามาผ่านทาง "ช่องนำเข้า (inlets)" - ช่องนำเข้าแต่ละช่องจะรับข้อมูลตัวอย่างสตรีมและข้อมูลเมทาดาตาจากช่องส่งออกเพียงช่องเดียวเท่านั้น
4. บันทึกข้อมูล - เมื่อกดสมัครรับสตรีมข้อมูลแล้ว คุณสามารถบันทึกข้อมูลลงในตัวแปรของภาษาโปรแกรมที่คุณต้องการ หรือเลือกใช้ซอฟต์แวร์ที่ทาง LSL มอบให้อย่าง LabRecorder เพื่อบันทึกข้อมูลลงในรูปแบบไฟล์มาตรฐาน เช่น .xdf
2.0 ภาพรวมของบทช่วยสอน
ในบทช่วยสอนนี้ เราจะยกตัวอย่างการจำลองตั้งค่าสถานการณ์การทดลองจริง และนำทางคุณไปพบกับขั้นตอนและชุดโค้ดคำสั่งขั้นพื้นฐานที่จำเป็นในการพัฒนาใช้งานร่วมกับ LSL ใน Python เราจะเขียนคำสั่ง Python เพื่อเล่นไฟล์เสียงไปพร้อม ๆ กับจัดเก็บข้อมูล EEG จากสองบุคคลที่กำลังสวมชุดหูฟัง Emotiv เราจะใช้คอมพิวเตอร์สองเครื่องที่รันระบบ EmotivPRO เพื่อจัดเก็บข้อมูล EEG แล้วทำการส่งบรอดแคสต์แต่ละสตรีมข้อมูลผ่านทางช่องส่งออก LSL แยกต่างหาก และเราจะใช้ไลบรารีของ Python ในการเล่นไฟล์เสียง พร้อมทั้งส่งตัวกระตุ้น (trigger) ไปควบคู่กันทุกครั้งที่ตรวจพบว่าไฟล์เสียงได้เริ่มต้นเล่นขึ้นมาแล้ว
ขั้นตอนต่าง ๆ:
1. ใช้ EmotivPRO สำหรับสตรีมข้อมูลผ่านช่องส่งออก LSL ซึ่งประกอบด้วยข้อมูล EEG (และ/หรือข้อมูลการเคลื่อนไหว, คุณภาพการสัมผัสสัมประสิทธิ์, คุณภาพของสัญญาณ และอื่น ๆ) 2. เล่นเสียงเพลงด้วยสคริปต์ Python และในขณะเดียวกันก็ส่งตัวกระตุ้นผ่านช่อง LSL อีกช่องหนึ่ง และใช้ LabRecorder เพื่อจับและบันทึกสตรีมข้อมูลทั้งสามชุดผ่านช่องนำเข้า LSL
2.1 ขั้นตอนที่ 1 - การติดตั้งและตั้งค่าเริ่มต้น
คุณจำเป็นต้องมี อุปกรณ์รับข้อมูลที่รองรับ สำหรับการเก็บข้อมูล
• อุปกรณ์ทางสมองทั้งหมดของ Emotiv สามารถเชื่อมต่อเข้ากับ LSL ผ่านซอฟต์แวร์ EmotivPROติดตั้งโปรแกรม EmotivPRO บนอุปกรณ์ของคุณ คุณจำเป็นต้องมีสิทธิ์ใบอนุญาตใช้งาน EmotivPRO ที่ถูกต้องเพื่อเรียกใช้งานระบบ LSL
ติดตั้งไลบรารี Python LSL library ด้วยโค้ดคำสั่งต่อไปนี้:
pip install pylslดาวน์โหลดซอฟต์แวร์ LabRecorder โดยตัวระบบจะเป็นแอปพลิเคชันที่ใช้งานได้ง่ายและฟรี โดยรันได้จากหน้า
บรรทัดสั่งการ (command line) หรือผ่านการดาวน์โหลดโปรแกรมแบบสแตนด์อโลนสำหรับการทดลองของเรา: ติดตั้งแพ็กเกจที่จำเป็นสำหรับการเล่นเสียงโดยใช้ Python
pip install sounddevice soundfile
2.2 ขั้นตอนที่ 3 - การส่งข้อมูลจาก EmotivPRO ผ่านทางสตรีม LSL
มองหาเครื่องหมายจุดสามจุด "..." ที่อยู่แถบมุมบนขวาของหน้าต่างแอปพลิเคชัน จากนั้นไปที่เมนู การตั้งค่า (Settings)
มองหาหัวข้อ "Lab Streaming Layer" และหัวข้อย่อย "Outlet"
เลือกชนิดข้อมูล (datatypes) ทั้งหมดที่คุณต้องการจะส่งบรอดแคสต์ข้อมูลออกไป
เลือกรูปแบบของชุดข้อมูล (32-bit float หรือ 64-bit double)
เลือกว่าจะส่งสตรีมข้อมูลออกไปแบบทีละตัวอย่างชิ้น หรือส่งออกไปเป็นกลุ่มก้อนข้อมูล
คลิกเลือกปุ่ม 'Start' เพื่อเริ่มทำการส่งสตรีมข้อมูลผ่าน LSL
2.3 ขั้นตอนที่ 4 - การนำสคริปต์ Python มาเล่นเสียงและส่งตัวกระตุ้น
คัดลอกและวางโค้ดต่อไปนี้ลงในไฟล์ Python และทำการบันทึกจัดเก็บไว้ในคอมพิวเตอร์ของคุณ
เตรียมไฟล์เสียง (แนะนำให้เป็นไฟล์สกุล .wav) ที่ต้องการจะนำมาเล่นและแก้ไขสคริปต์โดยเปลี่ยนค่า
ตัวแปรaudio_filepathให้ชี้ไปยังโฟลเดอร์พิกัดตำแหน่งทางเข้าสู่ไฟล์เสียงในคอมพิวเตอร์ของคุณเปิดหน้าต่าง Command Prompt เพื่อโต้ตอบกับบรรทัดสั่งการ และนำทางเปลี่ยนตำแหน่งไปยังโฟลเดอร์ที่
จัดเก็บไฟล์ Python ของคุณเอาไว้พิมพ์คำสั่ง:
python3 filename.py
• บรรทัดคำสั่งอาจแตกต่างกันตามการติดตั้ง Python ในเครื่องของคุณ คุณอาจต้องเปลี่ยนไปใช้pythonแทนการพิมพ์python3
ข้อควรจำ: กรุณาแทนที่ข้อความ/path/to/audio.wavด้วยพาธจัดเก็บไฟล์เสียงที่คุณต้องการจะเปิดใช้อยู่อิงตามจริงในระหว่างการทดลอง
"""
LSL Example: Play audio and send a trigger marker

This script creates an LSL marker stream, waits for the user to
press ENTER, then plays an audio file and sends a marker that
can be synchronized with EEG data collected through LabRecorder.
"""

import sounddevice as sd
import soundfile as sf
from pylsl import StreamInfo, StreamOutlet


def wait_for_keypress():
    print("Press ENTER to start audio playback and send an LSL marker.")
    while True:
        if input() == "":
            break


def play_audio_and_send_marker(audio_file, outlet):
    data, fs = sf.read(audio_file)

    print("Playing audio and sending LSL marker...")

    marker_val = [1]
    outlet.push_sample(marker_val)

    sd.play(data, fs)
    sd.wait()

    print("Audio playback finished.")


if __name__ == "__main__":

    info = StreamInfo(
        name="AudioMarkers",
        type="Markers",
        channel_count=1,
        nominal_srate=0,
        channel_format="int32",
        source_id="uniqueMarkerID12345"
    )

    outlet = StreamOutlet(info)

    while True:
        wait_for_keypress()

        audio_filepath = "/path/to/audio.wav"

        play_audio_and_send_marker(
            audio_filepath,
            outlet
        )
2.4 ขั้นตอนที่ 5 - การใช้งาน LabRecorder เพื่อรับชมและบันทึกข้อมูลสตรีม LSL ทั้งหมด
เปิดโปรแกรม LabRecorder
คลิกปุ่ม
Updateรายชื่อคลื่นสตรีม LSL ที่พร้อมให้เชื่อมต่อควรสังเกตปรากฏขึ้นในตารางรายชื่อสตรีม
• ตัวอย่างเช่น คุณควรจะมองเห็นชื่อสตรีมที่มาจากอุปกรณ์ EmotivPRO ทั้งคู่ (มักจะตั้งชื่อว่า "Emotiv-DataStream") ลงชื่อร่วมกับสตรีมประเภทเครื่องหมาย (ตั้งชื่อว่า "AudioMarkers")คลิกเลือกปุ่ม
Browseเพื่อเลือกตำแหน่งที่ต้องการใช้จัดเก็บรักษาไฟล์ข้อมูลลงเครื่องคอมพิวเตอร์ (และตั้งค่าย่อยอื่น ๆ)เลือกติ๊กถูกรายการสตรีมทั้งหมด จากนั้นเลือกคลิก
Recordเพื่อเริ่มเปิดใช้งานการบันทึกข้อมูล
3.0 การใช้งานและปรับแต่งข้อมูล
ตัวโปรแกรม LabRecorder จะผลิตไฟล์นามสกุล .XDF (Extensible Data Format) ออกมาเพื่อทำหน้าที่เก็บรวบรวมข้อมูลต่าง ๆ จากทุกคลื่นสตรีม โครงสร้างของไฟล์ .XDF จะแบ่งพิกัดออกตามประเภทช่องสตรีม ซึ่งแต่ละประเภทจะมีส่วนหัวระบุ (Header) ที่แตกต่างกันออกไป เพื่อบรรยายสิ่งที่มีบรรจุอยู่ภายในตัวมัน (ระบุชื่อของอุปกรณ์ตรวจวัด, ประเภทของสุ่มชุดข้อมูล, อัตราเร็วในการสุ่มสัญญาณ, ข้อมูลช่องสัญญาณ เป็นต้น) ท่านผู้ใช้ทดลองสามารถพึ่งพาและหยิบใช้ชุดคำสั่งสำเร็จรูปตามตัวอย่างกล่องโค้ดคำสั่งถัดไปนี้ ในการเปิดและแสดงข้อมูลพื้นฐานที่มีอยู่ภายในไฟล์ .XDF
ข้อควรจำ: กรุณาแทนที่ข้อความ /path/to/your/file.xdf ด้วยพาธจัดเก็บไฟล์ข้อมูลผลลัพธ์ .XDF ของ LabRecorder อิงตามจริงที่มีอยู่ในคอมพิวเตอร์ของคุณ
import pyxdf
import mne
import matplotlib.pyplot as plt
import numpy as np

# Give the path to your LSL output file here.
data_path = "/path/to/your/file.xdf"

# Load the XDF file.
streams, fileheader = pyxdf.load_xdf(data_path)

print("XDF File Header:", fileheader)
print("Number of streams found:", len(streams))

for i, stream in enumerate(streams):
    print("\nStream", i + 1)
    print("Stream Name:", stream["info"]["name"][0])
    print("Stream Type:", stream["info"]["type"][0])
    print("Number of Channels:", stream["info"]["channel_count"][0])

    sfreq = float(stream["info"]["nominal_srate"][0])
    print("Sampling Rate:", sfreq)

    print("Number of Samples:", len(stream["time_series"]))
    print("First 5 data points:", stream["time_series"][:5])

    channel_names = [
        chan["label"][0]
        for chan in stream["info"]["desc"][0]["channels"][0]["channel"]
    ]

    print("Channel Names:", channel_names)

    channel_types = "eeg"
4.0 ทรัพยากรและแหล่งเรียนรู้เพิ่มเติม
เอกสารอย่างเป็นทางการ
ศึกษารายละเอียดเพิ่มเติมได้ที่ เอกสารคู่มือการใช้งานต่าง ๆ เรียนรู้ระบบออนไลน์ของเรา ตลอดจนศึกษาตามหน้า README ของระบบอย่างเป็นทางการบน GitHub
แหล่งเรียนรู้ย่อยของทรัพยากรเพิ่มเติม:
• หน้าสำหรับศึกษารู้จัก ชุดโค้ดคำสั่งสำเร็จรูป ในการสั่งรันพึ่งพาการทำงานชุดระบบ LSL ร่วมกับ อุปกรณ์แวร์เอเบิลของ Emotiv พร้อมมีแบบฉบับไฟล์สคริปต์ตัวอย่างให้รับชม
• รับชมวิดีโอสาธิตที่มีประโยชน์จากช่อง LSL demo บน YouTube
• แหล่งคลังข้อมูลเก็บรักษารหัสต้นฉบับ SCCN LSL GitHub repository สำหรับรวบรวมไลบรารีระบบและหัวข้อย่อยที่เกี่ยวข้องทั้งหมด
• แหล่งคลังข้อมูล LSL GitHub repository สำหรับดูแลดูแลส่วนย่อยและแอปพลิเคชันระบบ LSLหัวข้อการสร้างและวิเคราะห์ข้อมูลท่อส่งผ่าน HyPyP analysis pipeline สำหรับงานศึกษาวิจัย Hyperscanning
อ่านต่อ